- Category:
- Workflow Tips
- Summary:
- Photoshop extend background: pick by image type and version — Generative Expand (PS25+) for textures, Content-Aware Fill for patterns, manual for solids.
The short answer
Your best method depends on your image type, Photoshop version, and how much control you need.
For solid backgrounds (white, single colour): use Crop Tool + Spot Healing — fastest, no AI needed.
For repeating patterns (bricks, fabric, tiles): Content‑Aware Fill handles repetition naturally.
For organic textures (sky, grass, water, sand): Generative Expand (Photoshop 25.0+) creates plausible extensions.
For complex gradients with objects (bubbles, leaves, people): a multi‑tool workflow — gradient recreation + Clone Stamp in Lighten mode — delivers results AI often misses.
If you're on Photoshop 2021–2024 (no AI): combine Content‑Aware Fill and Clone Stamp for reliable results.
Jump to any method using the navigation below.
What Is the Fastest Way to Extend a Background in Photoshop?
If you're running Photoshop 25.0 or later and your Creative Cloud plan includes Firefly‑powered features, Generative Expand is the quickest route. Adobe positions this as the primary tool for canvas extension, and community feedback confirms it works well for organic backgrounds — skies, landscapes, fabric drapes — where the AI can plausibly continue the existing texture.
Generative Expand — step by step
- Select the Crop tool (press
C). Drag any corner or edge handle outward to the new canvas size you want. The extended area appears as a transparent or checkerboard region. - In the Contextual Task Bar (just above the canvas), click the "Generative Expand" button. You can optionally type a text prompt — e.g., "more ocean with waves" — or leave the field blank to let Photoshop fill based on surrounding pixels.
- Wait a few seconds. The Properties panel shows several variations. Click through them to preview. When you find one that looks natural, accept it.
- Generative Expand creates a new layer with the generated content, leaving your original layer untouched. This is non‑destructive by design.
⚠ Common error
If you see the message "To use this feature, first drag the canvas to expand" even after dragging the handles, go to the gear icon in the Crop tool options bar and deselect "Use Classic Mode". The background layer must also be named "Background" (not renamed) for the feature to activate. See the Adobe Community fix.
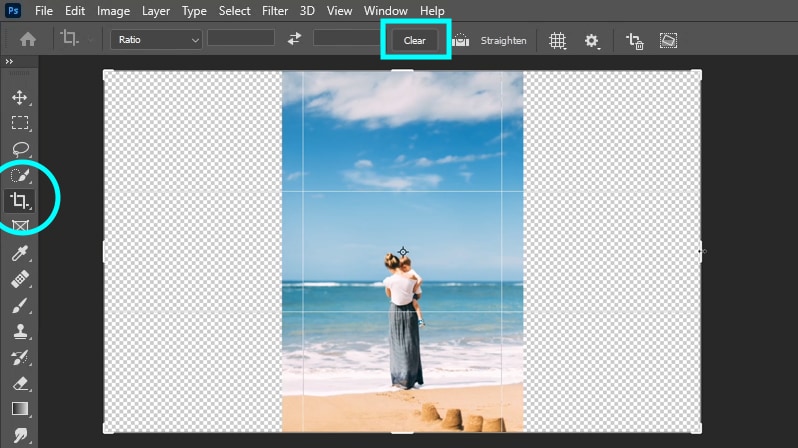
Crop tool with handles extended — the starting point for Generative Expand. The Contextual Task Bar appears above the canvas.
What you need to know before using it commercially
Adobe explicitly authorises commercial use for content created with Generative Expand in release versions 25.0 and above. Content generated in beta versions is not authorised for commercial work. Additionally, Photoshop automatically appends Content Credentials to PNG, JPG, or "Save as" exports — these metadata tags travel with the file and can be read by anyone who inspects it. Official Adobe guidance has full details.
- Fastest method — often under 10 seconds
- Non‑destructive (new layer)
- Multiple variations to choose from
- Requires Photoshop 25.0+ and Firefly‑enabled plan
- Can add random objects if prompt is vague
How to Extend Background Without Generative Fill (Photoshop 2021–2024)
If you're on an older version, don't have a Firefly‑enabled plan, or simply prefer manual control, four reliable methods work across Photoshop 2021 through 2024. Each suits a different kind of background.
| Method | Best for | Key step | Version |
|---|---|---|---|
| Content‑Aware Scale | Preserving the subject while extending the background | Select subject → Edit > Content‑Aware Scale → drag handle | 2021+ |
| Content‑Aware Fill | Repeating patterns and uniform textures | Select area → Edit > Fill → Content‑Aware | 2021+ |
| Crop + Spot Healing | Solid colours or simple gradients | Crop to new size → Spot Healing Brush (Content‑Aware) | All |
| Clone Stamp | Full manual control, complex textures | Alt‑click to sample → paint over extended area | All |
Method 1: Content‑Aware Scale (subject protection)
This tool stretches the background while leaving your main subject's proportions intact. First, create a selection of the subject (or use an alpha channel) to protect it. Then go to Edit > Content‑Aware Scale and drag a side or bottom handle. The protected area resists scaling while the rest fills in. This video walkthrough shows the channel‑protection technique in detail.
Method 2: Content‑Aware Fill (repeating patterns)
For backgrounds with repeating texture — brick walls, fabric weaves, grass — Content‑Aware Fill is what a Reddit user called "literally a one‑step fix." Make a selection of the area to fill (Lasso or Rectangular Marquee), then go to Edit > Fill and choose Content‑Aware from the dropdown. For best results, break large selections into several smaller ones to avoid blur or visible seams. CapCut's guide covers this and the next two methods.
Method 3: Crop Tool + Spot Healing Brush (solid colours)
Press C, drag the canvas to your desired new size, and hit Enter to apply the crop. Then select the Spot Healing Brush with Content‑Aware type enabled in the options bar, and brush over the empty extended area. Photoshop fills it by sampling adjacent pixels. This is often the fastest non‑AI method for plain white or single‑colour backgrounds.

Using the Crop tool to extend a landscape canvas — the blank area is then filled with Spot Healing or Content‑Aware Fill.
Method 4: Clone Stamp Tool (full manual control)
When you need pixel‑perfect accuracy — extending a patterned fabric, a brick wall, or a detailed texture — the Clone Stamp gives you complete authority. Alt‑click (Windows) or Option‑click (Mac) to sample a source point, then paint onto the extended canvas area. If the tool is blocked and shows a "no subject being selected" message, check that you're on the correct image layer — not an adjustment layer or an empty layer. This Reddit thread documents the exact error and the layer‑check fix.
💡 Pro tip for all manual methods
After extending with any of the above, use the Healing Brush on a separate layer to blend seams. This is especially helpful when Content‑Aware Fill leaves a visible boundary between original and extended areas.
How Do I Extend a Complex Background (Gradients, Patterns, Objects)?
Standard tools often fail when the background contains both a smooth colour gradient and repeated foreground elements — bubbles, leaves, sparkles, or other small objects. Content‑Aware Fill may produce blurry seams, and Generative Expand sometimes hallucinates random objects. The community‑derived workflow below, originally shared by an experienced retoucher on Reddit, handles this scenario reliably.
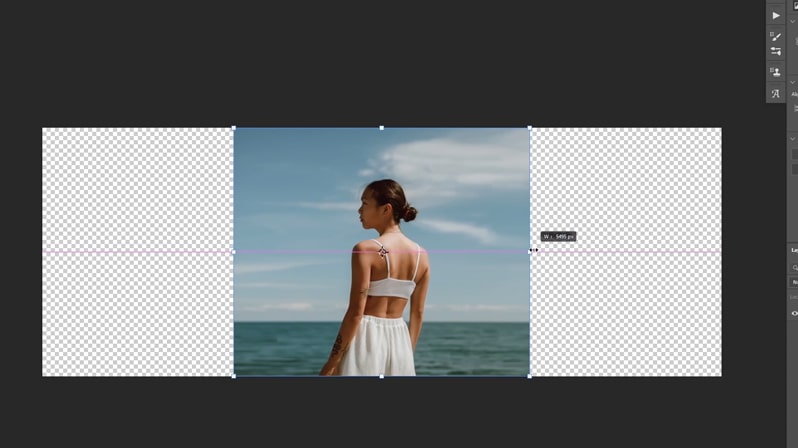
A classic complex-background case: smooth gradient from sky to sea, plus the subject in the foreground.
The pro workflow (gradient + element cloning)
- Select and isolate the subject. Use Select Subject or a manual mask, then copy the subject onto its own layer. This gives you a clean background layer to work on without affecting the person or object in front. Tools like Layerbench can automate the cutout and mask step if you're processing many images.
- Sample the gradient. Use the Eyedropper tool to pick at least three colour points from the existing background: a dark tone, a mid‑tone, and a light tone. Save them as swatches so you can reuse them consistently.
- Recreate the gradient on a new layer. Place a new empty layer between the subject and the background. Use the Gradient tool with your saved swatches to draw a smooth ramp from the dark to the light point, matching the original direction and angle.
- Clone one element. Locate a single representative element (bubble, leaf, star, etc.) from the original background. Clone it onto a new layer set to Lighten blend mode. Duplicate this layer multiple times, varying the size (Transform) and opacity to create a natural spread.
- Add depth. For elements that would be farther away, apply a slight Gaussian Blur (1–3 px) and lower opacity. Nearer elements stay sharp and fully opaque.
📌 Why this works
Recreating the gradient manually avoids the blur and colour shifts that Content‑Aware tools introduce on smooth ramps. Cloning in Lighten mode preserves the original element's brightness while letting the gradient show through underneath. The original Reddit discussion includes additional tips for specific element types.
Why Does My Extended Background Look Blurry or Seam Visible?
Even with the right method, things can go wrong. Below are the most common problems reported across Adobe Community and Reddit, with fixes that actually work.
🔴 Content‑Aware Fill looks blurry
Fix: Use multiple smaller selections instead of one large selection. Each smaller selection confines the algorithm to relevant pixels. Then blend edges with the Clone Stamp at low opacity (20–30%).
🔴 Generative Expand: "drag the canvas to expand"
Fix: Crop tool → gear icon → deselect "Use Classic Mode". Also ensure the layer is named "Background" — not renamed. Community‑confirmed fix.
🔴 Clone Stamp says "no subject being selected"
Fix: You're likely on an adjustment layer or an empty layer. Click the actual image layer (pixel layer) in the Layers panel. Reddit thread.
🔴 Generative Fill adds random objects
Fix: Leave the prompt blank — the AI then fills based on nearby pixels instead of interpreting a text description. If you do use a prompt, keep it concrete: "more sand with shells" rather than "beach scene."
⚠ Critical layer rule
For Generative Expand and Content‑Aware Fill to work correctly, the background layer must be a pixel layer named "Background" (Photoshop's default locked layer). If you've renamed it or converted it to a Smart Object, either rename it back or flatten a merged copy before extending.
Can I Extend a White Background for Product Photography?
Yes, and for solid white backgrounds the fastest method is the Crop Tool + Spot Healing combination described earlier. Press C, extend the canvas, apply the crop, then use the Spot Healing Brush set to Content‑Aware over the empty area. For most product shots, this yields a clean white extension in under 30 seconds.
If your white background isn't perfectly uniform — it has a subtle shadow or gradient from studio lighting — create a new layer behind the product and fill it with a gradient sampled from the existing background's lightest and darkest points. This preserves the original lighting feel rather than substituting a flat white.
💡 For e‑commerce batches
If you're extending the same backdrop across dozens of product images, record an Action (Window > Actions) that crops, extends, and applies the Spot Healing step. This keeps the canvas size consistent across your catalogue.
What About Extending Backgrounds in Photoshop 2026?
As of September 2026, Generative Expand remains the primary recommended tool in the latest Photoshop versions, still powered by Adobe Firefly. The core workflow — drag crop handles, click Generative Expand, choose a variation — is unchanged from Photoshop 25.0. Adobe has released incremental improvements to pattern recognition and edge blending, but the five methods covered in this article all continue to work in the current release.
If you're updating from an older version, note that Content‑Aware Scale and Content‑Aware Fill have received minor performance optimisations but no workflow changes. The troubleshooting fixes (Classic Mode, layer naming, selection size) remain valid.
When Extending the Background Is Not the Right Approach
🚧 Boundary case
Highly detailed, non‑repeating patterns — such as intricate bows, ornate wallpaper, or complex geometric motifs — often defeat both AI and manual tools. The Reddit user who tried "patch tool, healing brush, clone stamp, content aware fill, generative AI" on a bow pattern found that none produced a convincing extension. In these cases, the practitioner's choice is to reshoot with a wider backdrop or change the composition so the pattern doesn't need to continue beyond its original bounds.
Similarly, if your backdrop was ordered too narrow for a group shot and you're relying entirely on digital extension, consider whether the perspective stretch or AI artifacts will degrade the final image. This discussion on backdrop width illustrates the trade‑off: sometimes the best solution is to order a larger physical backdrop rather than spending hours on digital repair.
Knowing when not to extend saves more time than learning a faster method.