- Category:
- Background Removal
- Summary:
- How to remove background in GIMP: compare five methods from Fuzzy Select to Color to Alpha to pick the right one for your image type and avoid common mistakes
To remove a background in GIMP, you can use any of five main methods depending on your image type.
Fuzzy Select works fastest for solid, contiguous backgrounds; Select by Color handles scattered same-color areas; Foreground Select suits complex shapes; Desaturate+Threshold excels with high-contrast fine edges; and Color to Alpha works for one-color backgrounds but has known risks. Each method requires adding an alpha channel first (Layer → Transparency → Add Alpha Channel) and exporting as PNG to preserve transparency.
All steps below target GIMP 2.10.

Three common approaches to removing a background in GIMP: selection tools, colour-based removal, and masking.
Fuzzy Select and Select by Color Are Not Universal Solutions
A common misconception is that the Fuzzy Select tool can handle any solid-colour background in one click. In practice, it only works when the background is both contiguous (one connected area) and free of interior pockets. A Reddit user reported that Fuzzy Select missed internal background bits inside a subject — the green areas that should have been removed remained visible because they were disconnected from the main background region.
The same user found that Select by Color also failed for their image because it selected white highlights on the subject along with the white background. The example image they shared (a green object against a white background) shows leftover interior white patches after deletion — a problem many beginners face.
These failures are not bugs; they are inherent limitations of pixel-based selection tools. The takeaway: method choice matters. The right technique depends on whether the background is contiguous, whether the subject contains the same colour as the background, and whether fine edges (hair, fur, branches) are present. The following sections break down exactly when each method works — and when it does not.
If you process many images, note that manual per-image tweaking may not scale. The same Reddit user needed a batch solution, but the community could not offer a fully automated GIMP workflow — a limitation we address in the troubleshooting section.
Fuzzy Select Is the Fastest Option for Simple Backgrounds
For images with a solid, contiguous background — a white studio backdrop, a solid blue sky, a flat-colour wall — Fuzzy Select is the quickest route. According to GIMP's official documentation, the basic workflow uses selection tools combined with inverting the selection.
- Add an alpha channel if the image is a JPEG: Layer → Transparency → Add Alpha Channel. (JPEGs do not carry transparency data; this step enables it.)
- Select the Fuzzy Select tool (the magic wand icon in the toolbox).
- Click on the background area. Adjust the Threshold slider interactively in the tool options until the selection covers the entire background but not the subject.
- Invert the selection: Select → Invert (or press
Ctrl+I). - Press
Deleteor go to Edit → Clear to remove the background. - Export as PNG (File → Export As) to preserve transparency.
Best for: solid, contiguous backgrounds with a clear contrast edge against the subject.
Beginner ~5 seconds
Limitations: fails when the background is non-contiguous (e.g., holes inside the subject) or when highlights on the subject match the background colour. For those cases, move to Select by Color or Desaturate+Threshold below.
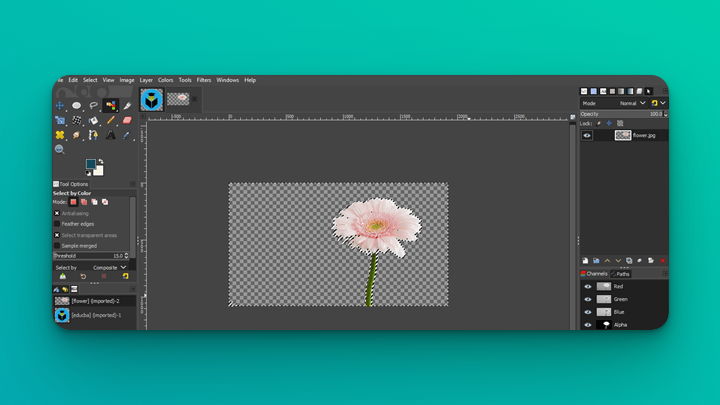
A clean result after using Fuzzy Select on a solid-colour background. The checkered pattern confirms transparency is preserved.
Select by Color Handles Non-Contiguous Color Areas with the Right Settings
When the background colour is uniform but appears in disconnected regions — for example, white gaps between the branches of a tree, or a patterned backdrop with holes — Select by Color is a better choice than Fuzzy Select. A detailed StackExchange workflow spells out the exact settings needed.
- Add an alpha channel if missing (Layer → Transparency → Add Alpha Channel).
- Optional but recommended: fill the background area with a plain colour using the Bucket Fill tool (
Shift+B) with these options: Fill transparent areas only, BG colour fill, Sample merged enabled. - Go to Select → By Colour. In the tool options, enable Fill transparent areas and Sample merged. The latter makes sure the selection samples from all visible layers.
- Click on the background colour. Adjust the Threshold slider until all background regions are selected but the subject remains unselected.
- To subtract unwanted areas (e.g., colour that spills onto the subject), hold
Ctrland drag a selection tool over those regions. - Grow the selection by 1 pixel (Select → Grow → 1) to eliminate thin rim pixels that can cause halos.
- Press
Deleteto clear the background. - Export as PNG or GIF to preserve transparency.
Best for: solid backgrounds that are scattered or non-contiguous.
Beginner ~10–20 seconds
Critical setting: "Sample merged" must be turned on (U24). Without it, the tool only samples from the active layer, which may miss colour data from lower layers.
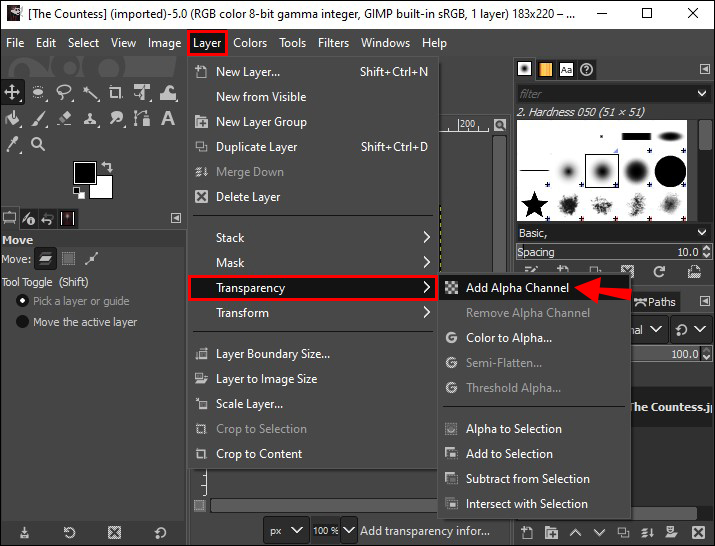
The Add Alpha Channel command is essential for JPEG images. Without it, transparency cannot be saved.
Foreground Select Tool Works Well for Complex Shapes Without Fine Details
The Foreground Select tool is designed for subjects with curved, irregular outlines — think flowers, fruit, or any object where the edge is not a straight line. According to Penji's breakdown, the tool uses a two-step process: a rough outline followed by a refinement pass.
- Activate the Foreground Select tool (it may be grouped with the Scissors Select tool in the toolbox).
- Draw a rough outline around the subject. The line does not need to be precise — just enclose the subject completely.
- A blue mask appears over the background area. Now paint inside the subject with the brush that appears. Use broad strokes to mark what should be kept. The mask refines in real time.
- When the subject looks clean (white) and the background is blue, press
Enter. A marching-ants selection forms around the subject. - Invert the selection (Select → Invert) and press
Delete, or add a layer mask to hide the background.
!GIMP Foreground Select tool being used to isolate a red dahlia flower from its blue background:max_bytes(150000):strip_icc()/006-how-to-remove-background-gimp-4689190-a8ad64ecc02945058936097388c8e396.jpg)
The Foreground Select tool in action: the blue overlay indicates the area that will be removed, while the subject is painted in to refine the edge.
Best for: objects with curved outlines where edges are not extremely fine (e.g., a flower, a piece of fruit, a solid object).
Intermediate ~30 seconds to 1 minute
Limitations: struggles with hair, fur, or any subject that has fine, thread-like edges. The paint-refine step can be time-consuming if the subject has many interior details. For those cases, Desaturate+Threshold often performs better.
Desaturate and Threshold Gives Clean Results on High-Contrast Subjects
This method originated in the GIMP community as a workaround for subjects with fine details — hair, tree branches, fur — against a high-contrast background. A Reddit user (Eboho_85) shared it as a non-destructive technique that uses a black-and-white mask to isolate the subject.
The core idea: by turning the image into a stark black-and-white mask, you can select the background based on brightness instead of colour, which bypasses many of the issues that Fuzzy Select and Select by Color run into with highlights and interior pockets.
Step-by-Step Workflow
- Add an alpha channel if missing (Layer → Transparency → Add Alpha Channel).
- Duplicate the layer (Layer → Duplicate Layer or
Ctrl+Shift+D). - Desaturate the duplicate: Colors → Desaturate → Luminosity. This converts it to greyscale.
- Apply Threshold: Colors → Threshold. Drag the slider until the subject appears white and the background appears black. Adjust interactively until the edges are as sharp as possible.
- With the black-and-white layer active, use the Fuzzy Select tool on the black (background) area. A low threshold (0–10) usually works best.
- Hide the black-and-white layer by clicking the eye icon next to it in the Layers panel.
- Click the original colour layer to make it active.
- Press
Delete(Edit → Clear) to remove the background. - Optional refinement: add a white layer mask and paint with a soft black brush at low opacity to feather any jagged edges.
Why it works: Threshold creates a clean binary separation based on luminance, not colour. This makes it particularly effective for hair, fur, or wispy branches against a bright sky — details that pixel-based colour selection would miss or muddy.
When This Method Fails
Low contrast between subject and background will not produce a clean black/white split. If both are similar in brightness, the Threshold slider cannot separate them cleanly, and the resulting mask will have grey areas that translate to partial selections.
JPEG colour shifts: A Reddit user reported that desaturating a JPEG can produce a greenish tint when converting to PNG. The fix: convert the image to PNG before starting (File → Export As → PNG), or use a different method such as Foreground Select for images that originally came as JPEG.
Best for: high-contrast subjects with fine edges (hair against sky, tree branches against snow, dark objects against light backgrounds).
Advanced ~1–2 minutes
Color to Alpha for One-Color Backgrounds – Use With Caution
Colors → Color to Alpha is the most direct method: pick a colour, and it becomes transparent across the entire image. It is fast and works well when the background is a single, solid colour with no overlap into the subject — for instance, a solid blue sky with no clouds that blend into the subject.
- Ensure an alpha channel exists (Layer → Transparency → Add Alpha Channel).
- Go to Colors → Color to Alpha.
- Click the eyedropper and sample the background colour.
- Adjust the Opacity threshold slider to control how aggressively the colour is removed.
- Click OK. Export as PNG.
Major warning — backed by StackExchange community: Color to Alpha can strip transparency from within the subject itself. If the subject contains the same colour as the background (e.g., white highlights on a person's skin against a white background, or a green leaf against a green backdrop), that colour becomes transparent too, creating holes or ghostly halos. Always inspect the result carefully.
Some YouTube demonstrations show Color to Alpha as a one-click solution, but those examples typically use subjects with zero colour overlap. In real-world images, overlap is common, so this method is best reserved for graphics, logos, or illustrations where the background colour does not appear anywhere on the subject.
Best for: one-colour backgrounds with no colour overlap in the subject.
Intermediate ~5–10 seconds
How to Choose the Right Method – Comparison Table
The table below summarises every method covered above, plus the manual Path Tool + Mask approach for full-control cases. Use it as a quick decision reference.
| Method | Best For | Difficulty | Speed | Fine Details | Common Mistake |
|---|---|---|---|---|---|
| Fuzzy Select | Solid contiguous background | Beginner | ~5 s | Low | Misses interior background bits |
| Select by Color | Solid non-contiguous background | Beginner | ~10–20 s | Low | Halo if grow step is skipped |
| Foreground Select | Complex shapes (no fine hair) | Intermediate | ~30 s–1 m | Medium | Rough strokes cause jagged edges |
| Desaturate+Threshold | High-contrast fine edges | Advanced | ~1–2 m | High | Only works with high contrast |
| Color to Alpha | One-colour background, no colour overlap | Intermediate | ~5–10 s | Medium | Strips subject transparency |
| Path Tool + Mask | Any subject, full manual control | Advanced | Slow (5 m+) | Very high | Time-intensive; requires practice |
The Path Tool + Mask method (not detailed above but implied in GIMP docs) gives pixel-level precision but is the most labour-intensive. It is the fallback when all automated methods fail on a specific image.
Common Problems and How to Fix Them
The following issues are drawn from real user reports on Reddit and StackExchange. Each is paired with a tested fix.
Issue: Halos and leftover rim colours
After deletion, a thin coloured fringe remains around the subject. This happens because anti-aliased pixels blend the background colour into the edge.
Fix: Before deleting, grow the selection by 1 pixel (Select → Grow → 1) to push the selection past the blended pixels. Alternatively, feather the selection by 1–2 pixels (Select → Feather) for a softer transition. Both tips come from the StackExchange community.
Issue: White background remains after deletion
You press Delete but the background stays solid white. The most common cause: the image has no alpha channel, so "transparent" is interpreted as white.
Fix: Go to Layer → Transparency → Add Alpha Channel before making any selection. This applies to every method above — without it, deletion has no visible effect. Also verify that the correct layer is active and that the selection is still active.
Issue: JPEG turns greenish after desaturation
When applying the Desaturate+Threshold method to a JPEG, the desaturated layer takes on a green tint. This is a known colour-encoding artefact of the JPEG format.
Fix: Convert the image to PNG before starting (File → Export As → PNG). PNG uses a different colour space that avoids the green shift. If the original file must stay as JPEG, consider using Foreground Select instead. This matches the advice from a Reddit user who encountered the same issue.
Issue: Checkered pattern — is that an error?
After deleting the background, a grey-and-white checkered pattern appears. This is GIMP's way of displaying transparency. It is not an error and will not appear in the final exported image.
Fix: Export as PNG (File → Export As → PNG). The checkered pattern is invisible in the exported file. If you want to remove it from the GIMP canvas temporarily, add a solid-colour layer behind the subject.
Issue: Batch processing not possible with manual methods
A Reddit user explicitly asked for a batch solution: "doing it manually isn't an option as I'm batch processing." None of the manual methods above scale to hundreds of images without per-image tweaking.
Workaround: For true batch removal, consider external tools such as remove.bg, or use GIMP's BIMP plugin (Batch Image Manipulation Plugin) to automate a fixed workflow. Be aware that BIMP still requires a consistent image type — if backgrounds vary, automation will produce errors. For uniform batches (e.g., product photos on the same white background), Color to Alpha or a BIMP script using Fuzzy Select may work.
Issue: Threshold method creates jagged edges
The Desaturate+Threshold method sometimes leaves stair-step edges along diagonal lines or curves.
Fix: Instead of deleting directly, use a layer mask. Add a white layer mask to the subject layer, then paint with a soft black brush at low opacity (20–40%) over the jagged areas. This softens the edge without losing detail. For finer control, use Select → Feather → 1 px before deleting.
One final check before exporting: Always zoom in to 200–400% and inspect the edges of your subject. If you see a halo, use the grow-selection fix above. If you see transparency where there should be solid colour, you may have used Color to Alpha on an image with colour overlap — undo and switch to Select by Color or Desaturate+Threshold instead.