- Category:
- Workflow Tips
- Summary:
- Learn how to group layers in Photoshop using menus, keyboard shortcuts (Ctrl+G), and drag-and-drop, with tips for efficient layer management.
To group layers in Photoshop, use one of these three methods:
- Menu: Select layers → Layer > Group Layers
- Shortcut:
Ctrl+G(Win) /Cmd+G(Mac) - Drag‑and‑drop: Drag selected layers onto the folder icon in the Layers panel
How to Group Layers in Photoshop
Group Layers Using the Menu
The most straightforward way to group layers is through Photoshop's main menu:
- In the Layers panel, select the layers you want to group. Use
Shift‑click to select a contiguous range orCtrl‑click (Cmd‑click on Mac) to pick individual layers. - Go to Layer > Group Layers in the top menu bar.
- Photoshop wraps the selected layers into a new group folder named Group 1 (or the next available number).
To ungroup, select the group folder and choose Layer > Ungroup Layers. This leaves the individual layers intact in your panel. For the official walkthrough, see Adobe's group and ungroup layers documentation.
Group Layers Using the Keyboard Shortcut
If you repeat the grouping action often, the keyboard shortcut is the fastest route:
- Windows:
Ctrl+G - macOS:
Command+G
Select the layers you want to group and press the shortcut. The ungroup shortcut is equally simple: Ctrl+Shift+G (Windows) or Command+Shift+G (macOS).
Note that the shortcut only works when you have two or more layers selected. To create an empty group, you still need to click the folder icon in the Layers panel (covered in the drag‑and‑drop section below). These shortcuts are documented by Adobe evangelist Julieanne Kost in her layer‑group shortcuts article.
| Action | Windows | macOS |
|---|---|---|
| Group selected layers | Ctrl+G |
Cmd+G |
| Ungroup layers | Ctrl+Shift+G |
Cmd+Shift+G |
| Duplicate a group | Ctrl+J |
Cmd+J |
Group and ungroup keyboard shortcuts
Group Layers Using Drag-and-Drop
The drag‑and‑drop method gives you full visual control over where layers land inside a group. Here is how to do it step by step:
- Create an empty group by clicking the folder icon at the bottom of the Layers panel (no layers need to be selected).
- Select the layers you want to move into the group.
- Drag the selected layers onto the group folder. As you hover over the folder, a dark highlight appears — release to place the layers at the top of the group stack.
- To place layers at the bottom of the group, hold
Shiftwhile releasing. This is a lesser‑known trick from Julieanne Kost that saves reordering steps later.
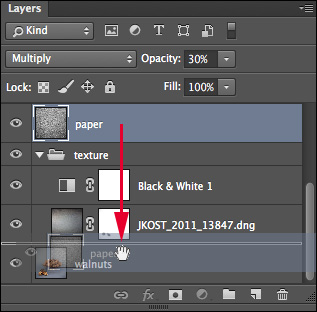
Dragging a layer into a group — the dark highlight indicates the target folder.
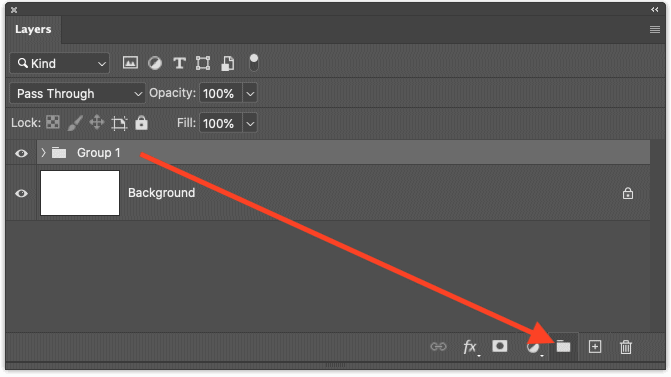
The folder icon at the bottom of the Layers panel creates an empty group.
💡 Prevent accidental entry when dragging: If the group folder is open and you drag a layer near it, the layer may land inside the group even if you only meant to reposition it above or below the folder. To avoid this, close the group folder before you start dragging, or position the cursor below the group's baseline (the indented area) rather than directly over the folder's name.
How to Manage Groups After Creation
Ungroup Layers
You can ungroup layers at any time. Select the group folder and choose Layer > Ungroup Layers from the menu, or press Ctrl+Shift+G (Windows) / Cmd+Shift+G (Mac). The layers remain in your document exactly as they were — they simply lose the folder wrapping. Both methods are covered in Adobe's official documentation.
Duplicate and Delete Groups
Duplicating a group copies all the layers inside it along with their masks, effects, and blend modes:
- Duplicate in place: Select the group and press
Ctrl+J(Windows) /Cmd+J(Mac). - Duplicate and reposition: Hold
Alt(Windows) /Option(Mac) and drag the group to a new spot in the Layers panel.
To delete a group without losing the layers inside it:
- Select the group, press
Delete(or drag it to the trash icon), and in the dialog that appears choose Group Only. - Faster method: Hold
Ctrl(Windows) /Cmd(Mac) while dragging the group to the trash icon — this skips the dialog and keeps the layers.
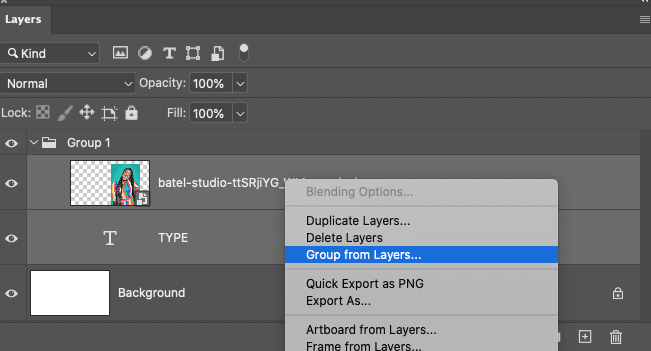
The context menu offers a "Group Only" option to preserve layers when deleting a group.
Expand and Collapse Groups Efficiently
When working with many groups, navigating the Layers panel can slow you down. These modifiers let you expand or collapse groups in one action:
- Expand/collapse all groups:
Ctrl-click (Windows) /Cmd-click (Mac) any disclosure triangle. - Expand/collapse all nested groups within the current group:
Alt-click (Windows) /Option-click (Mac) a disclosure triangle. - Right‑click a triangle to open a context menu with options to close or open the current group, or close/open all other groups.
Auto‑Select Groups with the Move Tool
When you have a complex composition with many groups, selecting the right one by clicking in the Layers panel can be tedious. Enable Auto‑Select in the Move tool's Options bar (the top of the workspace) and choose Group from the dropdown. Now clicking any layer that belongs to a group selects the entire group — useful for moving, resizing, or applying transformations to a whole set of layers at once.
Advanced Group Techniques: Nesting, Blend Modes, and Mobile Grouping
Nesting Groups Up to 10 Levels
Photoshop allows you to place groups inside other groups — up to 10 levels deep. This is especially useful for organising large projects such as UI layouts, multi‑section illustrations, or complex composites:
- UI example: A top‑level group called Header contains a nested group for Navigation, which in turn holds a group for Dropdown.
- Caution: Deep nesting can make the Layers panel harder to navigate and may slow down panel rendering on older machines. Use 3–5 levels for most projects; reserve deeper nesting for cases where the organisational clarity genuinely outweighs the overhead.
Controlling Blending with Group Blend Modes
One of the most useful — and often overlooked — group features is the blend mode setting. By default, a group's blend mode is set to Pass Through. This means that any blend mode applied to a layer inside the group will still interact with layers below the group.
If you want to confine blending to layers within the group only, change the group's blend mode from Pass Through to Normal. This is a practical technique when you are using adjustment layers or blend effects that should only affect the grouped elements, not the background or layers beneath the group.
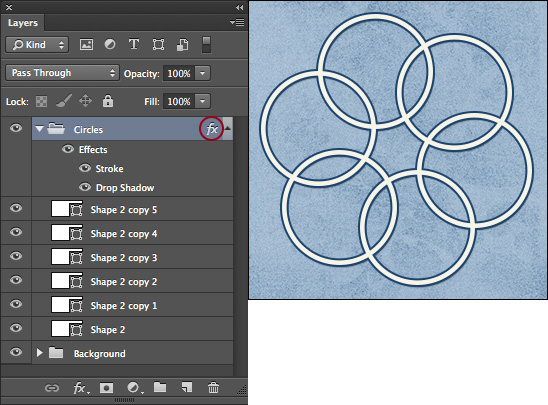
Setting a group's blend mode to Normal confines blending to layers within the group.
Grouping Layers on Photoshop Mobile
Photoshop on iOS and Android also supports layer grouping, though the workflow differs from the desktop version:
- Open the Layers panel in the mobile app.
- Tap Select multiple (you need at least two layers selected).
- Tap the group icon (folder symbol) to wrap the selected layers.
Mobile grouping does not support drag‑and‑drop or keyboard shortcuts — the multi‑select workflow is the only option. For full details, see Adobe's mobile grouping guide.
How to Avoid Common Issues When Grouping Layers
Preventing Layers from Accidentally Entering a Group
If you drag a layer near an open group folder, Photoshop may drop it inside the group even when you intended to place it just above or below the folder. This happens because the drop target area expands when the folder is expanded.
Two reliable workarounds:
- Close the group folder before dragging — a collapsed folder has a much smaller drop zone.
- Position the cursor below the group's baseline (the indented area where child layers sit) rather than over the folder's name or icon. This signals Photoshop to place the layer outside the group.
The Photoshop 2017 Bug: Groups Expanding Automatically
In Photoshop CC 2017 and some later versions, clicking a closed group's name — or using the keyboard arrows to navigate to it — causes the group to expand automatically. This can lead to new adjustment layers or dragged layers being placed inside the group unintentionally, breaking workflows and actions that rely on a specific layer order.
This issue was reported on Adobe's community forum and is a known quirk rather than a fixed bug. Workaround: Avoid clicking directly on the group name to select it. Instead, click only the disclosure triangle to expand the group. If you need to select the group without expanding it, use the Move tool's Auto‑Select feature (set to "Group") or Ctrl-click / Cmd-click a layer inside the group to select the parent group indirectly.
⚠️ Note for legacy users: If you are on Photoshop 2017 or an early CC build and experience unexpected layers landing inside a group, the auto‑expand behaviour is the likely cause. The workarounds above apply to all versions up to the current release.
Which Grouping Method Should You Use?
Each method suits a different working style and situation. Use this guide to choose the right approach for your workflow:
🥇 Beginners & step‑by‑step work
Use the menu method (Layer > Group Layers). It is the most visual approach and requires no memorisation. Ideal when you are learning or working through a tutorial.
⚡ Speed & repetition
Use the keyboard shortcut (Ctrl+G / Cmd+G). Once muscle memory kicks in, it is the fastest way to group layers repeatedly during a session.
🎯 Precise stacking order
Use drag‑and‑drop, especially with the Shift‑drag trick to place layers at the bottom of a group. You see exactly where each layer lands.
📱 Mobile / iPad workflow
Use the multi‑select workflow (requires at least two layers). The mobile app does not support keyboard shortcuts or drag‑and‑drop grouping.
🗂️ Large, nested documents
Combine shortcuts with group blend‑mode changes (Pass Through vs Normal) and expand/collapse modifiers (Alt-click / Opt-click) to keep your workspace tidy and efficient.
📦 Export‑oriented workflows
If you regularly export grouped layers as transparent PNGs or need to batch‑process organised groups, consider a dedicated plugin like Layerbench to streamline subject cutout and lossless layer export while keeping your PSD structure intact.