- Category:
- Workflow Tips
- Summary:
- How to add a background in Photoshop: unlock the background layer, create a new layer below it, and fill it with color, photo, or AI Generate Background.
▸ The short answer To add a background in Photoshop, create a new layer below your subject layer and fill it with a solid colour, a gradient, or an imported image. If your image already has a background, first remove it using Select Subject or the Remove Background button, then place the new layer underneath. You can also use Photoshop's AI-powered Generate Background feature (powered by Adobe Firefly) to create a background from a text description. The three key rules: unlock the background layer first, keep the subject layer above the background layer, and match lighting/colour for a natural result.
Add a New Background Layer Behind Your Subject
This method is the direct answer to the query. Use it when your subject already has no background (for example, a transparent PNG) or when you want to add a new backdrop behind the existing image without removing anything.
- Unlock the background layer — see the first H3 below.
- Resize the canvas to make room for the new background.
- Create a new layer below the subject — fill it with a solid colour, gradient, or drag in a photo.
- Verify layer order: subject on top, background layer underneath.
Unlock the Background Layer
By default, a newly opened image has a locked “Background” layer (its name appears in italics in the Layers panel). You cannot reorder it or add layers behind it while it is locked.
Action: go to Layer > New > Layer from Background. Give it a name (e.g., “Subject”). The layer is now a normal unlocked layer. Tom’s Guide covers this as the first step in its tutorial.
Tip: You can also double-click the “Background” layer directly in the Layers panel. Photoshop will prompt you to rename it — click OK.
Resize the Canvas
If the new background needs to be larger than the original image area, enlarge the canvas before adding it.
Action: Image > Canvas Size, or use the keyboard shortcut Ctrl+Alt+C (Windows) / Option+Cmd+C (Mac). The “Relative” checkbox lets you add exact pixel values to the width and height. Tom’s Guide documents this shortcut.
Choose a canvas extension colour that matches the background you plan to add — or set it to transparent if you are working on a layer that already supports transparency.
Create a Solid Color or Import a Photo
You have two straightforward options:
- Solid color:
Layer > New Fill Layer > Solid Color. Pick any colour from the Color Picker. Photoshop creates a new fill layer that you can change later by double-clicking its thumbnail. - Photo: Drag an image file from your desktop straight into the Photoshop document. Use Edit > Free Transform (
Ctrl+T/Cmd+T) to scale and position it.
Critical: In the Layers panel, make sure the new background layer sits below the subject layer. If it appears above, drag it down. Tom’s Guide and Adobe Learn both emphasise this ordering rule.
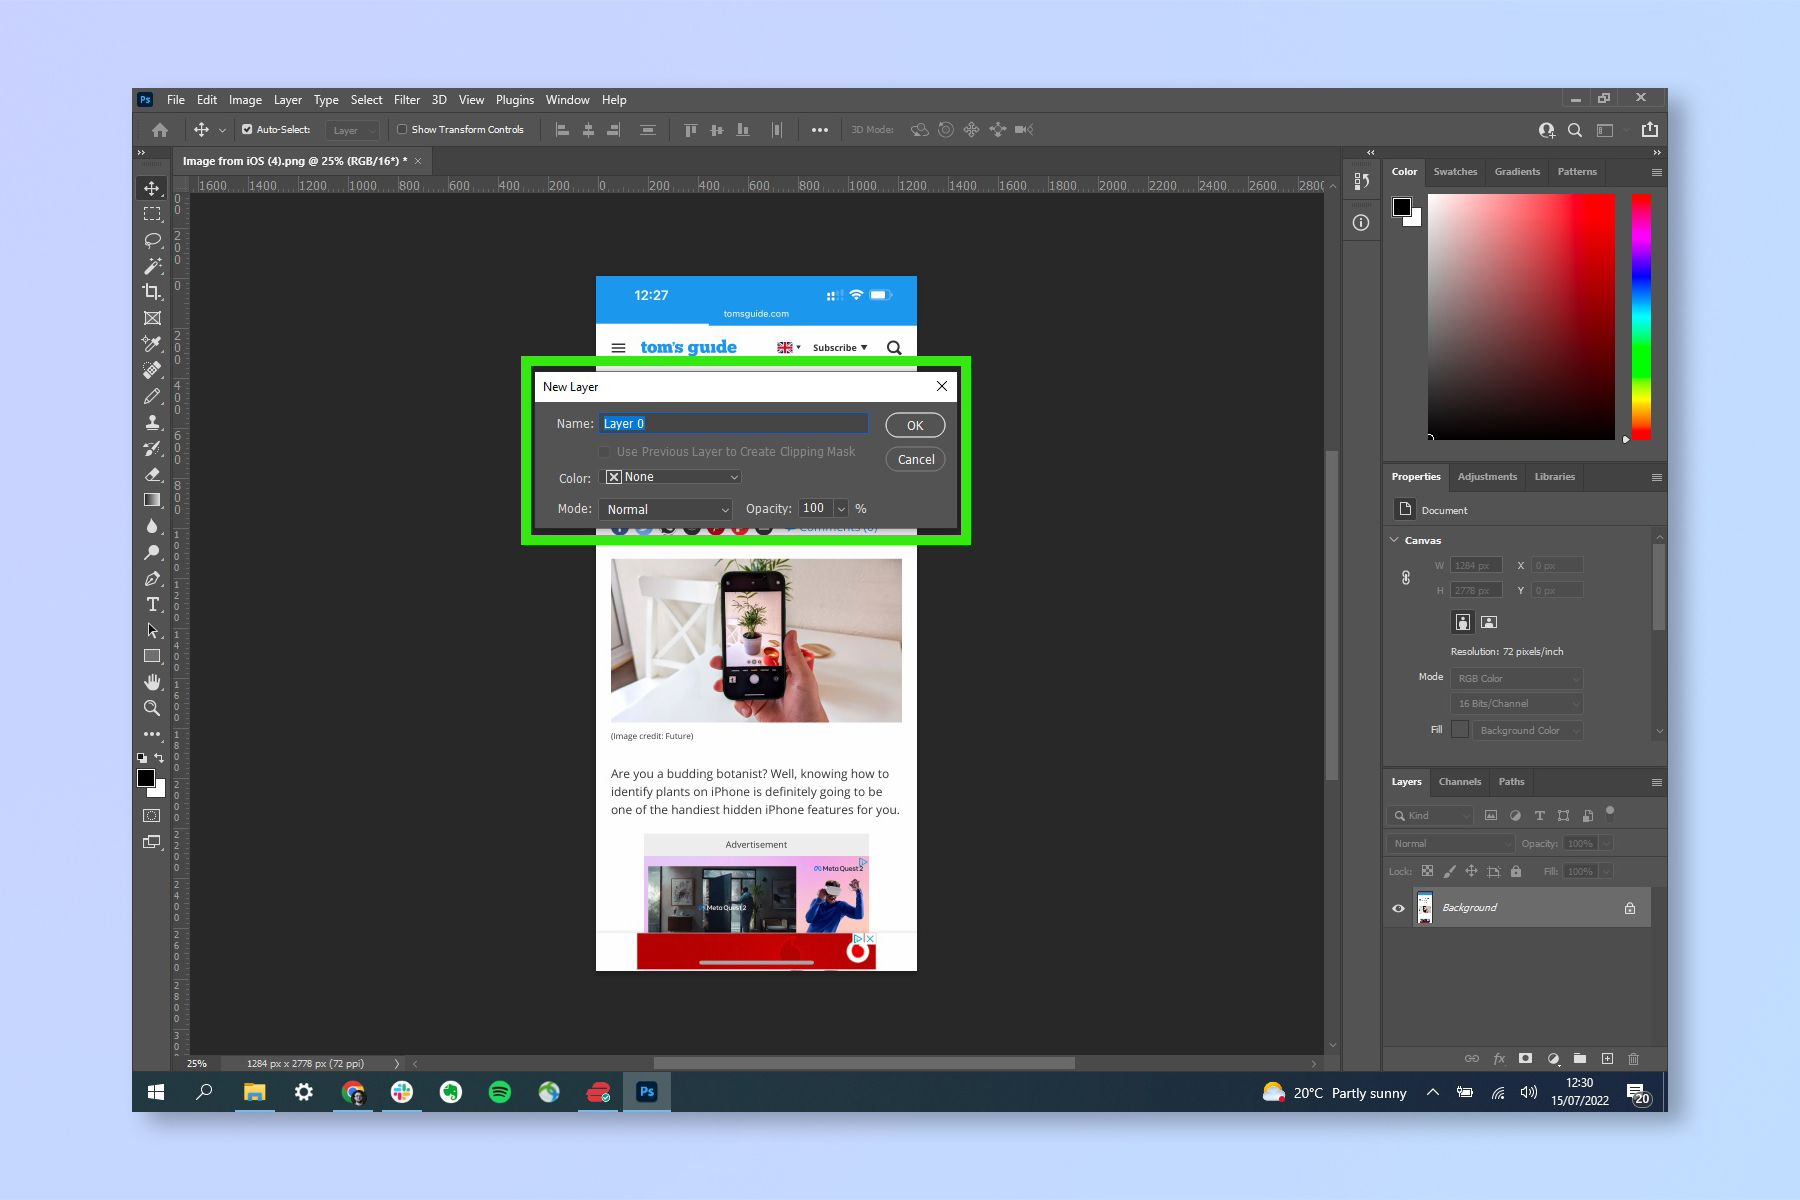
The New Layer dialog that appears when you choose Layer > New Fill Layer > Solid Color. Name the layer and click OK to open the Color Picker.
Community Workaround: When the Fill Layer Won’t Go Behind
A common frustration reported on forums: a newly created Solid Color fill layer sometimes sits above the subject, and dragging it down does not always produce the expected result. SitePoint community members found a reliable workaround.
Solution: Instead of a fill layer, use
Layer > New > Background from Layer. This command automatically pushes the new layer to the very bottom of the stack, turning it into a true background layer. It is the inverse of “Layer from Background” and solves the stacking problem in one click.
Replace an Existing Background With a New Photo
When the image already has a background, you first need to remove it before adding a new one. This is the workflow that most beginners search for — and where several common mistakes happen.
Remove the Existing Background
Modern Photoshop offers tools that are far more reliable than the old Magic Wand. Adobe Community experts recommend avoiding Magic Wand for background removal because it produces jagged edges and fails on fine details such as hair.
- Select Subject — click the button in the Options bar or go to
Select > Subject. Photoshop uses AI to detect the main subject. Then click the Add layer mask icon at the bottom of the Layers panel. - Remove Background button — when a pixel layer is selected, the Properties panel shows a “Remove Background” button. One click creates a layer mask that hides the background. The Adobe HelpX documentation shows this as the first step for the AI workflow as well.
- Refine: For tricky edges (hair, glass, fur), use
Select & Maskwith the Refine Edge brush.
Why this matters: A Reddit user recently asked “how do you add a background on photo?” after removing the original — the missing step was placing the new layer below the masked subject. Modern selection tools make the removal part far cleaner.
Add the New Background and Match the Color
Place your replacement photo or colour layer below the masked subject layer. Now the composite may still look artificial if the lighting and colour tones do not match.
Adobe Learn demonstrates a smart colour-matching trick:
- Duplicate the new background layer (
Ctrl+J/Cmd+J). - Drag the duplicate above the subject layer.
- Apply
Filter > Blur > Average. This samples the background’s dominant colour and fills the layer with a solid swatch. - Use that swatch as a reference: adjust the subject’s Curves or Levels adjustment layer (clipped to the subject) until the subject’s midtones and shadows feel consistent with the sampled colour.
- Delete or hide the blurred layer when done.
This technique gives you a data-driven target colour rather than guessing by eye.
Post‑Processing for Realism
One of the most persistent problems in product photography is colour spill from the original background — green or blue reflections that contaminate the subject’s edges. Practical Machinist forum members who shoot against green screens recommend this fix:
- Add a Hue/Saturation adjustment layer and clip it to the subject layer (right‑click the adjustment layer → “Create Clipping Mask”).
- In the adjustment panel, select the offending colour from the drop‑down (e.g., Greens or Cyans).
- Lower the Saturation slider and, if needed, nudge the Hue slider until the spill disappears.
- For maximum precision, use
Select > Color Rangeto isolate only the spilled areas before desaturating.
Generate a Background With Adobe Firefly AI
Photoshop’s Generate Background feature, powered by the latest Adobe Firefly Image Model (as of February 2026), lets you describe a new background in plain English and have Photoshop create it for you. Adobe HelpX provides the full documentation.
- Select the subject layer and click Remove Background in the Contextual Task Bar (or use the Properties panel).
- Click Generate Background — a text prompt field appears.
- Type a description (e.g., “sunlit beach at sunset with soft waves”) and press Enter or click Generate.
- Photoshop produces several variations. Click one to apply it, or edit the prompt and generate again for different results.

Photoshop’s workspace with the Generate Background prompt accessible from the Contextual Task Bar after removing the original background.
When to Use AI Instead of Manual Methods
AI generation is a strong choice when you cannot find a suitable stock photo or when you need a custom environment that matches a specific mood — a “vintage diner interior with neon signs” or a “foggy forest at dawn.” The AI creates original imagery from your description, which is a significant step forward compared to hunting through image libraries.
That said, the output still benefits from manual colour matching (using the Blur > Average technique from the previous section) and occasional edge cleanup. The AI handles composition and lighting reasonably well, but fine‑tuning the subject’s integration remains your responsibility.
Prompt Engineering Tips
The quality of the generated background depends heavily on how you write the prompt. Based on the Adobe HelpX guidance, these practices improve results:
- Be specific: “vintage diner interior with neon signs and checkered floor” works better than “restaurant”.
- Include lighting and mood: Words like “soft morning light”, “dramatic shadows”, or “overcast sky” guide the AI toward a consistent look.
- Cycle through variations: If the first set does not fit, click Generate again — each cycle produces fresh options. You can also tweak the prompt and regenerate.
- Keep the subject in mind: Mention the subject’s environment implicitly — “a forest path with dappled sunlight” will complement a person or a product better than a generic “nature”.
Troubleshoot Common Problems When Adding a Background
Even with clear steps, beginners — and sometimes experienced users — run into a handful of recurring issues. These are the problems reported most often on forums and official support channels.
“My Solid Color Layer Covers Everything”
Cause: A Solid Color fill layer always sits above the layer you had selected when you created it. If that layer was the subject, the colour covers it.
Fix: Drag the fill layer below the subject in the Layers panel. Alternatively, before creating the fill, select a layer that is already below — or use Layer > New > Background from Layer as described in the community workaround above. SitePoint users report this solves the issue.
“Delete Key Won’t Remove the Background”
Cause: The background layer is locked (its name ends with “Background” and appears in italics). The Delete key does not work on locked layers. Adobe Community sees this question frequently.
Fix: Double‑click the background layer to convert it to a regular layer. Now you can select and delete freely.
“Magic Wand Leaves Rough Edges”
Cause: The Magic Wand is pixel‑based and cannot handle transparency, gradients, or fine detail like hair. Adobe Community experts consider it outdated for background removal.
Fix: Use Select Subject or the Object Selection tool instead. If edges are still imperfect, open Select & Mask and use the Refine Edge brush or adjust the “Shift Edge” slider to -5% with a feather of 0.5 px.
“The New Background Color Spills onto My Subject”
Cause: Chroma‑key spill from a green or blue screen reflects onto the subject’s edges. Practical Machinist advice addresses this directly.
Fix: Add a Hue/Saturation adjustment layer clipped to the subject. Select the offending colour (Greens, Cyans, or Blues) and lower saturation. For stubborn spill, use Select > Color Range to isolate only the affected pixels before desaturating.
“I Removed the Background — Now How Do I Add a New One?”
Cause: After removal the subject is on a transparent layer, and the next step is not obvious. A Reddit user asked exactly this.
Fix: Your subject now sits on a transparent layer. Follow the steps in the first section: create a new layer below it, fill with colour or an image, and ensure the subject layer stays on top. That is all it takes.
An illustration of colour contamination: the textured version on the right shows how spill from a background can affect the perceived cleanliness of the composite. The left side shows the intended result.