- Category:
- Workflow Tips
- Summary:
- Learn how to add layers in Photoshop with 6 methods: button, menu, shortcut, duplicate, drag-drop, and adjustment layers for blank, image, and duplicate layers.
Quick Reference The fastest way to add a blank layer: click the “Create a New Layer” button (square with a plus) at the bottom of the Layers panel. A new transparent layer appears above your currently selected layer.
For an image as a layer, drag a file onto the canvas. To duplicate an existing layer, press Ctrl+J (Windows) or Cmd+J (Mac).
Button · Menu · Shortcut · Duplicate · Drag‑and‑drop · Adjustment layers
The Create a New Layer Button — Quickest Method for a Blank Layer
The Layers panel is your central hub for layer management. At its bottom edge sits the “Create a New Layer” icon — a square with a plus sign. Research guides and tutorials consistently point to this as the fastest route. It creates a transparent layer above the one you have selected, using your document’s default blending mode (Normal) and opacity (100%).
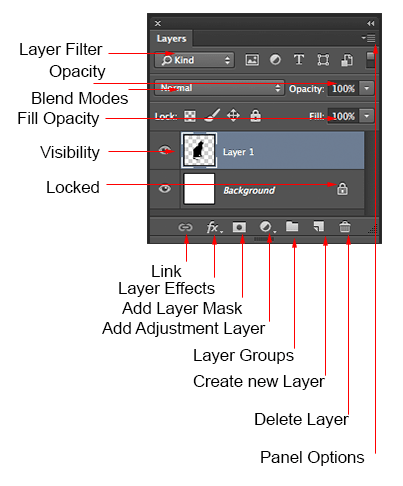
The Layers panel with the “Create a New Layer” button at the bottom (square with a plus). Source: PhotoshopCAFE.
Where to Find the Button
Look at the very bottom row of the Layers panel. In both Photoshop CC and Photoshop Elements the icon is the same: a rectangle with a folded corner and a plus sign (or a plain square with a plus in newer versions). Adobe’s Elements documentation confirms the button’s placement. If you cannot see the Layers panel, open it via Window > Layers or press F7.
What Happens When You Click It
A new, blank transparent layer appears directly above the layer you had selected. If the Background layer is selected (and locked), the new layer still goes above it — but you cannot paint on it until you convert the Background (see Troubleshooting below). The new layer uses Normal blend mode and 100% opacity by default. You can rename it by double-clicking the layer name in the panel. The Layers panel also shows an eye icon to toggle visibility, a lock icon, a blending-mode dropdown, and an opacity slider — all described in Adobe’s official layer documentation.
Tip Use this method when you want a fresh, empty layer instantly. No dialog, no naming — just one click. It is ideal for quick painting, dodging and burning, or adding a blank canvas for pasted content.
The Layer > New > Layer Menu — When You Need a Named Layer
If you want to name the layer, assign a color tag, or set a blending mode and opacity at the moment of creation, the menu path gives you full control. Go to the top menu bar: Layer > New > Layer. In the dialog that appears, enter a name (e.g., “Shadow adjustment” or “Logo overlay”), choose a color label, pick a blend mode, and set opacity. Adobe’s helpx page details every option in this dialog.

The Layer > New > Layer menu path opens a dialog for naming and settings. Source: YouTube tutorial.
You can also reach this dialog via the panel flyout menu (click the four-line icon in the top-right corner of the Layers panel) and choose New Layer…, or right-click directly on the Layers panel and select New Layer…. While this method takes an extra click compared to the button, it pays off when you are organising a complex composition from the start.
When to use Choose the menu method when you are building a layered file with many components — naming layers like “Subject”, “Background blur”, “Text overlay”, and “Color grade” keeps your workflow tidy and makes it easier for collaborators (or future-you) to navigate.
The Keyboard Shortcut Shift+Ctrl+N — Fastest for Power Users
For users who prefer keeping both hands on the keyboard, Shift+Ctrl+N (Windows) or Shift+Cmd+N (Mac) opens the same New Layer dialog as the menu method. This is documented across multiple sources, including this tutorial video. Type a name, press Enter, and you have a new layer — no mouse movement required.
If you press Ctrl+Shift+N (note the order) you get the same result. This shortcut is slightly slower than the one-click button because the dialog appears, but it is faster than reaching for the menu bar. Power users often combine it with Ctrl+J for duplication (covered next) to build multi-layer documents without ever touching the mouse.
Pro tip Memorise
Shift+Ctrl+NandCtrl+Jas a pair. Use the first to create a blank layer, the second to duplicate. Together they handle 80 % of everyday layer creation tasks.
The Duplicate Layer Shortcut Ctrl+J — Copy an Existing Layer
Select any layer in the Layers panel and press Ctrl+J (Windows) or Cmd+J (Mac). An exact copy of that layer appears above it, including its contents, blending mode, opacity, and mask. This is one of the most frequently used shortcuts in Photoshop, cited in both Quora discussions and video tutorials.
Alternatively, right-click the layer in the panel and choose Duplicate Layer… — this opens a dialog where you can name the copy and even send it to another open document. The duplicate counts toward the 8,000-layer limit (Photoshop Elements help notes this upper bound; system memory may lower it in practice).
When to duplicate Duplication is the foundation of non-destructive editing. Before applying a filter, painting adjustments, or experimenting with blending modes, duplicate the original layer. If the experiment fails, you delete the copy with no harm to the original. It also speeds up compositing: duplicate a subject layer, mask it differently, and create variations.
The Drag-and-Drop Method — Add an Image as a New Layer
To bring an external image into your Photoshop document as a new layer, simply drag the file from your file explorer (Finder on Mac) onto the Photoshop canvas and release. Photoshop automatically places the image as a new layer above the active layer. Adobe’s official site describes this as one of the primary ways to add a picture as a layer.

A multi-layer composition built by dragging images onto the canvas. Source: YouTube tutorial.
If you want scaling handles before committing the image, use File > Place Embedded (in current Photoshop versions) or File > Place (older versions). The embedded image appears with transform handles; press Enter to confirm the size and position. Note that the terminology changed: older Photoshop versions used “Place”, while CC 2019 and later use “Place Embedded” or “Place Linked”.
Best for Drag-and-drop is the go-to method for compositing photos, adding logos, overlaying textures, or bringing in reference images. Because it places the image as a Smart Object by default (when using Place Embedded), you can resize without losing quality.
Adding Special Layer Types — Adjustment, Fill, and Shape Layers
Not all layers are pixel-based. Photoshop offers special layer types that let you edit non-destructively or work with vector data. Adobe’s Elements documentation lists adjustment layers, fill layers, type layers, and shape layers as distinct entities.

The Layers panel showing visibility, linking, layer masks, and effect controls. Source: Adobe Help Center.
- Adjustment layers — Click the half-filled circle icon at the bottom of the Layers panel. Choose Levels, Curves, Hue/Saturation, or any other adjustment. The effect applies to all layers below without altering their pixels. This is the cornerstone of non-destructive color correction.
- Fill layers — From the same half-circle menu, select Solid Color, Gradient, or Pattern. Each creates a layer filled with that content, which you can mask and blend independently.
- Shape layers — Activate the Shape tool (rectangle, ellipse, polygon, or custom shape) from the toolbar. Draw on the canvas; Photoshop creates a vector shape layer with a built-in mask. The shape remains editable via the Path Selection tool.
- Type layers — Select the Type tool (
T), click on the canvas, and start typing. The text remains fully editable — font, size, kerning, and colour can be changed at any time.
If you work with Photoshop Elements, note that layer groups imported from full Photoshop are not supported and must be simplified. For advanced cutout and layer-export workflows, plugins like Layerbench can automate subject isolation and transparent PNG export with edge-cleanup controls — a useful addition when you regularly process layered files for web or presentation.
Troubleshooting — Why Can’t I Add a Layer? (Four Common Problems)
Background Layer Is Locked
The Background layer (the bottommost layer) has a small lock icon. You cannot add a new layer above it while it remains locked — Photoshop treats it as a protected base. Adobe’s documentation confirms this by design.
Fix: Double-click the Background layer in the Layers panel, give it a name (e.g., “Layer 0”), and click OK. The lock disappears and you can add layers above it. Alternatively, use Layer > New > Layer from Background.
Photoshop 2020 Bug — Button Unclickable
In Photoshop 2020, some users found the “Create a New Layer” button (square with a plus) completely unclickable. The Adobe Community bug report garnered over 11,700 views and 15 replies, indicating a widespread issue. Adobe fixed it in version 22.5.1.
Fix: Update Photoshop via the Creative Cloud desktop app to version 22.5.1 or later. While waiting for the update, use the Layer > New > Layer menu or the Shift+Ctrl+N shortcut as workarounds.
Lightroom “Open as Layers in Photoshop” Command Failing
Lightroom Classic users sometimes report that “Open as Layers in Photoshop” does nothing, or opens a single image instead of layered stack. This issue appears in community discussions on Facebook.
Fix: Ensure both Lightroom and Photoshop are updated to their latest versions. Reset Photoshop preferences (hold Alt+Ctrl+Shift on Windows or Option+Cmd+Shift on Mac at launch). As a workaround, use Photo > Edit In > Open as Layers in Photoshop directly from Lightroom’s menu bar.
Layer Limit Reached
Photoshop supports up to 8,000 layers per image, but system memory may lower this ceiling (Adobe Elements help). If you receive an error that no more layers can be added, check your layer count via Window > Layers and scroll to the bottom.
Fix: Merge unneeded layers (Layer > Merge Down or Ctrl+E), group related layers into layer groups (Layer > Group Layers with Ctrl+G), or flatten the image if you no longer need individual layers (Layer > Flatten Image). Note that Shift-clicking layers lets you add multiple layers to a group at once.
Verification — How to Confirm Your Layer Was Added Correctly
After using any of the methods above, run through this quick checklist to confirm the layer works as expected:
- Check the Layers panel — A new thumbnail should appear above the previously selected layer. If you gave it a name, that name appears next to the thumbnail.
- Toggle the eye icon — Click the eye icon next to the new layer. It should disappear from the canvas (if it has content) or show/hide transparency. If the layer hides when you click the eye, it is functioning correctly.
- Paint on it — Select the Brush tool (
B) and paint a stroke on the canvas. The paint should appear on the new layer, not on the layers beneath it. This confirms the layer is active and sits above the background. - Check for a lock — If the new layer shows a lock icon, right-click it and choose Unlock Layer. This is rare for newly created layers but can happen with certain templates.
- Verify transparency — A blank new layer shows a checkerboard pattern (if transparency is enabled). If you see a solid white or coloured thumbnail, the layer may have been created with a fill — check its blend mode or delete and re-create using the button method.
If all five checks pass, your layer is ready for editing, painting, masking, or blending. Layers can be hidden, linked, locked, grouped, and reordered freely — these operations are covered in Adobe’s core documentation and apply to every layer type discussed here.
Expected result A correctly added layer is transparent, editable, and positioned above the layer you had selected when you created it. You can move it, mask it, change its blend mode, or delete it without affecting any other layer in the document.