- Category:
- Export & Automation
- Summary:
- Learn to batch edit in Photoshop using Actions, Image Processor, and Camera Raw sync with decision table and error fixes for streamlined photo processing.
Batch editing in Photoshop applies the same edit to multiple files at once.
This article covers four built-in methods: Image Processor (resize & convert without an action), Actions + Batch (full control over edits), Camera Raw sync (raw-file adjustments), and scripts/droplets (advanced automation). You'll also find a decision table and fixes for common batch errors. This guide focuses on Photoshop's own tools — for very large raw catalogs (1000+ images), Lightroom Classic is a more efficient choice.
The Image Processor Handles Resizing and Conversion Without an Action
The Image Processor (File > Scripts > Image Processor) is a built-in batch tool that converts and resizes files without requiring you to record an action. According to Adobe's documentation, it can process camera raw files, output to JPEG, PSD, or TIFF (or all three at once), resize to specific pixel dimensions, embed or convert to sRGB, and add copyright metadata.

Image Processor dialog: choose source folder, output formats, resize dimensions, and colour profile options without recording an action.
When to Use the Image Processor
This method is a strong choice for quick, repetitive conversions — resizing a folder of JPEGs for web use, converting a set of TIFFs to JPEG, or adding copyright metadata. It is not designed for complex edits such as watermarking, sharpening, or colour grading. For those tasks, combine it with an action (see below).
📌 Tip — Combine Image Processor with an action The Image Processor dialog includes a checkbox to run a Photoshop action after conversion. As noted in community discussions on Quora, this lets you resize and apply a custom action (e.g., sharpening or a curve adjustment) in a single pass.
Step-by-Step: Image Processor
- Go to
File > Scripts > Image Processor. - Select the source folder containing your images.
- Choose output folder (same location or a new folder).
- Pick file type(s): JPEG, PSD, TIFF — or all three.
- Set resize dimensions (width and/or height in pixels).
- Optionally convert to sRGB and add copyright metadata.
- (Optional) Check Run Action and select a recorded action from the list.
- Click OK — the processor runs without further dialogs.
Actions Combined With the Batch Command Give You Full Control Over Edits
For truly custom batch editing — applying colour corrections, watermarks, sharpening, or any sequence of operations — the combination of Actions and the Batch command is the standard workflow. Adobe's Batch documentation details how to apply a recorded action to an entire folder, with controls for file naming, destination, and dialog suppression.
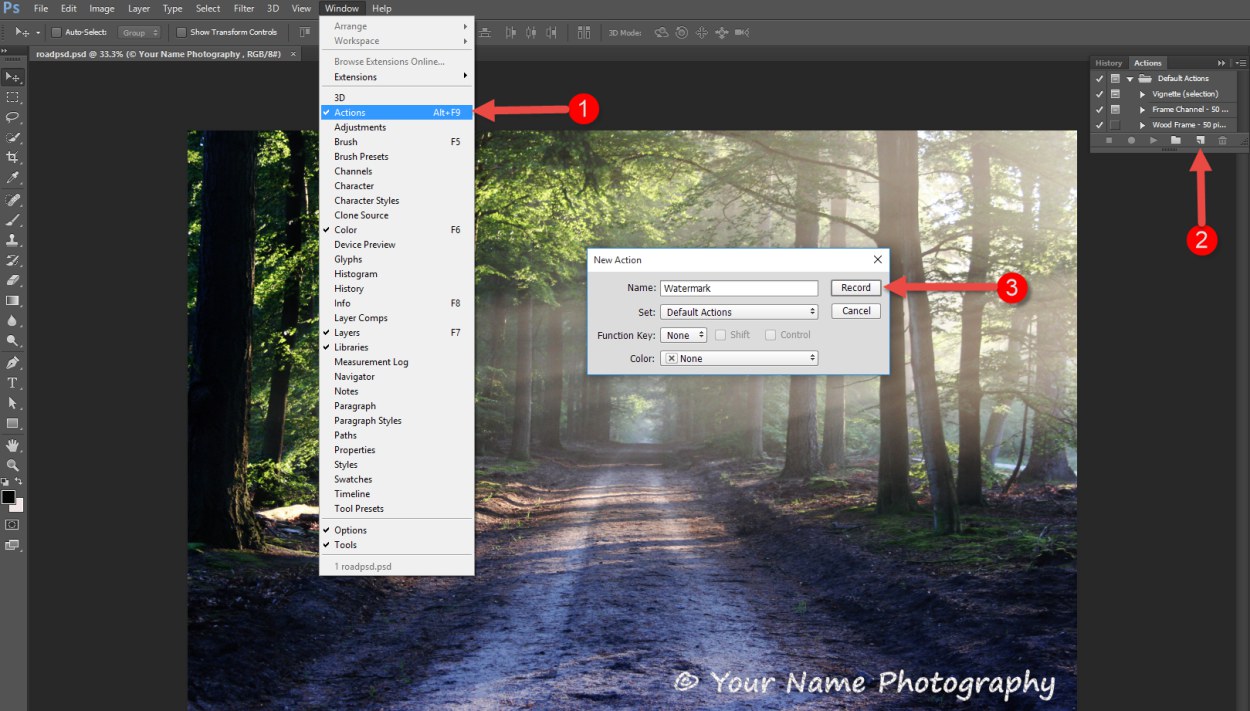
Creating a new action in the Actions panel — give it a descriptive name and record each step.
Step 1: Record Your Action
- Open Window > Actions to show the Actions panel.
- Click the New Action icon (folder-like button at the bottom). Name it (e.g., "Watermark + Sharpen").
- Click Record — perform your edits: levels, curves, place a logo via
File > Place, sharpening, etc. - Click the Stop button when done.
⚡ Speed Tip — assign a keyboard shortcut In the Actions panel, select your action, open the panel menu, and choose Action Options. Assign an F-key (e.g., F2) to run the action instantly on the active document. Reddit practitioners recommend this for repeated one-off batches.
Step 2: Apply via the Batch Command
- Go to
File > Automate > Batch. - Select your action from the Play dropdown.
- Set Source to Folder and choose the input folder.
- For Destination, choose Folder and pick an output location. Use the File Naming rules to rename outputs systematically (e.g., document name + serial number).
- Check Suppress File Open Options Dialogs and Suppress Color Profile Warnings — these prevent interruptions (IAS.edu guide).
- Check Override Action "Open" Commands — this is essential to avoid the common "same photo over and over" bug (see below).
- Click OK to run the batch.
!Adobe Photoshop Window menu with Actions panel highlighted over a cat photo workspace:max_bytes(150000):strip_icc()/001-creating-an-action-for-batch-processing-in-photoshop-e25dd15b1b53402496305759ce655c9a.jpg)
The Actions panel (highlighted) stores all recorded actions; access it via Window > Actions.
🔄 Why Your Batch Might Edit the Same Photo Repeatedly — and How to Fix It
This is a well-known problem in the Photoshop community: the action edits the same image over and over instead of moving to the next file. The cause is an action that recorded a specific file open command (e.g., "Open /Users/name/photo.jpg") instead of a generic open step.
The fix — recorded in Adobe's Batch documentation — is two-fold:
- Option 1: When recording the action, do not include an Open step. Let the Batch command open each file automatically.
- Option 2: In the Batch dialog, check Override Action "Open" Commands. This tells Photoshop to ignore any specific file reference in the action and open each source file instead.
Always combine this with the two "Suppress" checkboxes to prevent dialog boxes from halting the process.
Camera Raw Synchronization Offers a Streamlined Workflow for Raw Files
If you work with raw files (CR2, NEF, ARW, DNG, etc.), the Camera Raw plugin inside Photoshop provides a batch-sync feature that applies the same adjustments to multiple raw images at once. As described in Quora responses, you can open several raw files, edit one, then synchronise the rest.
How to Sync Camera Raw Adjustments
- In Bridge or directly via File > Open, select multiple raw files so they open in the Camera Raw dialog (each file appears as a thumbnail strip on the left).
- Adjust one image — white balance, exposure, contrast, lens corrections, etc.
- Select all thumbnails (Ctrl/Cmd+A), then click the Sync button at the top of the strip.
- In the Synchronize dialog, choose which settings to apply (check only the ones you adjusted).
- Click Done to save XMP sidecar files, or Open to continue editing the images as layers in Photoshop.
⚠️ When to Use Lightroom Instead For large raw collections — 1000+ images from a trip or event — Photoshop's batch tools become slow because they open each file individually. The Reddit photography community advises using Lightroom Classic for culling (star ratings), applying presets, and managing large catalogs efficiently. Photoshop is best suited for batches of 50–200 images that need detailed retouching beyond raw adjustments.
You can also combine Bridge and Lightroom: use Bridge's Camera Raw for basic edits (white balance, exposure, lens profiles) and save XMP files, then import those images into Lightroom CC for cataloging and further organisation (Adobe Community workflow).
Scripts and Droplets Automate Tasks That Actions Can't Handle
Actions cover a wide range of edits, but they have limits: they cannot replace smart objects in a template, handle variable text or images, or perform conditional logic. For those advanced scenarios, Photoshop offers scripts, droplets, and Variables.
Droplets — Drag-and-Drop Batch Icons
A droplet is a small executable file created from an action. Drag any image (or folder of images) onto the droplet icon, and Photoshop automatically runs the action on those files. To create one: File > Automate > Create Droplet. Choose an action, set output options, and save the droplet to your desktop or a folder. This is especially handy for repetitive tasks like watermarking or resizing that you run multiple times a week (Quora).
Scripts (ExtendScript / JavaScript) — For Smart Objects and Complex Logic
Scripts provide programmatic control over Photoshop. They can, for instance, batch-replace the contents of a smart object in a banner template. However, Adobe Community reports that such scripts can be fragile — the same script that works on one Windows machine may fail on another due to environment differences. A more reliable workaround, suggested by Reddit Photoshop users, is to reverse the workflow: start with each source image and place the template onto it, rather than trying to replace a smart object inside an existing document.
Photoshop Variables — Data-Driven Graphics
For batch-generating personalised templates (e.g., membership cards, certificates, event badges), Variables let you define text and image placeholders in a PSD, then import a data set (CSV or XML) to produce multiple versions. Set up variables via Image > Variables > Define, then use File > Import > Data Sets or combine with the Batch command. This approach is mentioned in community discussions as a robust alternative to scripting for template-based batch work.
Comparison Table — Which Batch Method Should You Use?
The table below summarises the four main built-in methods across the dimensions that matter most in practice. Use it to match your task to the right tool.
| Method | When to Use | Best For | Limitations |
|---|---|---|---|
| Image Processor | Quick format conversion & resizing; no action needed | Small–medium batches of JPEG, PSD, TIFF; web-ready outputs | No complex edits (watermark, curves, sharpening) unless combined with an action |
| Actions + Batch | Full-editing sequences: colour, watermark, sharpening, layer operations | Any file type; small–medium batches (up to ~200 images) | Slower for large raw sets; requires recording action; vulnerable to "same photo" bug without override |
| Camera Raw Sync | Raw-file colour & exposure adjustments | Large raw batches (especially via Bridge); non-destructive XMP workflow | Limited to raw files; basic tonal edits only — no layers, text, or compositing |
| Scripts / Droplets / Variables | Smart objects, variable data, conditionals, drag-and-drop repeats | Advanced users; template personalisation; repetitive tasks | Fragile (script compatibility issues); steep learning curve for Variables |
For a deeper look at any method, jump back to its section using the navigation at the top of this article.
How to Confirm Your Batch Edit Worked Correctly
After a batch run, always verify the output before archiving or distributing the files. Use this checklist — adapted from the Adobe Batch documentation and IAS.edu guide — to catch errors early.
- Count the files — does the destination folder have the expected number of images? If some are missing, check whether certain files failed to open (often due to corruption or unsupported formats).
- Verify file naming — confirm that the naming rules you set in the Batch dialog were applied consistently (e.g., "Project_001.jpg", "Project_002.jpg").
- Spot-check edits — open three to five random outputs and look for the applied edit: watermark visible, correct dimensions, colour profile intact, no unwanted artefacts.
- Check format and colour — ensure the output is in the expected file type (JPEG vs. TIFF) and colour space (sRGB for web, Adobe RGB for print).
- Review logs — if you used a script, check the JavaScript console (Window > Console) for error messages. For the Batch command, look for any "Errors occurred" dialog at the end of the process.
If you notice issues, revisit the action recording or Batch settings. The most common errors — missing files, wrong naming, or the "same photo" bug — are usually resolved by checking the override and suppress options described in the Actions section above.
For advanced layer export workflows — such as batch-saving multiple layers as transparent PNGs — a dedicated tool like Layerbench can complement Photoshop's native batch features by automating subject cutout, edge cleanup, and lossless layer export with a single click.