- Category:
- Workflow Tips
- Summary:
- Master combining multiple objects into one in Illustrator with Pathfinder Unite and Shape Builder Tool, and avoid the common grouping mistake.
Method 1
Pathfinder Unite — Window → Pathfinder → Unite
Method 2
Shape Builder Tool — Shift+M → drag across overlaps
Important: Grouping (Ctrl+G) keeps objects separate — it is not merging. Use the methods above when you need a single editable object.
Pathfinder Unite – Single Path or Compound Shape? What Different Sources Say
If you have read more than one tutorial on merging shapes in Illustrator, you have likely encountered a contradiction. The official Adobe Help documentation states that the Unite command combines overlapping paths into “an object with a single path.” Yet a popular blog describes the result as a “single compound shape.” Which is correct?
The short answer: Adobe’s description is accurate for a standard Unite click. The result is a single path object — a destructive, permanent merge. The term “compound shape” properly refers to a separate, non‑destructive feature accessed by holding Alt while clicking Unite (in current versions) or by choosing “Make Compound Shape” from the Pathfinder panel menu.
⚠ Version‑Sensitive Behavior
In older versions of Illustrator (CS4 and earlier), alt‑clicking Unite performed a combined Unite + Expand operation. In current versions (CC 2020 and later), alt‑click creates a non‑destructive Compound Shape that remains editable. If you are using a legacy version, test the shortcut on a duplicate first. (Source: StackExchange community)
For most workflows — preparing artwork for export, applying effects, or reducing object count — a standard click on Unite (without Alt) gives you exactly what you need: one object, one path.
The Two Main Methods That Produce a Single Object
These two techniques handle the vast majority of merging tasks in Illustrator. Both turn multiple selected shapes into a single object, but they work differently under the hood. Below you will find the step‑by‑step procedure for each, along with the situations where one shines over the other.
Pathfinder Unite – Step by Step
- Select the objects you want to combine. They can overlap or sit separately — Unite works in both cases (separate shapes become sub‑paths of a single compound path).
- Open the Pathfinder panel:
Window→Pathfinder(or pressShift+Ctrl+F9on Windows /Shift+Cmd+F9on Mac). - Click the Unite button — the first icon under “Shape Modes” (looks like two overlapping squares merging into one). The result takes the fill and stroke attributes of the frontmost object in your selection.

Two overlapping shapes before (left) and after applying Pathfinder Unite — note the single outline and uniform fill.
💡 Pro Tip — Non‑Destructive Alternative
If you want to preserve the original objects for future editing, holdAltwhile clicking Unite. This creates a Compound Shape — a live, editable group that behaves like a single object for effects and exporting but lets you double‑click to adjust the individual pieces later.
Shape Builder Tool – Step by Step
- Select all shapes you want to merge — they must be selected before the tool activates.
- Activate the Shape Builder Tool: press
Shift+Mor select it from the toolbar (it shares a slot with the Live Paint Bucket). - Click and drag across the overlapping areas you want to merge. A red mesh overlay appears as you drag — release to combine those regions into one shape. To merge non‑adjacent pieces, hold
Shiftand click each region.

The Shape Builder tool lets you merge by physically “painting” over the areas you want to combine — ideal for complex compositions with many overlapping pieces.
The Shape Builder tool is often faster than Pathfinder when you are working with a large number of overlapping shapes and only want to merge specific regions rather than everything in the selection. It also keeps non‑selected areas intact, which makes it a strong choice for exploratory design work.
Why Grouping Is Not the Same
A common source of confusion — especially for beginners — is the difference between grouping and merging. When you press Ctrl+G (or Cmd+G on Mac), Illustrator creates a group: a container that holds the original objects as separate, fully editable items. A group still contains multiple paths; it just makes them easier to move and scale together.
If you need a single object — for a 3D effect, a unified fill, an SVG export with no sub‑layers, or a mask — grouping will not work. The Reddit Illustrator community frequently sees users who grouped shapes and then wondered why an effect applied to each piece separately. Check the Layers panel: a group shows a <Group> label; a merged object shows a single path entry.
⚠ Quick Check
If you select the combined result and see multiple anchor‑point paths when you switch to the Direct Selection Tool (A), you are looking at a group or a compound path, not a single merged object. Use Unite or Shape Builder instead.
When Objects Have Different Colors or Strokes — Why Merge Might Fail
One of the most frustrating problems new users encounter is the “solid block” effect: you merge line art with colored squares, and the result is a single blob of solid color instead of the combined shapes you expected. This happens because the Merge command (not Unite) has a specific requirement.
According to Adobe’s official documentation, the Merge operation only combines objects that share the same Fill, Opacity, and effects. When two overlapping objects have different fills, the overlapping area is subtracted from the back object by the frontmost object — it does not merge them into a single shape with two colors.
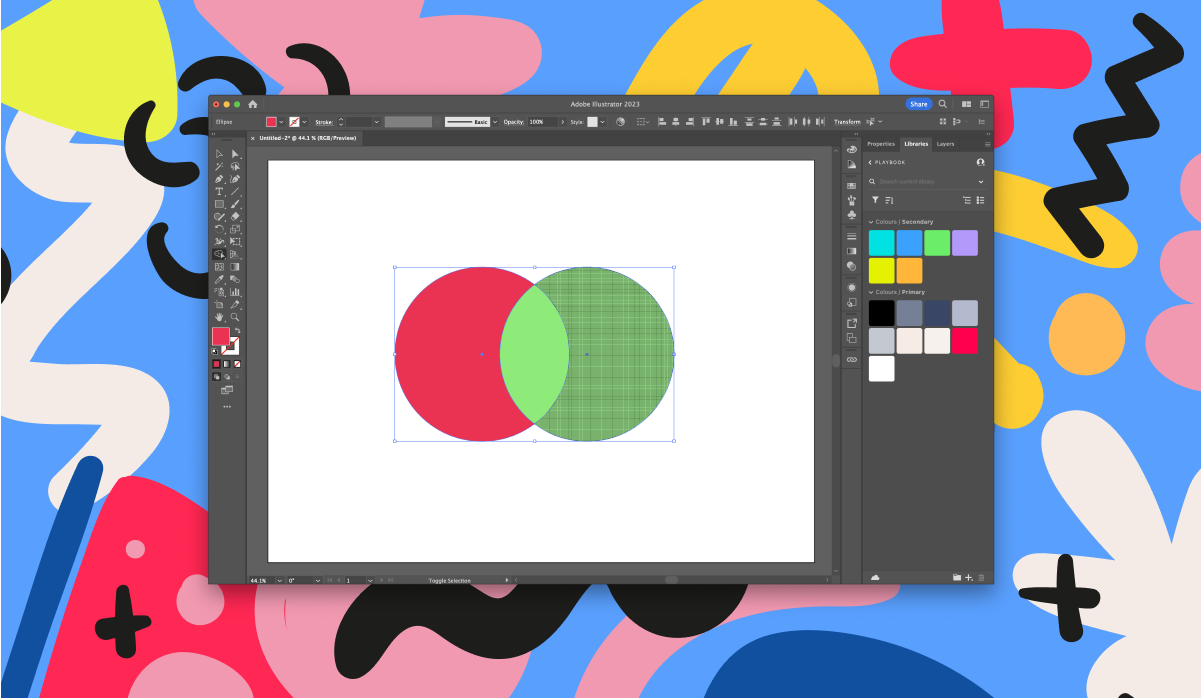
When objects have different fills, Merge subtracts the overlapping area rather than combining them. Use Unite for a single shape, then recolor if needed.
A real user on Adobe Community reported exactly this issue: merging line art with colored squares produced a solid block of color. The solution was to switch from Merge to Unite, which always creates a single path regardless of color differences. Unite takes the frontmost object’s attributes, so the result will have one uniform fill — but the shape itself will be correct.
💡 How to Keep Multiple Colors After Merging
If you need a single object that contains multiple colors, use one of these workarounds:
- Divide + Recolor: Use the Divide command in the Pathfinder panel (second row, first icon), then manually assign fills to the resulting pieces.
- Live Paint: After merging with Unite, select the result and go to
Object→Live Paint→Make, then paint each region with the Live Paint Bucket.- Expand + Ungroup: After Divide, use
Object→Expandand then ungroup to access individual colored pieces.
Combining Strokes and Filled Shapes — The Outline Stroke Step
Merging a stroke (a line, an arrow, or a character outline) with a filled shape requires an extra step that many tutorials skip. The Pathfinder tools only work on closed paths — strokes are open paths and will not merge correctly until they are converted to filled shapes.
The StackExchange design community highlights a typical case: a user wanted to apply a 3D effect to a combined arrow and letter “G.” When the arrow was still a stroke, the 3D effect applied to each part separately, breaking the illusion. The fix was to convert the stroke first.
- Select the stroked object (the path, line, or type with a stroke).
- Go to
Object→Path→Outline Stroke. This converts the stroke into a closed filled shape that matches the stroke’s width. - Now select both objects (the outlined stroke and the filled shape) and apply Unite (or Shape Builder) as usual.
This same method works for text characters that have strokes applied. If you have outlined text (converted to paths) with a stroke weight, Outline Stroke must be applied before merging, or the stroke will be lost.
⚠ Note for Type
If you are merging live text with shapes, convert the text to outlines first (Type→Create OutlinesorShift+Ctrl+O). After that, follow the Outline Stroke step if the text has a stroke applied.
Permanent Merge Without Losing Editability — The Symbol + Rasterize Trick
Sometimes you need a truly permanent merge — not just a single object, but a reduction in file size and complexity that even the Pathfinder cannot achieve. A SuperUser discussion documents a user working with a 55 MB file who needed to collapse hundreds of small overlapping paths into a single vector object while keeping the ability to edit. The standard methods (Group, Compound Path, manual merging) were either not permanent enough or produced groups.
The community provided two powerful solutions:
Rasterization (Permanent, Non‑Editable)
Select the objects, go to Object → Rasterize, and choose a resolution that preserves your detail. This collapses everything into a single raster image — the file size drops dramatically, but you lose vector editability. This is the best option for final exports or when you no longer need to change the artwork.
Symbol + Rasterize (Editable with Reduced File Size)
Create a Symbol from your artwork (F8), then double‑click to enter Symbol Isolation Mode, select all contents, and apply Effect → Rasterize (set to 300 ppi). The symbol remains editable in the Symbols panel, while the placed instance renders as a single raster object — slashing file size without permanently losing your source. (Source: SuperUser comment thread)
91.6% — File size reduction achieved by one SuperUser commenter: from 56.9 MB down to 4.8 MB simply by unchecking “Create PDF Compatible File” in the Save As dialog. This option preserves the visual appearance while stripping extensive PDF overhead — a reversible trick that does not alter your vector objects at all. (Source)
If your primary goal is file size reduction and you do not need a permanent merge, always try disabling PDF compatibility first — it is non‑destructive and can cut file size by more than 90 % in some cases.
What to Do When Unite Creates a Group Instead of a Single Object
You carefully select your objects, click Unite, and the Layers panel still shows a <Group> — or the result behaves like multiple objects when you try to apply an effect. This is a known frustration, and the Reddit Illustrator community sees it regularly.
The most common cause is that your objects were already grouped before you applied Unite. When Pathfinder operations are applied to a group, they treat the group as a whole and often produce another group instead of a single path. The fix is simple:
- Ungroup everything first: Select your objects and press
Shift+Ctrl+G(Windows) orShift+Cmd+G(Mac) repeatedly until no more groups remain. Alternatively, right‑click and choose Ungroup from the context menu. - Check the Layers panel — you should see individual path entries, not a
<Group>label. Now apply Unite again. - If it still creates a group, the objects likely have different attributes (different fills, strokes, opacity, or effects). In that case, Unite will still merge them into a single path, but the result may contain sub‑paths or appear as a group in older Illustrator versions. Use the Direct Selection Tool (
A) to verify — click on the shape; if you see a single continuous path, it is merged despite the Layers panel label.
💡 Preventive Habit
Before any Pathfinder operation, get into the habit of selecting your artwork and pressingShift+Ctrl+Gtwice — this guarantees that no stray groups interfere with the merge.
How to Confirm Your Objects Are Properly Merged
You have followed the steps, but how can you be sure the merge actually took effect? Use these checks to verify that your result is a single object — not a group, a compound shape, or a compound path.
- Check the Layers panel. A single merged object shows a single path entry — no
<Group>, no<Compound Shape>, no nested sub‑entries. (If you used alt‑click to create a Compound Shape, it will be labelled as such — that is intentional and still counts as a single object for most purposes.) - Use the Direct Selection Tool (
A). Click on the merged shape. A single path highlights with anchor points along its entire outline. If you see multiple separate path segments, the objects are not fully merged. - Apply a uniform fill or effect. Select the result and change its fill color or add an effect (e.g.,
Effect→3D→Extrude & Bevel). If the fill or effect applies continuously across the entire shape without “breaking” at the original seam lines, the merge is successful. - Try Exporting. Export the artwork as SVG (or another vector format) and open it in a code editor. A single merged object produces one
<path>element, not multiple<path>or<g>elements.
✗ If your result fails any of these checks, return to the ungrouping step or switch to the Shape Builder tool, which tends to produce cleaner single‑object results in edge cases.
📌 Final Note
The method you choose — Unite, Shape Builder, Merge, or the Symbol + Rasterize trick — depends on whether you need a permanent merge, whether your objects share fills, and whether you are working with strokes or filled shapes. The table below summarises which technique to reach for in each situation.
| Your Goal | Recommended Method | Notes |
|---|---|---|
| Quick merge of overlapping shapes | Pathfinder Unite | Takes attributes of frontmost object |
| Merge only specific overlapping areas | Shape Builder Tool | Best for complex compositions |
| Objects with different fills / colors | Unite + Live Paint | Unite first, then recolor |
| Strokes + filled shapes | Outline Stroke → Unite | Convert strokes to filled shapes first |
| Permanent merge + file size reduction | Symbol + Rasterize | Keeps editability via Symbol panel |
| Non‑destructive live merge | Alt + Unite (Compound Shape) | Double‑click to edit individual pieces |