- Category:
- Workflow Tips
- Summary:
- Learn how to crop in Photoshop with seven methods: Crop Tool for full images, Frame Tool or layer masks for single layers, plus straighten and exact dimensions.
The short answer: Press C to activate the Crop Tool, drag the border handles to define your crop area, and press Enter (Return on Mac) to apply. For a single layer, use the Frame Tool or a layer mask instead. To straighten, click the Straighten button and draw a line along the horizon. For exact pixel dimensions, enter width and height values in the options bar before dragging. The sections below walk through each method step by step.
How to Use the Basic Crop Tool in Photoshop
The Crop Tool is the most direct way to trim your canvas. It works on the entire image — all visible layers are cropped together. Here is the standard workflow, based on Adobe’s official documentation and detailed tutorial resources.
- Select the Crop Tool. Press
Con your keyboard, or click the Crop Tool icon in the toolbar (it looks like two intersecting right angles). - Adjust the crop border. Drag any corner or edge handle inward to define the area you want to keep. The area outside the handles is dimmed so you can preview the result.
- Reposition the image inside the crop. Click and drag anywhere inside the crop border to move the image within the frame. This is especially useful when you need to reframe without changing the crop box size.
- Commit the crop. Press
Enter(Windows) orReturn(macOS), or click the checkmark icon in the options bar. To cancel, pressEscape.
The Crop Tool gives you a live preview with a dark overlay and a 3×3 grid by default, helping you compose the shot as you crop. You can switch the overlay to a different composition guide — more on that in the overlays section below.

The Crop Tool in Photoshop with an active crop border — drag the handles to define the area you want to keep.
★ Pro Tip
If you need to crop multiple images to the same aspect ratio, enter the ratio (e.g., 16:9) in the options bar before you start dragging. The crop box will snap to that ratio as you resize it.
How to Crop Only One Layer Without Affecting the Rest
This is one of the most common questions Photoshop users ask — as seen on Reddit — because the standard Crop Tool applies to the entire canvas. When you need to trim just one layer (a cutout, a texture, a logo) while leaving other layers untouched, you have two reliable options.
▶ Method 1: Frame Tool
The Frame Tool (shortcut K) is designed specifically for this task. It creates a rectangular or elliptical frame that acts as a mask on a single layer — quick, visual, and non-destructive.
Select the Frame Tool, draw a frame over the area you want to keep, and Photoshop automatically masks the rest of the layer. You can resize or reposition the frame at any time. This is the easiest approach for simple shapes, as explained in this tutorial video.
▶ Method 2: Layer Mask from a Selection
For more control, use the Rectangular or Elliptical Marquee Tool (M) to select the area you want to keep on that layer. Then click the Add Layer Mask icon at the bottom of the Layers panel. Everything outside the selection is hidden — but not deleted.
This method, detailed in Lenscraft’s guide, lets you refine the mask later with a soft brush if the edges need to blend. It is non-destructive, so you can always go back and adjust.
Which method should you choose? Use the Frame Tool when you need a quick rectangular or elliptical crop on a single layer — it is the fastest path. Use the Marquee + Layer Mask approach when you may need to soften edges, paint adjustments, or later change what area is visible.
For users who frequently isolate subjects and export them, a plugin like Layerbench can streamline the workflow further — it runs subject selection, creates a mask, and exports a transparent PNG in a single action, which can be useful when cropping out a subject to its own layer.
How to Crop to Exact Dimensions and Straighten Images
When you need a specific pixel size — for a web banner, a social media graphic, or a print layout — you can enter exact values before cropping. The Wesleyan University tutorial demonstrates this workflow with real-world layout specs.
How to Enter Exact Pixel Dimensions Before Cropping
- Select the Crop Tool (
C). - Enter your values in the Width and Height fields in the options bar. For example, type
1200 pxin Width and375 pxin Height for a single-photo banner. - Drag the crop box on the canvas — it will snap to the aspect ratio you entered. You can reposition the box by dragging inside it, but its proportions are locked.
- Press
Enterto apply. The image is now exactly 1200×375 pixels.
Here are some commonly used web layout dimensions:
| Use Case | Pixel Dimensions | Source |
|---|---|---|
| Single-photo banner | 1200 × 375 px | Wesleyan University |
| Smaller banner | 600 × 189 px | Wesleyan University |
| Gallery image | 500 × 350 px | Wesleyan University |
How to Use the Straighten Tool
A crooked horizon is one of the fastest ways to make a photo look unprofessional. The Crop Tool includes a dedicated Straighten feature that corrects the rotation and crops in one step.
- Select the Crop Tool (
C). - Click the Straighten button in the options bar (it looks like a small level).
- Draw a line along what should be the horizontal or vertical axis — for example, drag along the horizon in a landscape photo or along the edge of a building. As you draw, a thin line appears.
- Release the mouse. Photoshop automatically rotates the image and adjusts the crop border to remove the rotated corners. Press
Enterto apply.
This tool is described in detail on Lenscraft’s guide and works reliably for horizons, architectural verticals, and any image with a clear reference line.
Troubleshooting Common Crop Tool Problems
Even experienced users occasionally run into issues where the Crop Tool behaves unexpectedly. Here is the most common problem and its fix, drawn from Adobe Community reports.
⚠ Problem: Crop tool is greyed out or the image disappears
This usually happens when leftover values are still sitting in the Width, Height, or Resolution fields in the options bar — for example, from a previous crop where you entered specific numbers. The tool tries to apply those old constraints and the preview breaks.
Fix: Click the Clear button in the options bar (it is located next to the Resolution field). This removes all stored values and resets the Crop Tool to its default free-form mode. The image will reappear and the handles will work normally again. You can also press
Escapeto cancel the current crop and start fresh.
Another important check: if the Crop Tool is entirely greyed out in the toolbar, the active layer may be locked. Unlock it by clicking the lock icon in the Layers panel, then try again. The tool works on any unlocked layer or on the Background layer as long as it is not fully locked.
How to Use Composition Overlays and Modifier Keys
The Crop Tool includes visual guides that help you apply classic composition rules while cropping. These overlays are described in Lenscraft’s tutorial and can be switched on the fly.
Choosing a Composition Overlay
When the Crop Tool is active, look for the Overlay menu in the options bar (it may show a grid icon). Click it to choose from:
- Rule of Thirds (3×3 grid) — the default overlay. Helps align key elements along the grid lines or at their intersections.
- Golden Spiral — a spiral guide based on the golden ratio, useful for leading the viewer’s eye through the image.
- Grid, Diagonal, and Triangle overlays for other compositional needs.
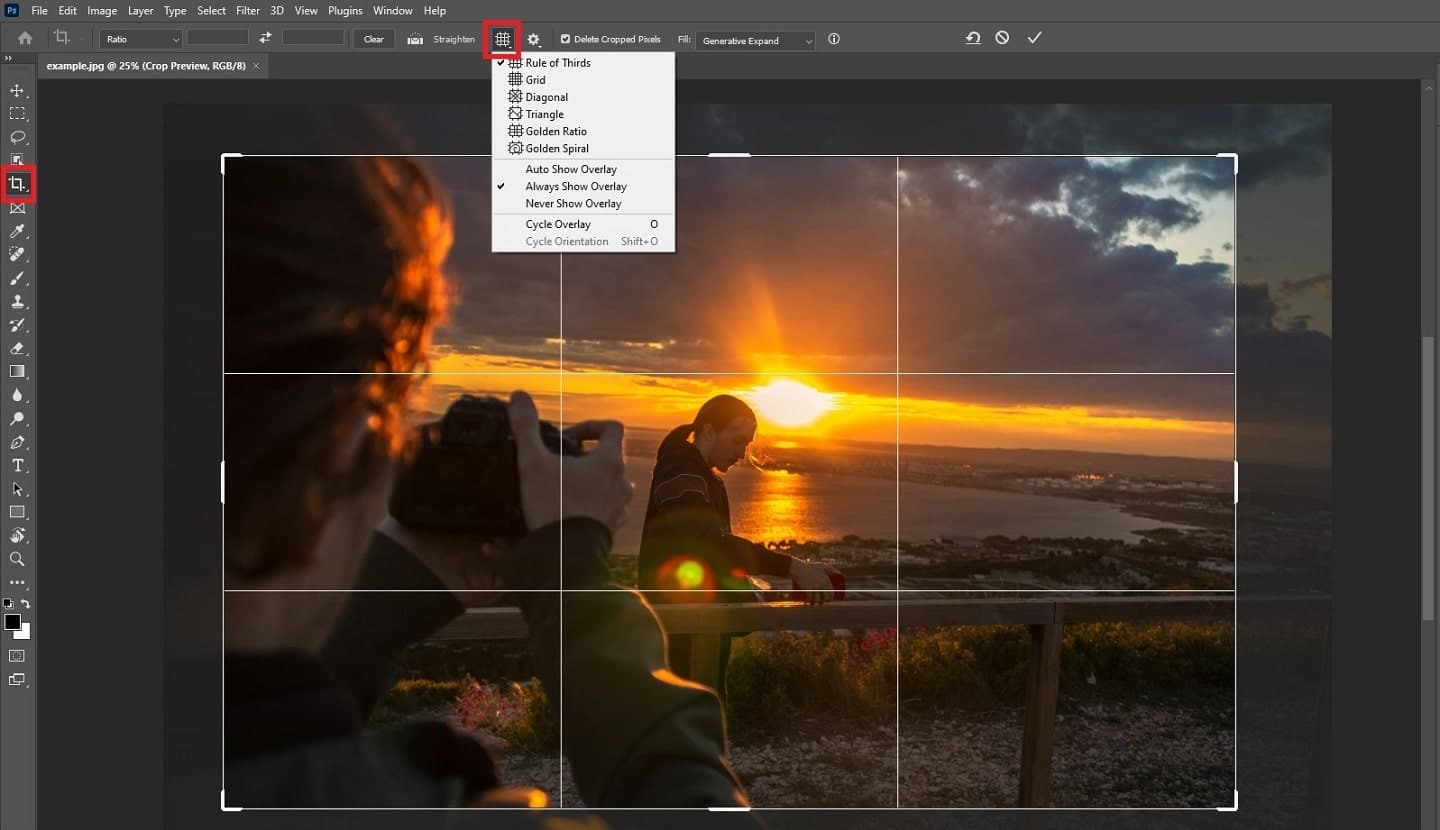
The Rule of Thirds overlay helps you position key subjects along the grid lines for a balanced composition.
Modifier Keys for Precision Cropping
While dragging the crop handles, two modifier keys give you additional control:
Shift — Hold Shift while dragging a corner handle to maintain the original aspect ratio of the image.
Alt (Option) — Hold Alt (Windows) or Option (macOS) to resize the crop border symmetrically from the center.
You can combine both: Shift + Alt drags from the center while keeping the aspect ratio locked — useful for quickly centering the crop on a subject.
Pro Tips for Non-Destructive and Power-User Cropping
Once you are comfortable with the basics, these advanced practices help you work more flexibly and preserve your original image data for future edits.
Keep Hidden Pixels for Future Edits
By default, Photoshop permanently discards the pixels outside your crop border. Lenscraft’s guide highlights a better approach for important work: uncheck the Delete Cropped Pixels box in the options bar before you commit the crop. When this option is off, the cropped areas are merely hidden — you can later re-crop to reveal them or even reposition the image within the same crop boundary.
This is especially valuable when you are exploring different framing options. You can crop tightly, decide later that you need more context, and simply re-enter the Crop Tool to adjust the border outward again.
★ Power User Tip
Julieanne Kost, Adobe’s Principal Digital Imaging Evangelist, covers dozens of advanced cropping workflows in her dedicated tutorial. She demonstrates how to use specific sizes and aspect ratios for different output formats, how to crop with Smart Objects for total flexibility, and how to combine the Crop Tool with Content-Aware Fill to extend canvas areas seamlessly. It is a worthwhile watch for anyone who crops images regularly.
Another pro-level technique: convert your layer to a Smart Object before cropping. Right-click the layer in the Layers panel and choose Convert to Smart Object. Then crop as usual. Because the layer is a Smart Object, the crop is applied as a non-destructive mask, and you can double-click the Smart Object thumbnail to edit the original content at any time. This combines the convenience of the standard Crop Tool with the safety of a fully reversible workflow.