- Category:
- Workflow Tips
- Summary:
- Quick Comparison: Which Matting Tool Should You Use
The short answer Go to Layer → Matting → Defringe, enter a pixel width (1–3 px typical), and click OK. Works only on an isolated pixel layer, not on a mask or a flattened image. If you see vertical streaks or no effect at all, jump to the troubleshooting section below.
Quick Comparison: Which Matting Tool Should You Use?
Before you reach for Defringe, it helps to know which of Photoshop's six matting methods matches your fringe type. The table below covers every option in Layer → Matting plus two powerful alternatives — Camera Raw Defringe and Select and Mask's Decontaminate Colors.

The Defringe dialog — enter a pixel width and Photoshop replaces fringe colours with neighbour averages.
| Tool | What it does | When to use | Key limitation |
|---|---|---|---|
| Defringe | Replaces fringe pixels with the average colour of neighbouring pixels | White or coloured halos on an isolated pixel layer after a selection | Does not work on masks; may create vertical streaks on anti-aliased edges |
| Remove White Matte | Contracts the edge inward and fills with the layer's own colours | White fringing around objects pasted onto a transparent background | Only affects white halos; can clip fine detail |
| Remove Black Matte | Same contraction logic for dark fringes | Black halos from dark-background extractions | Rarely needed; most composites produce white fringing |
| Camera Raw Defringe | Eyedropper-based removal of purple/green chromatic aberration | Lens-based colour fringing (CA), not selection halos | Only works on raster layers via Filter → Camera Raw Filter; not for selection edges |
| Select and Mask — Decontaminate Colors | Replaces fringe colours with the surrounding edge colours of the object | Complex edges (hair, fur) after the Select and Mask workspace | Outputs transparency; requires a new layer with mask |
| Dust & Scratches + Darken blend | Blurs the edge then darkens it via blend mode | White halos caused by over-sharpening, not selection edges | Destructive if applied directly; can blur edge detail |
Each method has a specific use case, and several can be combined. The rest of this article walks through Defringe first — then shows when to switch to another tool.
Prepare Your Layer for Defringe: What Works and What Doesn't
Defringe operates on pixel data — it reads the colour of edge pixels and replaces them with an average of their neighbours. That means it needs a real pixel layer, not a mask, not a Smart Object, and not a flattened background.
Isolate the object on its own layer
After making a selection, press <kbd>Ctrl+J</kbd> (Windows) or <kbd>Cmd+J</kbd> (macOS) to copy the selection onto a new layer. This is your isolated pixel layer. Defringe will now have access to the actual RGB values it needs to work.
Don't use Defringe on a layer mask
This is the single most common mistake. As the Photoshop Training Channel makes clear, Defringe is greyed out when a mask is selected because masks store transparency data, not colour data. If you need to defringe a masked object, apply the mask first (Layer → Layer Mask → Apply), then run Defringe on the resulting pixel layer.
Flattened images won't respond
A single Background layer is effectively flattened. Defringe needs the object separated from its background. Duplicate the Background layer (<kbd>Ctrl+J</kbd>) and work on the copy — or better, keep your composite layers separate until you're done refining edges. Forum discussions confirm that Defringe often appears to "do nothing" when the image hasn't been properly isolated.
⏱ Quick check Before running Defringe, look at the Layers panel. Is your object on its own layer? Is the layer highlighted (not a mask)? Is the layer a pixel layer (not a Smart Object)? If yes to all three, you're ready.
Apply Defringe Step by Step
When your layer is ready, the procedure itself takes only a few seconds. Here's the exact sequence for Photoshop CC (the path is identical in CS6 and later versions).
Access the command
With the isolated pixel layer selected, go to Layer → Matting → Defringe (official Adobe documentation).
Set the pixel width
Start with a width of 1 pixel. This is enough for most selection halos. If fringe remains, increase to 2 or 3 pixels. Small Business notes there is no documented maximum width — you can go higher, but values above 3–4 pixels often begin to soften legitimate edge detail.
Preview and adjust
Zoom to 200% on an area where the fringe was visible. If the halo is gone, you're done. If it's reduced but still there, reapply Defringe with a larger width. If you see new artifacts (vertical streaks), see the troubleshooting section below.
When to use this as a final step
In his Photoshop compositing workflow, Matt Kloskowski describes Defringe as "a must do for natural looking composites." Run it after you've placed your cutout onto the final background — it removes the last telltale glow that gives away a synthetic edge.
-
Select the isolated pixel layer
-
Layer → Matting → Defringe
-
Enter width 1–3 px
-
Click OK and inspect at 200%
-
Re-apply with a larger width if fringe persists
Troubleshoot Common Defringe Problems
Defringe is simple when it works, but real-world composites throw up several recurring issues. Here's what causes each one and how to fix it.
“Why Does Defringe Create Vertical Lines?”
This is the most-reported problem. Adobe Community reports describe vertical streaks appearing after a 1-pixel Defringe on manually created selections. The cause is an anti-aliased selection edge: Photoshop samples neighbouring pixels that include both foreground and background colours, and on near-vertical edges this produces a streak.
Fix: Use a width of 2 pixels instead of 1. If streaks persist, apply a 1-pixel Minimum filter to the layer mask before running Defringe (Filter → Other → Minimum). For Photoshop CS6 users, a known bug causes vertical lines even with wider settings — in that case, skip Defringe entirely and use Remove White Matte or the Dust & Scratches + Darken workaround described below.
⚠️ CS6 users Vertical lines on Defringe are a documented issue in Photoshop CS6 (v.13.06). If you're on that version, use Remove White Matte or Dust & Scratches instead.
“Defringe Does Nothing — Even at Width 30”
If Defringe has no visible effect at any width, the layer likely isn't isolated, or the fringe isn't a selection halo. Check:
-
The object is on its own pixel layer (not a mask, not the Background).
-
The fringe is caused by over-sharpening, not by the selection edge. Photoshop Gurus forum users found that sharpening halos don't respond to Defringe — they require the Dust & Scratches + Darken method.
“Green Haze Remains After Channel Extraction”
Channel-based extractions (especially from green-screen or blue-screen footage) can leave a coloured haze that Defringe won't touch. Forum experts recommend using Select and Mask with Decontaminate Colors enabled, or re-selecting the object with the Pen Tool for a cleaner edge.
“Can I Defringe Multiple Layers at Once?”
No — Defringe works on one layer at a time. To batch-process, record a Photoshop Action: start recording, run Defringe with your preferred width, stop recording, then use File → Automate → Batch to apply the action to multiple layers or files.
Defringe vs. Remove White Matte vs. Camera Raw Defringe: Which One for Which Fringe?
Each matting tool targets a specific kind of fringe. Choosing the wrong one wastes time and can damage edge detail. Here's how to decide.
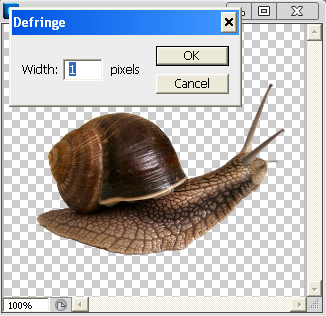
Defringe works well on objects with a transparent background — the checkerboard pattern makes fringe easy to spot.
Remove White Matte
Best for white halos around objects that were pasted from a selection. It contracts the edge inward slightly and replaces white fringe with the layer's own colours. Photoshop Gurus suggests using it when Defringe creates artifacts — it's gentler and doesn't produce vertical streaks.
Remove Black Matte
The same logic as Remove White Matte, but for dark fringes. Useful if you extracted an object from a black background and see a dark edge. Rarely needed in typical compositing.
Camera Raw Defringe
This is not a selection-edge tool. Adobe Community experts emphasise that Camera Raw Defringe corrects chromatic aberration — the purple or green fringing caused by lens optics. Apply it via Filter → Camera Raw Filter → Optics → Defringe and use the eyedropper to sample the coloured fringe. It won't help with white selection halos.
Select and Mask — Decontaminate Colors
The go-to for hair, fur, and complex edges. After running Select and Mask, tick Decontaminate Colors and output to a new layer with a layer mask. This replaces fringe colours with the object's own edge colours, often eliminating the need for a separate Defringe pass.
Combine Defringe with Edge Decontamination and Dust & Scratches
For stubborn fringing, layering multiple methods almost always yields a cleaner edge than any single tool.
For over-sharpening halos
White halos that come from sharpening (not from selection) need a different approach. Forum-tested workflow:
-
Duplicate the layer.
-
Apply Filter → Noise → Dust & Scratches with a radius of 2–3 pixels.
-
Set the duplicate layer's blend mode to Darken.
-
If the halo is reduced but the edge looks soft, reduce the layer's opacity to balance.
This works because the Darken blend mode only affects pixels lighter than the layer below — the white halo gets replaced, while the correct edge pixels remain untouched.
For hair and fur
After using Select and Mask with Decontaminate Colors and outputting to a new layer, apply Defringe with a width of 1–2 pixels. Then soften the layer mask edge with Filter → Blur → Gaussian Blur at 0.5 pixels. This two-pass approach removes halos while keeping the natural softness of hair edges.
🧵 Pro tip For extremely fine hair, skip Defringe entirely and rely on Decontaminate Colors alone — Defringe's averaging can blur individual strands when the fringe is very thin.
When Defringe Won't Work: Limitations and Version-Specific Issues
Defringe is a specialised tool with clear boundaries. Knowing where it stops working saves you from chasing a fix that doesn't exist.
It does not work on layer masks
As noted earlier, Defringe requires a pixel layer. Photoshop Training Channel states this explicitly: "Defringe does not work on masks." If you need to defringe a mask, apply it first.
Not for chromatic aberration
Adobe Community clarifies that Defringe and Camera Raw Defringe are two different features. Selection halos (white, grey, coloured by background) are Defringe's domain. Purple/green fringing from lens optics belongs to Camera Raw Filter.
Fails on flattened images
A single Background layer that has never been separated gives Defringe no isolated edge to work on. Duplicate the layer first, or keep your composite layers separate from the start.
CS6 vertical-line bug
Photoshop CS6 (v.13.06) has a known issue where Defringe produces vertical lines regardless of width settings. Adobe Community #7 users report this consistently. The workaround is to use Remove White Matte or the Dust & Scratches + Darken method instead.
📌 Bottom line Defringe is a quick, effective fix for selection halos on isolated pixel layers. When it falls short — vertical lines, no effect, coloured haze, or chromatic aberration — the alternatives above will get you a clean edge. For any fringe that remains after all these methods, manual cleanup with the Clone Stamp or Healing Brush is the final fallback.