- Category:
- Workflow Tips
- Summary:
- What's the Difference Between Export and Save As in Photoshop
Exporting flattens your work for web or print. Save As preserves layers for editing. This guide covers static bitmap exports only.
Quick reference
-
Web: File → Export → Export As → JPEG (photo) or PNG (graphic)
-
Print: File → Save As → TIFF (lossless, layered) or use Export As with sRGB conversion
-
Layer: Right‑click layer → Quick Export as PNG
-
One‑click: Set preferences at Edit → Preferences → Export (Win) / Photoshop → Preferences → Export (Mac)
What's the Difference Between Export and Save As in Photoshop?
Photoshop offers two fundamentally different ways to output a file. Save As (File → Save As) preserves every layer, alpha channel, spot color, and embedded color profile — it is the right choice when you need to keep the document fully editable in PSD, PSB, or TIFF format. Adobe's documentation confirms that Save As maintains all structural data.
Save a Copy (File → Save a Copy) creates a flattened copy without altering your original document. It is useful when you want a quick JPEG or PNG snapshot of your current canvas without touching the working PSD.
Export (File → Export → Export As, or the Quick Export command) flattens the image and, by default, strips metadata such as EXIF camera data and color profiles to reduce file size. As experienced users on Reddit note, Export As is designed for web-ready output where a small footprint matters more than editable structure.
Rule of thumb: Use Save As for anything you will edit again. Use Export for anything going to a client, a browser, or social media.

The Photoshop File menu with Export options including Save for Web (Legacy) and Export As.
How Do I Export a Single Layer as a Transparent PNG?
Exporting a single layer with a transparent background is one of the most common tasks in Photoshop. The quickest method:
-
In the Layers panel, select the layer you want to export.
-
Right-click the selected layer and choose Quick Export as PNG.
-
Photoshop prompts you for a save location (unless you have set a default folder in Preferences). The result is a PNG file with transparency preserved.
If you need more control over size, color space, or metadata, use File → Export → Export As instead. In the dialog, choose PNG from the Format dropdown and ensure Transparency is checked. Adobe's Quick Export documentation covers every preference option in detail.
PNG uses lossless compression, making it ideal for logos, UI elements, illustrations, and any image with sharp edges or text. As noted by the Photoshop community, PNG files will be noticeably larger than JPEGs for photographic content, but every pixel remains exact.
Tip — batch layer export Select multiple layers in the Layers panel, then right-click any selected layer and choose Quick Export as PNG. Photoshop exports each layer as a separate PNG file automatically.
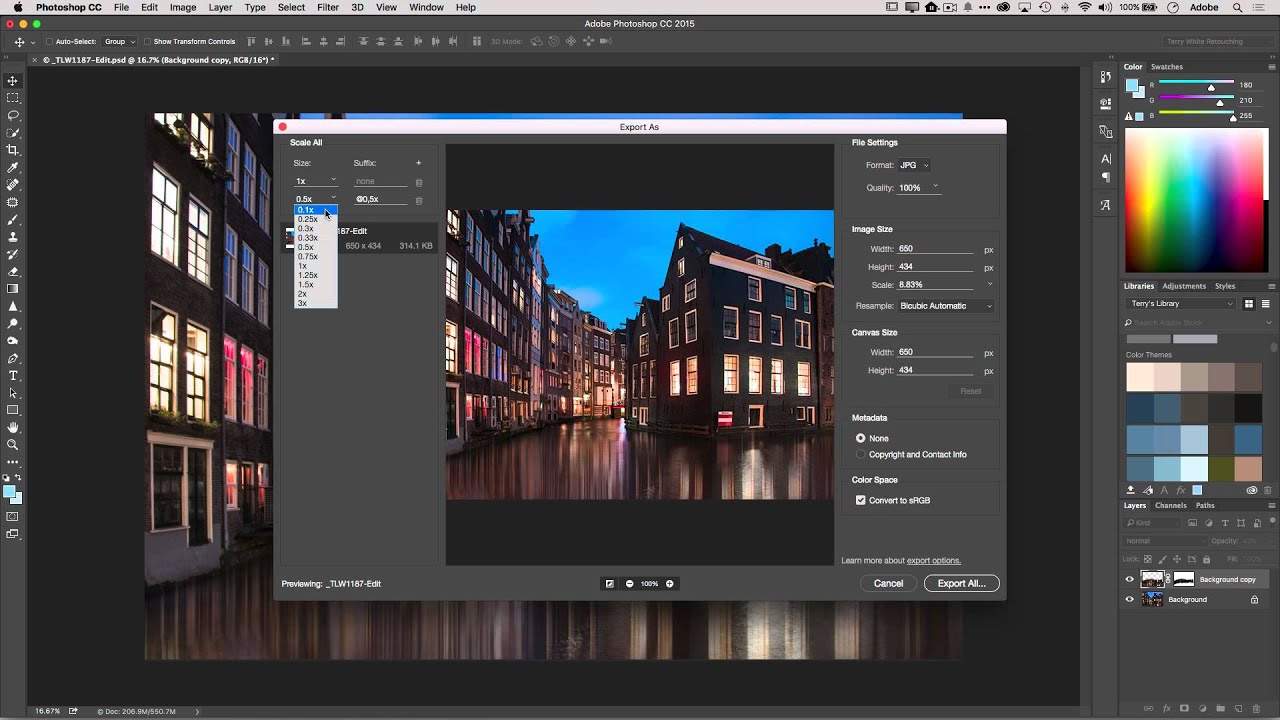
The Export As dialog showing PNG format selection, transparency checkbox, and image scaling options.
Which File Format Should I Use for My Export?
Each format makes different trade-offs between quality, file size, compatibility, and feature support. The table below summarises the key differences.
| Format | Compression | Transparency | Best For | Relative Size |
|---|---|---|---|---|
| JPEG | Lossy | No | Photos, gradients, web images | Small–medium |
| PNG | Lossless | Yes | Logos, text, UI, illustrations | Medium–large |
| TIFF | Lossless (LZW, ZIP) | Yes (via alpha) | Print, archival, editing workflows | Large |
| BMP | Uncompressed | No | Legacy applications | Very large |
JPEG – When to Use It
JPEG is the go-to format for photographs and images with continuous tones. Its lossy compression can produce excellent results at moderate file sizes. At 100% quality, the loss is imperceptible to most eyes, though the file remains technically lossy — as Reddit users have pointed out, "100%" minimises artifacts but does not eliminate them. JPEG does not support transparency.
PNG – When to Use It
PNG's lossless compression preserves every pixel exactly. It supports full transparency through an alpha channel. Use PNG for images with text, logos, screenshots, or any graphic that requires sharp edges. For photographic images, PNG files can be 3–5× larger than equivalent JPEGs.
TIFF – When to Use It
TIFF is the standard format for print and archival workflows. It supports lossless compression (LZW or ZIP) as well as layers, alpha channels, and spot colors when saved via Save As. When exported via Export As, the image is flattened. Experienced print professionals note that TIFF with LZW compression offers a good balance of size and editability.
BMP – A Rarely Used Option
BMP is an uncompressed format that produces very large files. It has no practical advantage for modern web or print workflows and is included primarily for backward compatibility with legacy software.
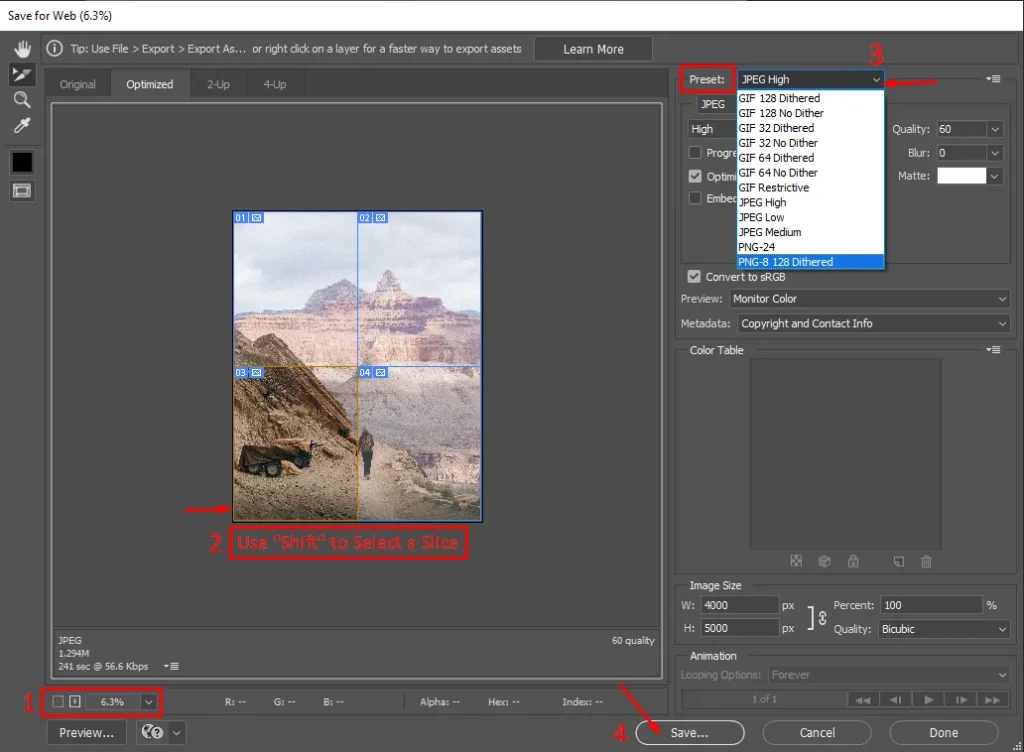
Side-by-side comparison available through the Save for Web dialog helps assess quality versus file size before exporting.
How Do I Set Up Quick Export for One-Click Exports?
Quick Export is designed for speed. Once configured, you can export an entire document or selected layers with a single click. To set it up:
-
Go to Edit → Preferences → Export (Windows) or Photoshop → Preferences → Export (macOS).
-
Choose your preferred format (PNG, JPG, or GIF) and, for JPG, set the quality level.
-
Under Color Space, select sRGB for web output; this ensures consistent colors across browsers.
-
Set metadata options — choose "None" for the smallest file size, or keep copyright/contact info as needed.
-
Decide the export location: Ask where to export each time gives you control; Export files to an assets folder next to the current document is faster for repeated exports.
-
Optionally check Use legacy 'Export As' if you prefer the older dialog interface.
Once preferences are saved, simply click File → Quick Export as [format] or right-click a layer and choose Quick Export as PNG. Adobe's official guide covers every option in full.
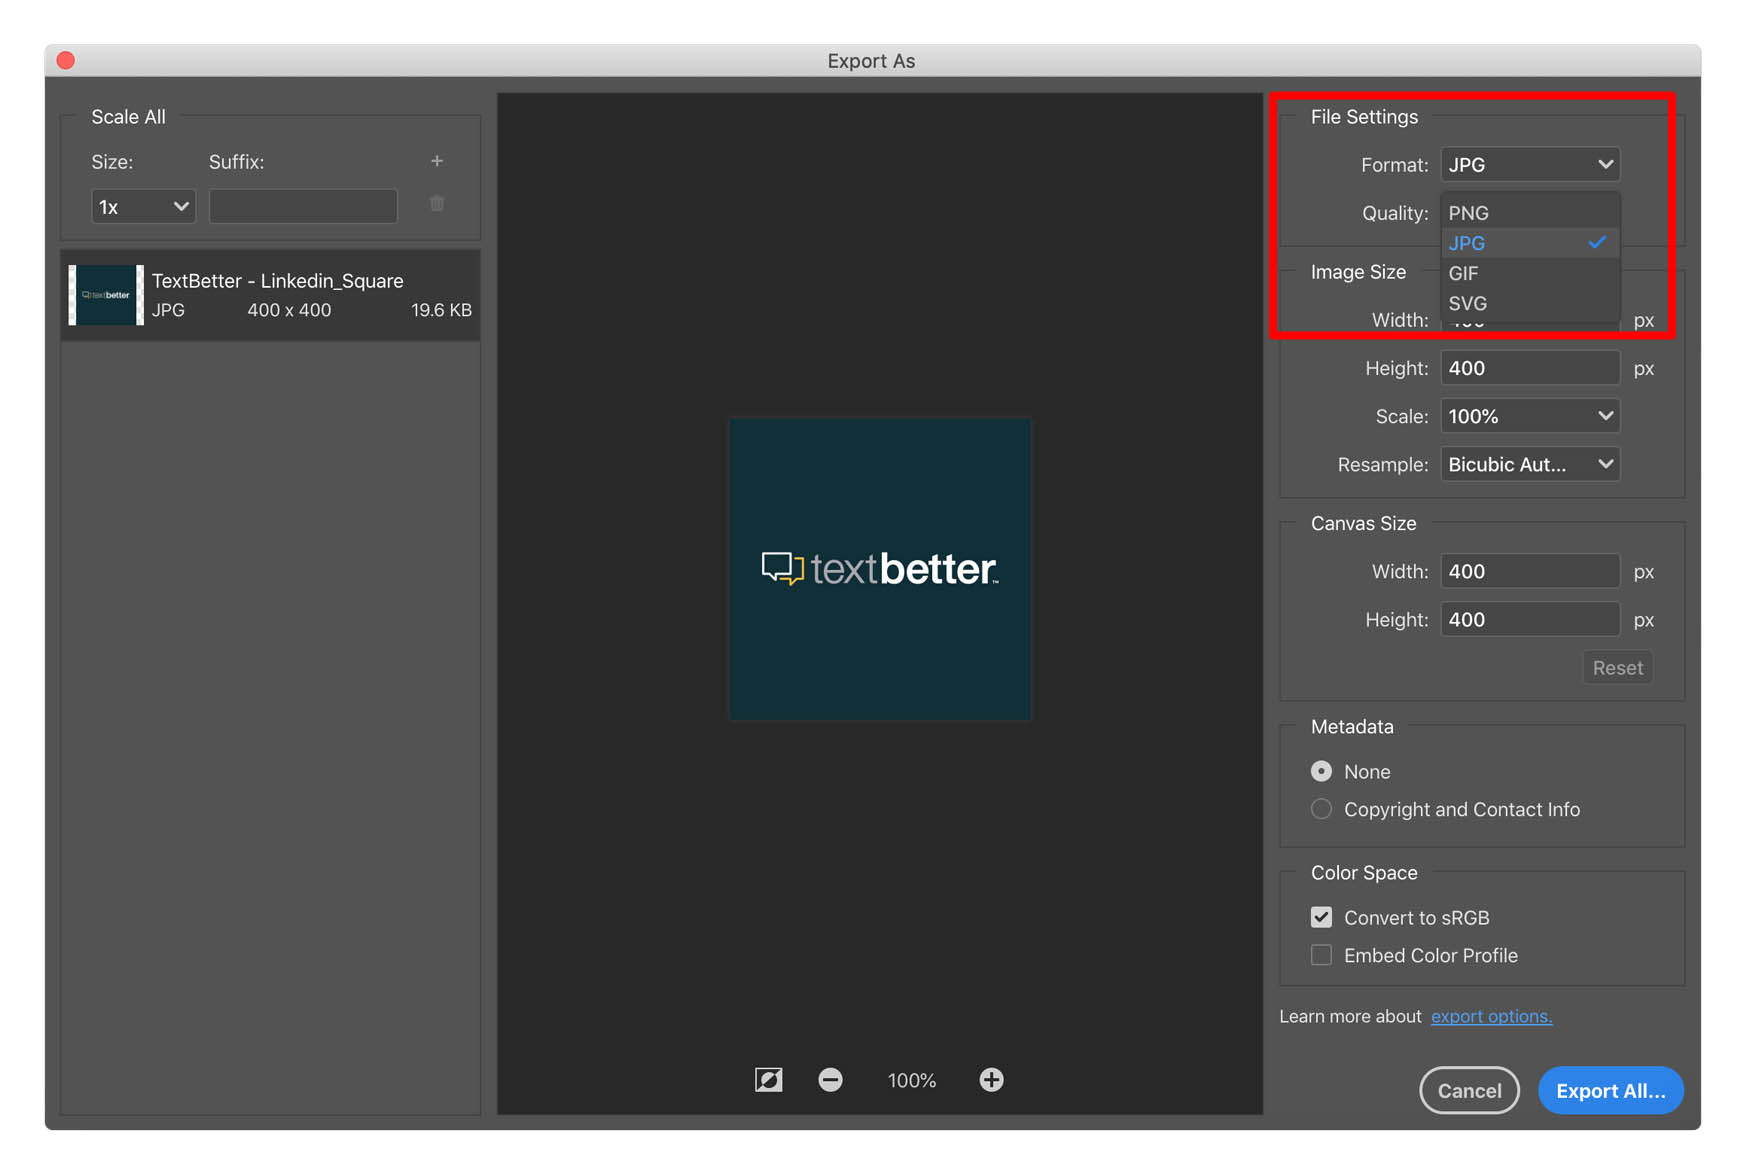
The Export As dialog with format, quality, and color space options clearly laid out.
How Can I Avoid Quality Loss When Exporting in Photoshop?
Quality loss during export usually falls into three categories: upscaling artifacts, color shifts, and compression damage. Each has a specific cause and a practical solution.
Understanding Quality Loss from Upscaling
When you increase an image's dimensions in the Export As dialog — say from 1000×1000 px to 2000×2000 px — you are asking Photoshop to invent 75% of the pixels. As one experienced Reddit user explains, the pixel area quadruples, and the missing data causes softening and blockiness. Always export at your source's native resolution. If you must upscale, do it externally with dedicated software or, as a last resort, apply the Dust & Scratches filter (covered in the final section of this guide).
⚠ Avoid upscaling in Export As Resizing inside the Export As dialog is convenient but almost always degrades quality. Keep a master file at your highest resolution and export at 100% scale.
The sRGB Rule for Consistent Colors
For web export, always check Convert to sRGB and Embed Color Profile in the Export As dialog. Regular contributors to the Photoshop subreddit emphasise that skipping these steps leads to washed-out or shifted colors on browsers that assume sRGB. For print, use Proof Colors (View → Proof Setup → Custom) to soft-proof your CMYK output before exporting.
Why JPEG 100% Is Still Lossy
The JPEG specification uses lossy compression at every quality level. At 100%, the quantization table is very fine, and the loss is usually invisible — but it is still there. As noted in the same Reddit discussion, if you need pixel-identical output, use PNG or TIFF instead of JPEG.
sRGB Embed profile PNG for precision
Why Can't I Export from Photoshop? Troubleshooting Common Errors
Export errors can stop a workflow cold. Here are the two most frequently reported issues and their fixes, drawn from Adobe Community threads and user reports.
"An Unknown Error Occurred" in Export As
This error (often triggered by the Shift+Ctrl+W shortcut) affected Photoshop versions 21.x on Windows. Adobe Community moderator Mohit Goyal confirmed that the fix shipped in Photoshop 22.1.1. Update to that version or later. The thread received over 61,000 views and 66 replies, indicating a widespread issue.
Source: Adobe Community (66 replies, 61,632 views)
Generic Export Pop-Up Errors
A Facebook user in the Graphic Designers Africa group reported a nondescript pop-up when exporting. Common causes include: corrupt preferences (reset by holding Ctrl+Alt+Shift on launch), a full scratch disk, or missing fonts linked to visible layers. Clearing disk space or increasing the scratch disk allocation in Preferences → Performance usually resolves it.
Source: Graphic Designers Africa (Facebook)
Workaround Using Legacy Export
If the modern Export As dialog continues to fail, enable Use legacy 'Export As' in the Quick Export Preferences panel. You can also access the older dialog directly via File → Export → Save for Web (Legacy). This alternative interface often bypasses bugs present in the newer Export As engine.
Note on version compatibility The legacy "Save for Web" dialog lacks some modern features (such as artboard export and responsive sizing) but remains a reliable fallback.
How Do I Batch Export Multiple Images from Photoshop?
When you need to export several files at once, Photoshop provides two efficient workflows depending on whether your source is a set of open documents or a single layered file.
Multiple open documents: Use File → Scripts → Image Processor. This built-in tool lets you select a folder of images (or work on all open files), choose a destination folder, and set format, quality, and size options for all files at once.
Multiple layers in one document: Select the layers you want to export in the Layers panel, then right-click any selected layer and choose Quick Export as PNG. Photoshop exports each layer as a separate file, naming them after the layer names. This feature is part of the Quick Export workflow and is ideal for exporting app icons, UI elements, or sprite sheets.
For temporary duplicates, use Image → Duplicate to create a copy of the current document, then export the copy — the original remains untouched. Adobe's Save documentation also covers using History snapshots as a non-destructive fallback.
What's the Print Professional's Hack for Upscaled Images? Dust & Scratches
When you have no choice but to upscale a low-resolution image — a client sends you a 500×500 px logo and you need it at 2000×2000 px — a less‑known workaround comes from the print industry. After resizing the image to the target dimensions, apply Filter → Noise → Dust & Scratches. Experienced print professionals on Reddit recommend this as a "fast and dirty" fix: it smooths the blocky artifacts that upscaling introduces.
Use a small radius (1–3 px) and a threshold low enough to preserve edge detail. The filter works by blurring stray pixels into their surroundings, which reduces the harsh staircase effect on diagonal lines.
⚠ Workaround, not best practice Dust & Scratches is a rescue technique, not a replacement for working from a high-resolution source. Dedicated upscaling tools (such as Super Resolution or third-party AI upscalers) produce measurably better results. Use this hack only when you cannot reacquire the original.
All trademarks and copyrighted content referenced in this article belong to their respective owners. Brief excerpts are used under fair use (17 U.S.C. § 107) for commentary and informational reporting.