- Category:
- Workflow Tips
- Summary:
- Feathering softens selection edges by fading between foreground and background pixels
The short answer: Feathering softens selection edges by fading between foreground and background pixels. Photoshop has no single dedicated feather tool — you apply the effect to a selection or a layer mask. The five methods below range from the classic <kbd>Shift+F6</kbd> command (fast, destructive) to layer-mask feathering (flexible, non‑destructive). Pick the one that fits your workflow; the layer-mask approach is widely regarded as the most versatile for compositing work.
📖 Official Adobe documentation on feathering
Feather the Edges of Any Selection Using These 5 Methods
Each method below works with any selection — a marquee, a lasso, a saved alpha channel, or a layer's transparency. Choose based on whether you need editability after applying, a live preview, or a quick one‑off result.
destructive Feather With the Classic Select > Modify > Feather Command
Shortcut: <kbd>Shift+F6</kbd> — works identically on macOS and Windows.
-
Make a selection using any tool (Marquee, Lasso, Quick Selection, etc.).
-
Go to
Select > Modify > Featheror press <kbd>Shift+F6</kbd>. -
Enter a radius between 0 and 250 px. Start with 0.5–2 px for a subtle fade; use 5–20 px for a wide, soft edge.
-
Click OK — the selection marching ants now represent the feathered area.
⚠️ Destructive — no undo past this step. Once you apply the command, the selection edge is permanently blurred. You can step back with <kbd>Ctrl+Z</kbd> / <kbd>Cmd+Z</kbd> or via the History panel, but you cannot later adjust the feather radius. For editable workflows, use the layer-mask method below.
Source: Adobe's official feathering page documents the 0–250 px range and the recommended starting values.
non‑destructive Feather With a Layer Mask and the Properties Panel
Best for: compositing, Smart Objects, and any project where you may need to tweak the edge later.
- <kbd>Ctrl</kbd>‑click (macOS: <kbd>Cmd</kbd>‑click) the layer thumbnail to load its transparency as a selection.
- Click the Add layer mask icon (circle in a rectangle) at the bottom of the Layers panel.
- Open the Mask Properties panel:
Window > Properties. - Drag the Feather slider (range 0–100 px). The mask edge softens in real time.
- Optionally adjust Density (mask opacity) and Shift Edge (contract/expand the mask boundary).
💡 Why this is the go‑to method: The feather lives on the mask — it never touches the original pixels. You can revisit the slider at any time, delete the mask and start over, or paint on the mask with black/white to refine specific areas.
This workflow is detailed in the Adobe Community thread on feathering layer edges and is widely adopted by experienced compositors.
live preview Feather With the Select and Mask Workspace
Shortcut: With an active selection, click Select and Mask in the Options bar, or go to Select > Select and Mask.
- With a selection active, open Select and Mask.
- In the Properties panel on the right, locate the Feather slider.
- Adjust it while viewing the edge against your chosen background mode (Onion Skin, Black, White, etc.).
- Under Output Settings, choose Layer Mask or New Layer with Layer Mask for a non‑destructive result.
- Click OK.
⚠️ Known bug in some CC 2024 versions: The feather preview shows correctly but the effect disappears after clicking OK. If this happens, switch to the Layer Mask + Properties method (Method 2) — it achieves the same result without the bug. See the Adobe Community bug report.
Adobe's documentation covers Select and Mask as a primary feathering workflow.
live preview Feather With Quick Mask Mode and Gaussian Blur
Shortcut: Press <kbd>Q</kbd> to enter Quick Mask mode (works on both macOS and Windows).
-
Make a selection, then press <kbd>Q</kbd> — the unselected area appears as a red overlay (the Quick Mask).
-
Go to
Filter > Blur > Gaussian Blur. -
Adjust the Radius to blur the mask edge — this is your feather amount. The preview updates live on the canvas.
-
Click OK, then press <kbd>Q</kbd> again to exit Quick Mask. The marching ants now reflect the feathered selection.
💡 Full‑screen preview advantage: Unlike the
Select > Modify > Featherdialog, Quick Mask lets you see the feather effect across the entire image before committing. It is especially useful when you are feathering a large area and want to judge the transition by eye.
This technique is explained step‑by‑step on Photoshop Essentials.
Keyboard Shortcuts and Version Differences
Knowing the shortcuts and version boundaries saves time and prevents confusion:
- <kbd>Shift+F6</kbd> — opens the Feather Selection dialog (all CC versions, also in Photoshop Elements with minor UI differences).
- <kbd>Q</kbd> — toggles Quick Mask mode (identical behaviour on macOS and Windows).
- Select and Mask was introduced in Photoshop CC 2015.3. The Feather slider in the Mask Properties panel caps at 100 px (per the Options bar range) while the classic command allows up to 250 px.
- Layer mask feathering works in every version that supports adjustment layers (CS4 onward).
Adobe's official documentation confirms the 0–100 px (Options bar) and 0–250 px (Feather command) ranges.
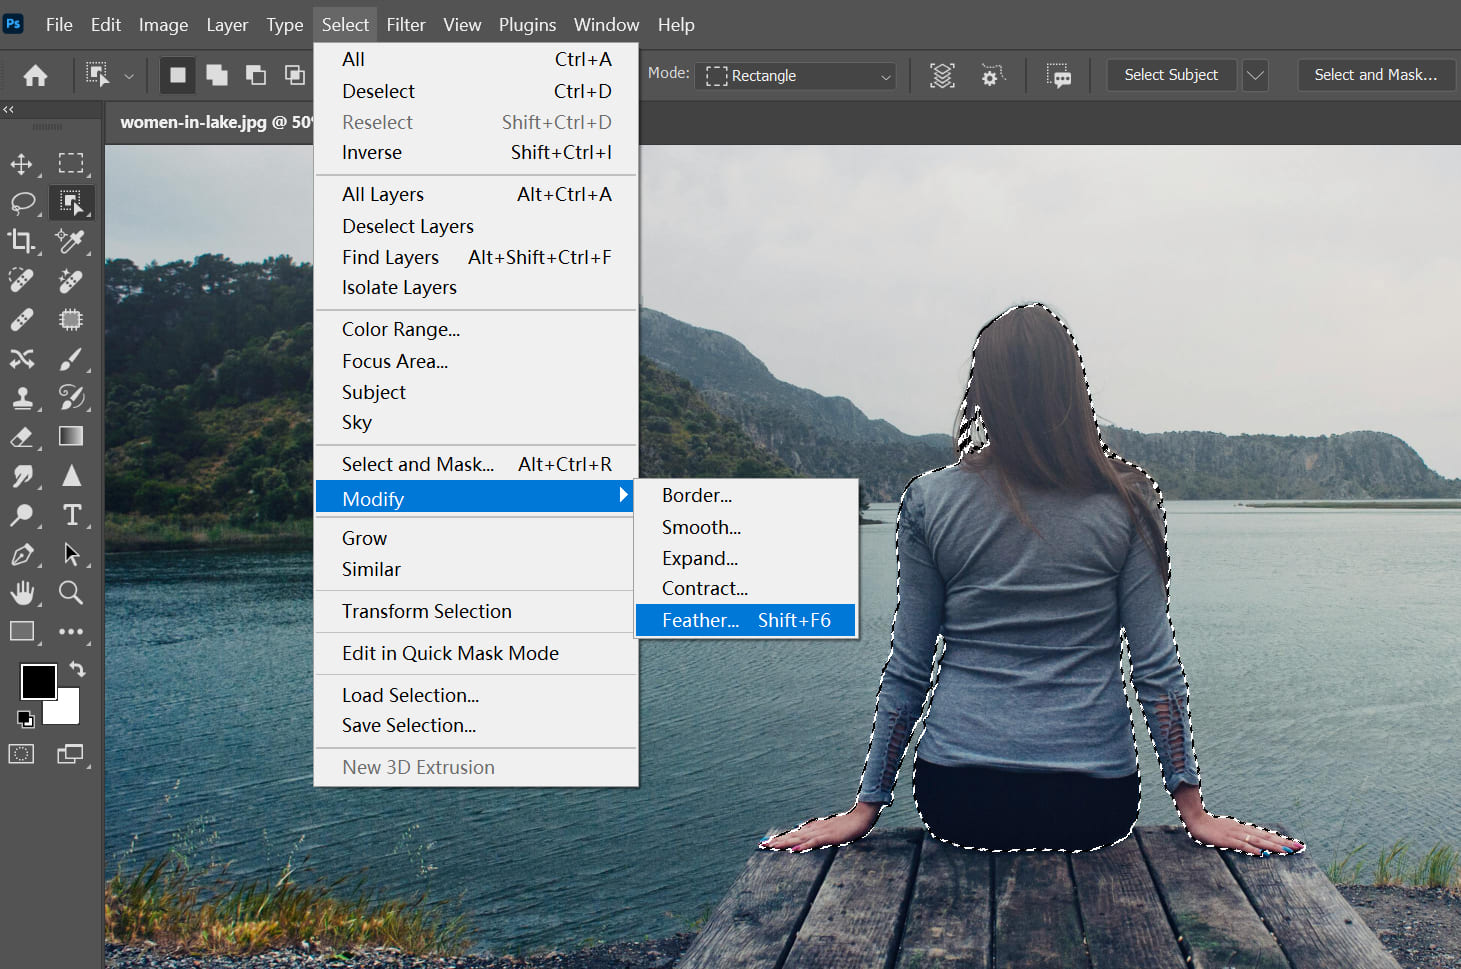
The classic Feather command lives under Select > Modify > Feather (<kbd>Shift+F6</kbd>).
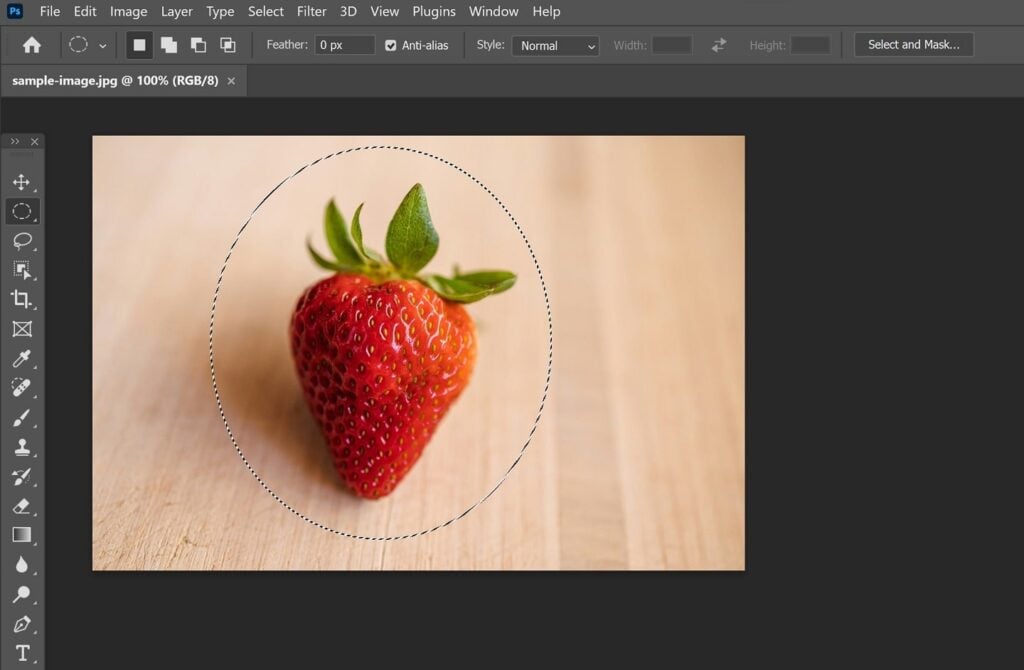
Load the layer's transparency via <kbd>Ctrl+click</kbd> (macOS: <kbd>Cmd+click</kbd>) to feather it as a mask.
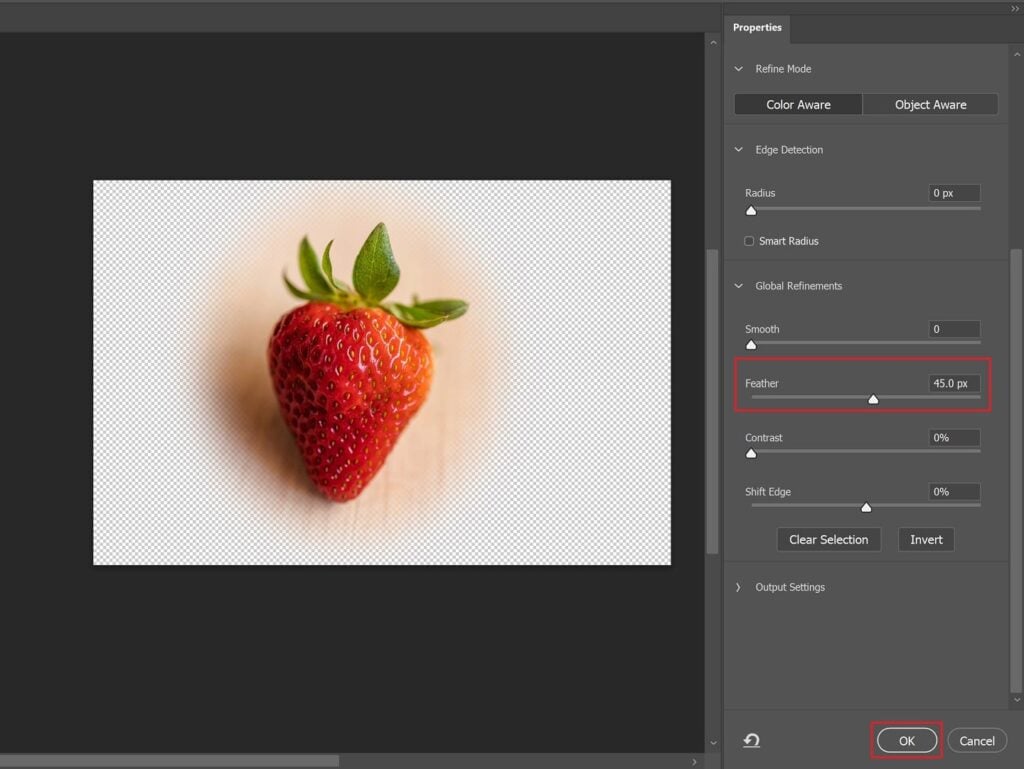
Select and Mask gives a live preview of the feather. Here the Feather slider is set to 45 px.
Feather Only One Edge of an Image or Shape
The standard Feather command affects the entire selection boundary. To soften just one side — a common request — you need a different approach.
Solution 1 — Gradient on a Layer Mask (Recommended)
-
Add a layer mask to your layer (Layer > Layer Mask > Reveal All).
-
Select the Gradient tool (shortcut <kbd>G</kbd>). Set it to Black to White, Linear.
-
Drag from the side you want transparent (black end) toward the side you want opaque (white end). The gradient transition creates a one‑sided feather.
-
Refine by dragging again or adjusting the mask with a soft brush.
This is the most reliable method, confirmed by users on Reddit's Photoshop community and the Adobe Community forum.
Solution 2 — Blur Tool on a Workpath
- Create a workpath along the single edge using the Pen tool.
- Select a soft brush, then use the Stroke Path with Brush feature (right‑click the path > Stroke Path > Brush).
- Apply a Gaussian Blur to the brushed area to feather that edge alone.
Less precise than the gradient mask, but useful when you need to feather an irregular single edge.
💡 Selection‑based fade: Use the Rectangular Marquee to select only the region you want to fade, then apply a layer mask with feather. Constrain the mask's effect to that selection.
Feather the Edges of a Smart Object Without Rasterizing
Smart Object pixels are not directly editable, so Select > Modify > Feather appears greyed out when the layer is active. The fix is straightforward.
Workaround: Layer Mask on the Smart Object
-
<kbd>Ctrl</kbd>‑click (macOS: <kbd>Cmd</kbd>‑click) the Smart Object's layer thumbnail to load its transparency as a selection.
-
Click the Add layer mask button.
-
In the Mask Properties panel, adjust the Feather slider — this feathers the mask, not the Smart Object's pixels.
-
The Smart Object remains fully editable. Double‑click its thumbnail to edit the source file; the mask updates automatically.
⚠️ Avoid rasterizing unless necessary.
Layer > Rasterize > Smart Objectmakes the pixels editable but destroys the Smart Object's editability. Only rasterize if you are certain the content is final.
This approach is widely shared in Reddit workflows (context from this thread) and Adobe Community discussions.
Fix Common Feathering Problems and Errors
Real‑world Photoshop work throws up the same handful of frustration points. Here is how each one is resolved.
❌ “No pixels are more than 50% selected”
The feather radius is larger than the selection area. Fix: Reduce the radius, or better — ignore the error and apply the feather via a layer mask (the mask has no such limitation and will still work).
❌ Feather preview disappears after OK in Select and Mask
Known bug in certain CC 2024 versions. Fix: Use the Layer Mask + Properties panel method instead. If already applied, delete the output mask and recreate using Method 2.
❌ Feathered edges look harsh when printed
The feather may not be rendering on screen. Fix: Open the Channels panel and inspect the mask channel — it should show a smooth gradient. If it is stepped, increase the feather radius. Also verify your document colour mode and printer profile.
❌ “How do I remove feathering after applying it?”
If you used Select > Modify > Feather (destructive), undo with <kbd>Ctrl+Z</kbd> or step back in the History panel. If you used a layer mask, delete the mask or set the Feather slider back to 0. For permanent feathering, try Layer > Matting > Defringe to shave off semi‑transparent pixels (source: Adobe.com).
❌ “How do I make feathered edges sharp again?”
This reflects a misunderstanding — feathering is what makes edges soft. To revert, remove the feather entirely (see above). You cannot have both a feathered edge and a sharp edge simultaneously.
❌ “I cannot fade the edges of an image to save my life”
Many beginners expect a dedicated “feather tool” — there isn't one. Feathering is always applied to a selection or a mask. Ensure you have an active selection (marching ants) or a selected mask layer, then adjust the feather.
Additional community‑reported issues are documented in this Adobe Community thread and this bug report.
Use Feathering for Advanced Compositing and Effects
Beyond basic edge softening, feathering unlocks several powerful compositing techniques:
Feather + Blend‑If for Hair, Fire, and Smoke
After feathering the mask, open Layer Style (Layer > Layer Style > Blending Options) and adjust the Blend‑If sliders. Drag the “This Layer” and “Underlying Layer” sliders to let the background show through based on brightness — this removes faint halos that a feathered mask alone leaves behind. The technique is especially effective for translucent subjects like smoke, fire, or wispy hair.
Soft Vignette With Elliptical Marquee
- Select the Elliptical Marquee tool.
- Draw an ellipse around the centre of your image.
- Apply a large feather (150–250 px via
Select > Modify > Feather). - Invert the selection (<kbd>Shift+Ctrl+I</kbd> / <kbd>Shift+Cmd+I</kbd>).
- Add a Curves or Levels adjustment layer — the inverted, feathered selection becomes a mask that darkens the edges, creating a smooth vignette.
Soft Glow Effect
- Duplicate the subject layer.
- Load a selection of the subject (<kbd>Ctrl+click</kbd> / <kbd>Cmd+click</kbd> the layer thumbnail).
- Apply a heavy feather (30–60 px).
- Fill the selection with a colour (foreground colour or a sampled highlight).
- Set the duplicate layer to Screen or Overlay blend mode and adjust opacity to taste.
Choose the Right Feathering Method for Your Workflow
Each method has trade‑offs. The table below summarises them so you can pick the best fit for your current task.
| Method | Non‑destructive? | Live preview? | Best for |
|---|---|---|---|
Select > Modify > Feather |
✗ | ✗ | Quick one‑off selections, no need to edit later |
| Layer Mask + Properties | ✓ | ✓ | Any composite, especially Smart Objects and client files that may need revision |
| Select and Mask | ✓ | ✓ | Complex edges (hair, fur) — but watch for the known bug |
| Quick Mask + Gaussian Blur | ✓ | ✓ | Real‑time visual control, full‑canvas preview |
| Gradient on mask (single edge) | ✓ | ✓ | Feathering only one side of a layer or shape |
💡 Performance note: A heavily feathered mask increases file size because it creates many semi‑transparent pixels (source: Adobe.com). For very large print files, consider using a clipping mask or a vector mask where possible — they remain crisp and lightweight.
Next Step – Feather a Subject Into a New Background
This final exercise ties together the most common real‑world use case: selecting a subject, feathering the edge, and placing it onto a new background. Follow these steps to practise the non‑destructive, Quick Mask, and Properties‑panel workflows in a single session.
Practical Compositing Workflow
-
Select the subject using Quick Selection or
Select > Subject(Photoshop CC 2018+). -
Refine the edge with Quick Mask: Press <kbd>Q</kbd>, apply a small Gaussian Blur (1–2 px), then press <kbd>Q</kbd> again to exit.
-
Isolate the subject: Press <kbd>Ctrl+J</kbd> / <kbd>Cmd+J</kbd> to copy the feathered selection to a new layer.
-
Add a background layer below the subject layer — a solid colour, a gradient, or an image.
-
Check the edge: If the transition still looks sharp, add a layer mask to the subject layer and feather it by 0.5–1 px in the Properties panel.
-
For a realistic blend: Open Blend‑If in the Layer Style dialog and fine‑tune the “This Layer” and “Underlying Layer” sliders to match the lighting of your background.
-
Save as PSD to preserve the mask and the Smart Object (if any) for future edits.
This single exercise uses the layer-mask feather (Method 2), Quick Mask (Method 4), and Blend‑If — covering the three most versatile approaches from this guide.
All trademarks and product names belong to their respective owners. Adobe Photoshop is a registered trademark of Adobe Inc.