- Category:
- Workflow Tips
- Summary:
- Learn how to flip a layer in Photoshop on desktop and mobile using Edit > Transform or Free Transform, and avoid flipping the entire canvas.
The short answer
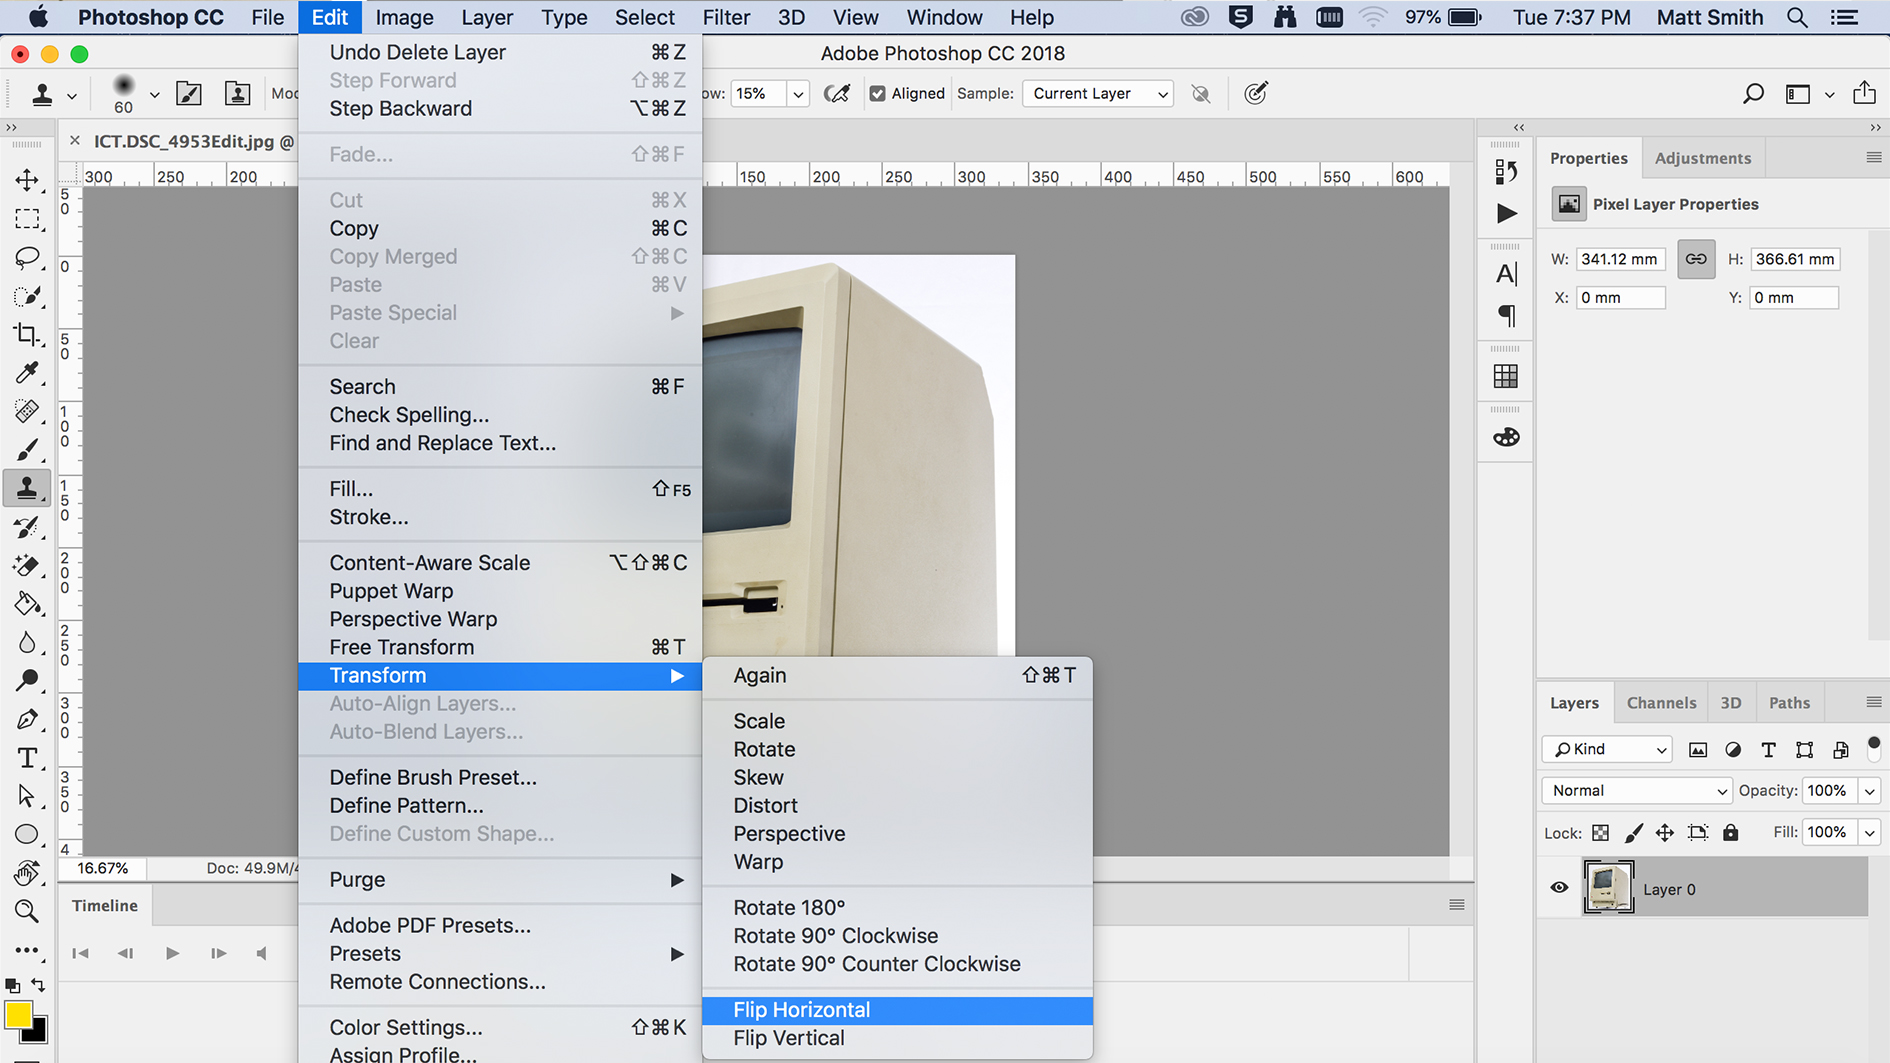
Select the layer in the Layers panel, then go to Edit › Transform › Flip Horizontal (or Flip Vertical).
Alternatively, press Ctrl+T (Win) / Cmd+T (Mac) to enter Free Transform, right‑click inside the bounding box, and choose Flip.
For mobile (iPad/iPhone): tap the layer, tap Layer properties › Transform, then tap the flip icon.
Flip the Canvas vs. Flip a Single Layer — Which One Do You Need?
The single most common point of confusion — and the one that sends users to forums in frustration — is the difference between flipping the entire canvas and flipping just one layer.
⚠️ Common mistake Image › Image Rotation › Flip Canvas Horizontal flips every layer in your document. If you use this command when you meant to flip a single layer, your text, your background, and every element will mirror at once. Reddit users regularly report this mix-up, and Adobe’s own documentation keeps the two commands in separate menus for exactly this reason.
Use this table to decide which command you actually need:
| What you want to happen | Command to use |
|---|---|
| Mirror a single object, text, or photo — everything else stays put | Edit › Transform › Flip Horizontal (or Vertical) |
| Mirror the entire composition (all layers at once) | Image › Image Rotation › Flip Canvas Horizontal (or Vertical) |
| Spin a layer 180° (not mirrored — upside down) | Edit › Transform › Rotate 180° |
Flip horizontal mirrors left-to-right; flip vertical mirrors top-to-bottom. A 180° rotation simply spins the content — a left-facing arrow rotated 180° still faces left, but flipped horizontally it faces right. Many users confuse the two, so check your result after applying.
Flip a Single Layer Using the Edit Menu
This is the method Adobe documents as the primary workflow in their official guide. It works on any unlocked layer.
- In the Layers panel, click the layer you want to flip. Make sure it’s not locked (if you see a lock icon, duplicate the layer or unlock it).
- Go to the menu bar and choose Edit › Transform.
- Select Flip Horizontal or Flip Vertical.
The layer mirrors in place around its own centre — its position on the canvas does not change.

The Edit › Transform › Flip Horizontal path in Photoshop CC with a single layer selected.
Flip a Layer Using Free Transform
If you prefer working with handles and a context menu, Free Transform gives you the same result with a few extra visual cues. Adobe’s flip-image guide highlights this as the fastest route for many users.
- Select the layer in the Layers panel.
- Press
Ctrl+T(Win) /Cmd+T(Mac) — a bounding box appears around the layer content. - Right‑click anywhere inside the bounding box to open the context menu.
- Choose Flip Horizontal or Flip Vertical.
- Press
Enter(Win) /Return(Mac) to confirm, or click the checkmark in the options bar.
Free Transform also lets you scale, rotate, or skew in the same session — flip is one option among many in the same tool.
Right‑click inside the Free Transform bounding box to access flip options alongside other transforms.
Flip a Layer to the Opposite Side of the Canvas (Mirror Effect)
Here’s a scenario that trips up many users: you flip a layer, but it stays exactly where it was — it just faces the other way. As one Reddit user put it, “Standard flip doesn’t move the layer to the other side.” If you want the layer to also reposition to the opposite edge of the canvas (like a true mirror effect), you need a workaround.
Workaround 1 — Select All + Transform
- Select the layer you want to flip.
- Press
Ctrl+A(Win) /Cmd+A(Mac) to select the entire canvas. - Press
Ctrl+T/Cmd+Tto enter Free Transform. - Right‑click and choose Flip Horizontal (or Vertical).
- Confirm with
Enter/Return.
The layer flips relative to the canvas boundaries, moving it to the opposite side.
Workaround 2 — Temporary Solid Layer
- Create a new solid‑fill layer (any colour) above your target layer.
- Select both the solid layer and your target layer (
Ctrl+click each in the Layers panel). - Go to Edit › Transform › Flip Horizontal.
- Delete the temporary solid layer.
💡 When to use these Use the Select‑All method when you want the layer to mirror to the other side as if the canvas centre were the mirror line. Use the temporary‑layer trick when Select‑All is inconvenient (e.g., working with grouped selections). Both techniques preserve the layer’s original proportions — only its position flips.
Flip Multiple Layers at Once
When you need to mirror several elements together, you have two options depending on the result you want.
Flip each layer individually
Select multiple layers in the Layers panel (Ctrl+click or Shift+click), then go to Edit › Transform › Flip. Each layer flips around its own centre — their relative positions stay the same, but each element mirrors independently. This is the method community members confirm works for batch flipping.
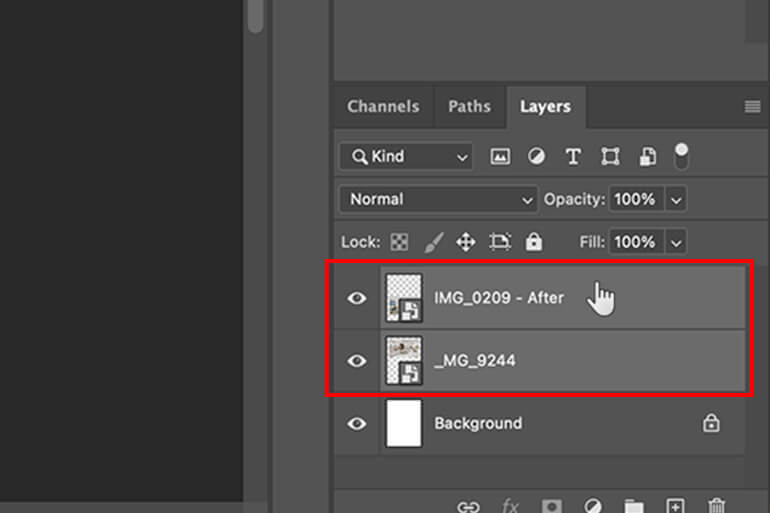
Select multiple layers in the panel, then apply Edit › Transform › Flip to flip each around its own centre.
Flip as a group (common pivot point)
If you want all selected layers to flip together around a single centre (preserving their relative spacing as a group), follow these steps:
- Select the layers you want to group.
- Press
Ctrl+G(Win) /Cmd+G(Mac) to place them in a folder. - Select the folder in the Layers panel.
- Go to Edit › Transform › Flip.
The entire group flips around the folder’s centre anchor. This is especially useful for composite designs where elements need to stay aligned relative to one another.
Flip a Layer in Photoshop on Mobile (iPad/iPhone)
Photoshop mobile uses a different interface — no Free Transform handles, no right‑click. Adobe’s mobile help page outlines the workflow.
- Open your project and tap the layer you want to flip in the Layers panel.
- Tap Layer properties (the gear or three‑dot icon).
- Tap Transform.
- Tap the Flip Horizontal or Flip Vertical icon.
- Tap the checkmark to apply the change.
⚠️ Mobile limitation Mobile does not support the Select‑All workaround for repositioning (described above). To move a flipped layer to the opposite side of the canvas on iPad or iPhone, duplicate the layer, flip it, and then drag it into position manually.
Note: dragging a corner handle on mobile rotates the layer — you must use the dedicated flip icon in Layer properties to mirror it.
Flip Only Part of a Layer (Selection Flip)
Sometimes you don’t want to flip the entire layer — just a specific shape, person, or detail within it. This technique works on any layer type.
- Use a marquee tool (Rectangular Marquee, Elliptical Marquee, or Lasso) to select the area you want to flip.
- Make sure the target layer is active in the Layers panel.
- Go to Edit › Transform › Flip Horizontal (or Vertical).
Only the pixels inside the selection are mirrored; the rest of the layer stays untouched. This is useful for composite images where you want to flip a single element — a person’s gaze, a logo, a piece of text — while keeping the background and other objects intact.
💡 Pro tip For maximum control, create a new layer from the selection (
Ctrl+J/Cmd+J) and flip that new layer. This keeps your original layer completely untouched and makes it easier to adjust the flipped element’s position later.
Flip a Layer Mask Without Flipping the Layer
You may want to mirror the mask — the area that hides or reveals parts of the layer — without changing the layer’s pixel content. This is a common need for creating mirrored reflections or symmetrical reveals.
- In the Layers panel, click the chain icon between the layer thumbnail and the mask thumbnail to unlink them.
- Click the mask thumbnail to select it (a white border appears around it).
- Go to Edit › Transform › Flip Horizontal (or Vertical).
- Re‑link the mask to the layer by clicking the now‑empty link area (optional).
After flipping, the mask hides a different area of the image. This technique is non‑destructive — you can always flip the mask back or fine‑tune it with a brush.
Create a Custom Keyboard Shortcut for Flipping
Photoshop has no default keyboard shortcut for Flip Horizontal or Flip Vertical. Adobe Community experts confirm this — but you can assign your own in a few clicks.
- Go to Edit › Keyboard Shortcuts (or press
Ctrl+Alt+Shift+K/Cmd+Option+Shift+K). - In the Shortcuts For dropdown, choose Layer.
- Scroll to the Transform section.
- Find Flip Horizontal and Flip Vertical in the list.
- Click in the shortcut field for each command and press the key combination you want (e.g.,
Ctrl+Shift+Hfor horizontal,Ctrl+Shift+Vfor vertical). - Click Accept and then OK.
Photoshop will warn you if the key combination is already in use. Choose a combination that doesn’t conflict with your existing workflow. This works in Photoshop CC 2015 and later.
Flip Non‑Destructively Using Smart Objects
Flipping a raster layer permanently changes its pixels — the transformation is baked in and cannot be undone after saving and closing. If you want the freedom to experiment with orientation, convert the layer to a Smart Object first.
- Right‑click the layer in the Layers panel and choose Convert to Smart Object.
- Select the Smart Object layer.
- Apply any flip method: Edit › Transform › Flip or Free Transform.
- To reverse the flip, select the Smart Object and apply the same flip again, or double‑click the Smart Object to edit the original content without any transformation.
💡 Why use Smart Objects? Smart Objects preserve the original pixel data. You can flip, scale, rotate, or skew repeatedly without degrading quality. For designers who need to test multiple orientations, this approach is far safer than flipping a raster layer directly.
Troubleshooting — Why Is “Flip Horizontal” Grayed Out?
Nothing is more frustrating than finding the Flip command greyed out and unusable. Based on community reports from Reddit and Facebook groups, here are the four most common causes and their fixes.
Cause 1 — Background layer is locked The default Background layer has a lock icon. Fix: duplicate it (right‑click › Duplicate Layer) or unlock it by clicking the lock icon. The Flip command only works on unlocked layers.
Cause 2 — Using the wrong menu
Make sure you are in the Edit menu, not the Image menu. Image › Image Rotation flips the entire canvas and may be greyed out or produce the wrong result.
Cause 3 — No selection — or hidden layer If a selection is active but contains no layer pixels, Flip is unavailable. Also check that the layer’s eye icon is on (hidden layers cannot be transformed).
Cause 4 — Multiple layers selected When multiple layers are selected, Flip may appear greyed out if any of them is locked or hidden. Select only the layer you want to flip, or unlock all selected layers.
If none of these solve the problem, try restarting Photoshop or resetting your preferences — a corrupted workspace can occasionally disable transform commands.
How to Check Your Flip Worked — and Avoid Common Mistakes
After applying a flip, a quick visual check can save you from discovering later that you flipped the wrong thing.
| What you see | What it means | Outcome |
|---|---|---|
| Only the selected element is mirrored; everything else looks the same | You used Edit › Transform › Flip — correct | ✓ Correct |
| Your text, background, and all elements are mirrored | You used Image › Image Rotation › Flip Canvas — a common mix-up | ✗ Undo now (Ctrl+Z / Cmd+Z) and use Edit › Transform instead |
| The layer moved to the opposite side of the canvas and is mirrored | You used the Select‑All workaround — correct for repositioning | ✓ Correct |
| The layer is mirrored but stayed in the same position | You used a standard flip — correct if you only wanted orientation | ✓ Correct |
One more check: if you searched for “invert a layer” and ended up here — note that in Photoshop “invert” usually means colour inversion (Image › Adjustments › Invert), not orientation flipping. Use the steps above only when you want to mirror a layer’s geometry, not its colours.
📌 Final sanity check If you’re ever unsure which command was used, look at the History panel (Window › History). It will list “Flip Canvas Horizontal” or “Transform: Flip Horizontal” as the last action — giving you a clear record of what actually happened.