- Category:
- Workflow Tips
- Summary:
- Learn how to lock a layer in Photoshop with three methods: click the lock icon, use Ctrl+/ shortcut, or apply partial locks like transparent pixels or position.
Three ways to lock any layer
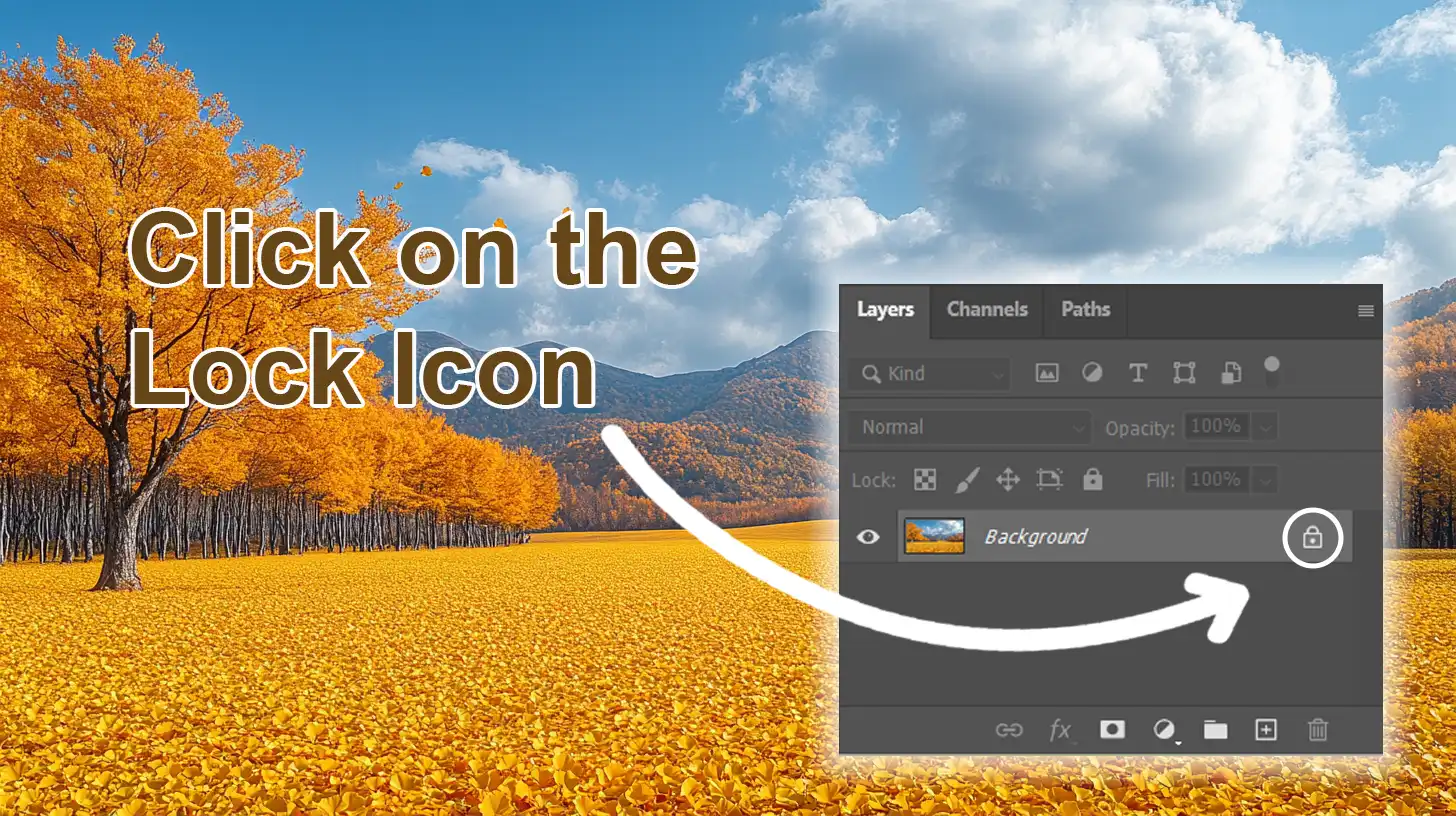
1. Click the lock icon above the Layers panel (looks like a small padlock). Select the layer first, then click the icon — the layer locks fully.
2. Use a keyboard shortcut — Ctrl+/ (Windows) or Cmd+/ (Mac) toggles lock on the selected layer.
3. Apply a partial lock — choose from four lock types (transparent pixels, image pixels, position, or all) using the same lock-icon row in the Layers panel.
Full details and troubleshooting below.
Lock a Layer with One Click in the Layers Panel
The quickest way to protect a layer from accidental edits is the lock icon sitting directly above your layer stack in the Layers panel. Select the layer you want to lock — click its name in the panel — then click the padlock icon (the lock icon) in the toolbar above the stack. The layer immediately shows a small padlock to its right, indicating it is now fully locked.
This method works on a single layer at a time. If you need to lock several layers together, hold Ctrl (Windows) or Cmd (Mac) and click each layer to select multiple layers, then click the lock icon — all selected layers lock at once. You can also use the menu path Layer → Lock Layers or Layer → Lock All Layers in Group from the Layers panel menu for batch operations.
Tip — what the padlock tells you
A solid padlock icon next to the layer name means the layer is fully locked. A hollow or dimmed padlock appears when only partial locks are active (more on those in the next section). If you see no icon at all, the layer is completely unlocked.
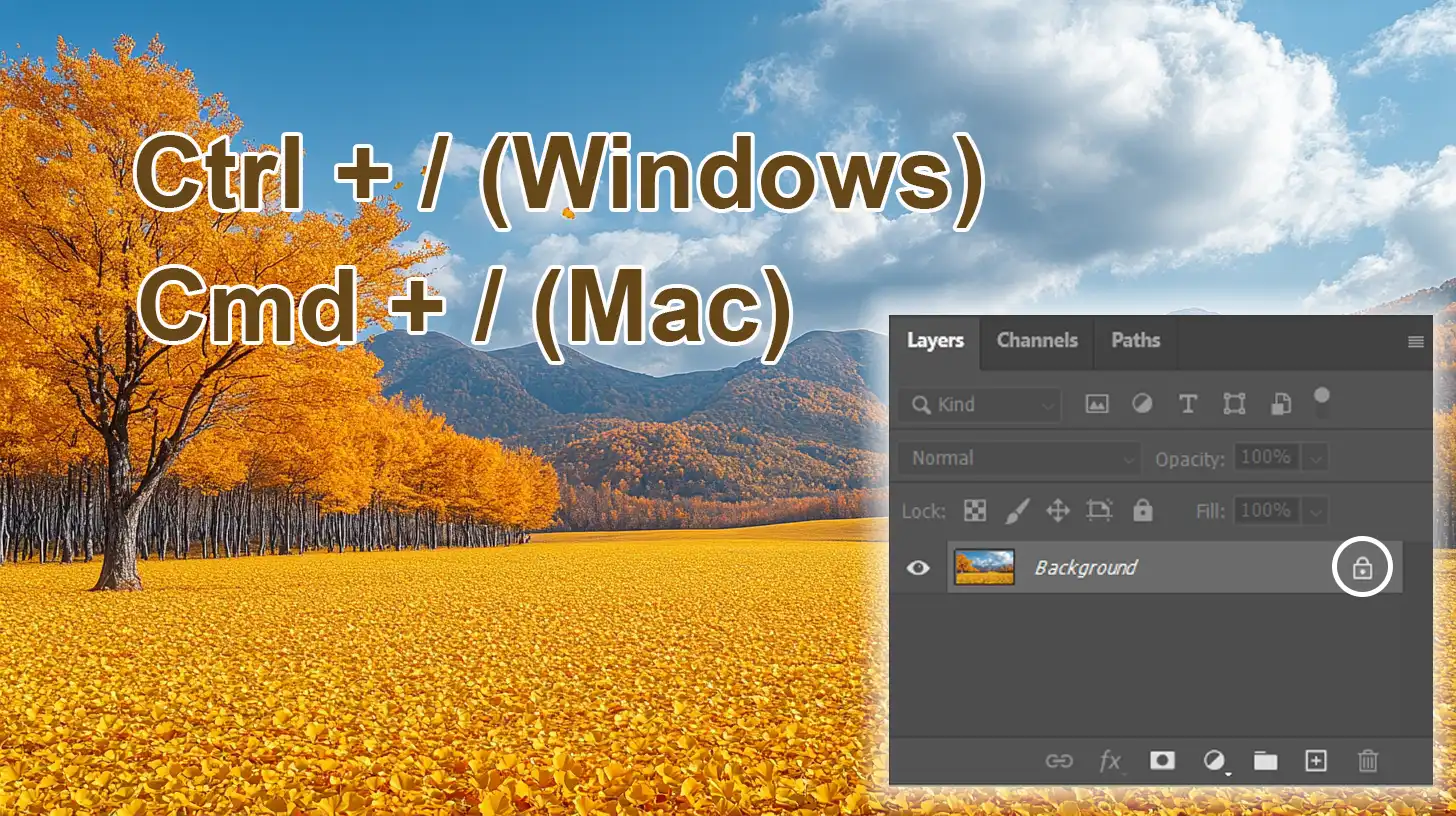
The lock icon sits above the layer stack; clicking it locks the selected layer immediately. The keyboard shortcut Ctrl+/ does the same thing.
According to Adobe's official documentation, the lock icon toggle is the primary interface for layer locking and works across all layer types — pixel layers, adjustment layers, shape layers, and Smart Objects.
Use a Keyboard Shortcut to Lock or Unlock Layers Fast
If you prefer keeping your hands on the keyboard, Photoshop provides two shortcuts that are significantly faster than reaching for the mouse. The primary one toggles lock on whatever layer or layers you have selected.
| Action | Windows | Mac |
|---|---|---|
| Lock / unlock selected layer(s) | Ctrl+/ |
Cmd+/ |
| Unlock all layers (except Background) | Ctrl+Alt+/ |
Cmd+Option+/ |
The first shortcut, Ctrl+/ / Cmd+/, toggles a full lock on the active layer. If the layer was unlocked, it becomes fully locked; if it was already locked, it unlocks. This is documented on Adobe's unlock layers page as the recommended speed method.
The second shortcut — Ctrl+Alt+/ / Cmd+Option+/ — is less well known. It unlocks every layer in the document except the Background layer. A community bug report on Adobe's forum confirms this shortcut works in current Photoshop versions (as of 2025–2026). It is especially useful when you have locked many layers for layout work and need to release them all at once.
⚠️ Common misconception —
Ctrl+L
PressingCtrl+L(Windows) orCmd+L(Mac) opens the Levels adjustment panel — it has nothing to do with layer locking. The correct lock shortcut always uses the forward-slash key (/).
Understand the Four Types of Layer Locks — and When to Use Each
Photoshop does not offer just one kind of lock. The row of four icons next to the lock icon in the Layers panel lets you choose exactly what you want to protect. Knowing the difference can save you from accidentally blocking edits you actually need.
These four partial locks are documented on Adobe's unlock layers page. Here is what each one does and when you would use it.
🔲 Lock Transparent Pixels (checkerboard)
What it blocks Painting, filters, or edits on transparent areas of the layer.
Use for Digital painting — keep your brush strokes inside existing shapes. Also useful for type layers where you want to protect the letter shapes while changing colour.
🖌️ Lock Image Pixels (paintbrush)
What it blocks Edits to opaque pixels using painting tools, filters, or adjustments.
Use for Preventing accidental brush marks on a finished layer while you still want to move or transform it. Note: you can still edit the layer mask when image pixels are locked.
↔️ Lock Position (crossed arrows)
What it blocks Moving the layer content on the canvas with the Move tool or arrow keys.
Use for UI mockups and layouts where elements must stay aligned. Combine with Lock Transparent Pixels for near-complete protection while still allowing opacity changes.
🔒 Lock All (padlock)
What it blocks Transparency, pixels, position — everything.
Use for Finalised layers you do not want touched at all. A fully locked layer cannot be painted on, moved, transformed, deleted, or adjusted in any way.

The four lock icons appear in a row above the layer stack. From left to right: Lock Transparent Pixels, Lock Image Pixels, Lock Position, and Lock All.
A quick-reference comparison table summarises the behaviour of each lock type:
| Lock type | Icon | Prevents | Still allowed |
|---|---|---|---|
| Lock Transparent Pixels | Checkerboard ▦ | Painting / editing on transparent areas | Move, transform, opacity, mask edits |
| Lock Image Pixels | Paintbrush 🖌️ | Painting / filtering / adjusting opaque pixels | Move, transform, opacity, mask edits |
| Lock Position | Crossed arrows ↔️ | Moving content on canvas | Paint, filter, opacity, mask edits |
| Lock All | Padlock 🔒 | All edits, moves, painting, deletion | Reordering in the layer stack (except Background) |
How to Unlock a Layer — Including the Background Layer
Unlocking works differently depending on whether you are dealing with a normal layer or the special Background layer. Here is the procedure for both, based on Adobe's unlock guide.
Unlock a Normal Layer
If the layer has a padlock icon next to its name, click that padlock — the layer unlocks immediately. This works for both fully locked layers and partially locked layers. For partial locks, one click removes all partial locks at once, returning the layer to a completely unlocked state.
You can also use the keyboard shortcut Ctrl+/ / Cmd+/ as a toggle — if the layer is locked, pressing the shortcut unlocks it.
Unlock the Background Layer
The Background layer is a special case. When you create a new document with an opaque background, Photoshop automatically generates a Background layer that is partially locked by default. You cannot move it, change its opacity, or paint on its transparent areas (there are none) without converting it first.
To unlock the Background layer, double-click its name in the Layers panel. A dialog titled New Layer appears with the option "Layer from Background". Click OK, and the Background becomes a normal, unlocked layer. You can then rename it, move it, adjust its opacity, or apply any edits you need.
Double-click the Background layer and choose "Layer from Background" to convert it into a fully editable, unlocked layer.
Note — Background vs. normal locked layers
The Background layer shows a solid lock icon and cannot be dragged to a different position in the stack. Once converted to a normal layer, it behaves like any other layer — including the ability to be re-ordered or locked partially.
What Happens When a Layer Is Locked — Behaviors and Limitations
A locked layer is not completely frozen. Understanding exactly what is and is not allowed helps you avoid confusion. Adobe's documentation and community bug reports clarify the boundaries.
- Fully locked layer (Lock All): You cannot edit it with any tool, delete it, paint on it, apply filters, or change its blending mode. The layer content is completely protected.
- Still reorderable (except Background): Even when fully locked, a normal layer can be dragged up or down in the Layers panel. Only the Background layer is pinned in place.
- Shape layer gotcha: Locking a shape layer disables the Shape Properties in the Properties panel — you will not be able to change fill colour, stroke, or corner radius while the layer is locked. This is a known behaviour confirmed by the Adobe Community bug report.
- Partial locks are additive: You can combine, say, Lock Transparent Pixels and Lock Position on the same layer. The lock icon next to the layer name will appear hollow or dimmed to indicate that some, but not all, properties are locked.

A normal layer with a full lock (padlock icon) alongside the Background layer, which has its own built-in partial lock. Notice the stack order can still be changed for the locked layer.
Lock Groups of Layers at Once
When you are working on a complex document with dozens of layers, locking them one by one is tedious. Photoshop allows you to lock all layers inside a group in a single action. As outlined in Adobe's help page, you have two ways to do this:
- Via the Layers panel menu: Click the panel menu icon (four horizontal lines) in the top-right corner of the Layers panel and choose Lock All Layers in Group.
- Via the Layer menu: Go to Layer → Lock Layers and choose the group you want to lock.
This applies a full lock to every child layer within the group. It is particularly useful when you have a set of text layers, UI elements, or reference images that should stay untouched while you work on other parts of the document. To unlock them, use the same menu path or the Ctrl+Alt+/ shortcut (which skips the Background but unlocks everything else, including group contents).
Troubleshooting Common Lock Issues
Even experienced users run into layer-lock problems that are not covered in the official documentation. The following real-world issues come from the Adobe Community forum, Graphic Design StackExchange, and Reddit discussions.
"Layer Won't Unlock in RGB Mode"
Some users report that layers imported from specific sources — such as images dragged directly from a web browser or certain stock assets — appear locked even when the document is in normal RGB mode. In some cases, even Cmd+J (duplicate layer) creates a locked copy. The workaround: try converting the locked layer to a Smart Object (right-click the layer → Convert to Smart Object), then duplicate it. Alternatively, if the layer behaves like a Background layer, double-click it and choose "Layer from Background".
"Can't Lock a Layer to the Top of the Stack"
Photoshop does not have a native "always on top" feature — you cannot lock a layer so that new layers always appear beneath it. The workaround, shared by the Graphic Design StackExchange community, is to place the layer you want at the very top of the stack and then create a group around everything else. Any new content you create outside the group will appear above the group but still below your top layer — as long as the group is positioned beneath it. This is not a perfect solution, but it is the only reliable method without third-party scripts.
"Persistent Locks on Imported Layers"
Smart Objects imported from other documents or downloaded from stock sites occasionally arrive with a lock that does not respond to the usual unlock methods. In most cases, the lock is on the Smart Object's source file, not on the layer itself. Right-click the Smart Object layer and choose Edit Contents — if the source file opens with its own locked layer, unlock it there and save. The parent layer will then be editable. If the lock persists, rasterize the layer (right-click → Rasterize Layer) to convert it to a plain pixel layer.
!Instructional graphic showing how to unlock a Background layer by double-clicking and selecting Layer from Background
For stubborn locked layers, converting to a normal layer via the double-click method often resolves the issue.
What Photoshop Locking Can't Do — and Workarounds
Layer locking in Photoshop is powerful, but it has several limitations that can frustrate users who expect more granular control. Knowing these boundaries — documented in StackExchange discussions and Reddit threads — helps you choose the right approach for each situation.
- No native "always on top" lock. As mentioned above, you cannot lock a layer to prevent new layers from appearing above it. The group workaround is the closest you can get without scripting.
- Layer masks cannot be locked independently. There is no separate lock for a layer mask. If you lock Image Pixels, you protect the pixel content but the mask remains editable. If you lock All, the mask is also locked. To protect a mask while editing the layer, consider duplicating the mask or using an adjustment layer with a clipping mask.
- Locking does not prevent stacking-order changes (except Background). Many users assume a locked layer stays in place — but you can still drag it up or down in the panel. Only the Background layer is fixed in its position.
- Partial locks are all-or-nothing on unlock. When you click the padlock icon to unlock a layer that had partial locks, it removes all of them. There is no way to remove just one partial lock without also removing the others — you have to re-apply the ones you want to keep.
⚠️ Final advice for stubborn locks
If a layer simply will not unlock — whether it is a stock asset, a Smart Object, or an imported file — the safest path is to convert it to a normal layer. Right-click the layer and choose Rasterize Layer, or use Layer → Smart Objects → Rasterize. This removes all lock metadata and gives you a clean pixel layer. For Background layers, the double-click conversion is the only method that works.
All trademarks and referenced material belong to their respective owners. This article is not affiliated with or endorsed by Adobe Inc.