- Category:
- Background Removal
- Summary:
- Learn how to make background transparent in Paint using two distinct methods: free-form cut and Color 2 precision, fixing anti-aliased edges and saving as PNG
The short version — works across all Paint versions:
- Open your image in Paint.
- Under Select, check Transparent selection.
- Use Free-form selection to trace around the subject.
- Right-click the selection and choose Cut.
- Paste into a new Paint window.
- Save as PNG — JPG will flatten the background to white.
Important This method works best in Classic Paint but has known pitfalls (anti-aliased edges, random toggle failures). The sections below cover each version’s quirks and the fixes that actually work.
The Two Methods in Classic Paint Work Differently — and Sources Disagree on Which Is Better
If you search for "how to make background transparent in paint" you will find two competing procedures. Both produce a transparent cutout, but they handle the object’s edges differently — and neither official documentation explains when to use which.
The Standard Free-Form Cut Method
- Open your image in Classic Paint (Windows 7, 8, or 10).
- Go to the Select dropdown and check the Transparent selection box. Then pick Free-form selection.
- Trace around the object you want to keep. A dotted line follows your cursor.
- Right-click inside the selection and choose Cut. The selected area is removed.
- Open a new Paint window and Paste. The object appears on a white canvas.
- Save the file as PNG. Transparency is preserved only in PNG format.
This method works well when the object has a clean, high-contrast edge — think a solid logo on a white background or a fruit on a plain table. Sources such as Photoroom's Paint guide recommend it as the primary approach.
Free-form selection lets you trace around the subject. Best for objects with clearly defined edges.
⚠ Known limitation The free-form cut often leaves a faint coloured halo (anti-aliased edge) around the pasted object (source: Reddit community discussion). This is because Paint blends the selection edge with the original background, and the transparency does not carry that blend information.
The Color 2 Legacy Method for Precision
A less-known but more precise alternative surfaced on Reddit and in forum threads. It uses Paint's Color 2 (secondary colour) to tell Paint which hue to treat as transparent.
- Set the background colour as Color 2. Click the Color 2 square in the toolbar, then use the eyedropper to pick the background colour you want removed.
- Enable Transparent selection from the Select dropdown.
- Press Ctrl+A to select the entire canvas, then invert the selection (the background is now selected instead of the subject).
- Press Ctrl+X to cut the background away. Only your subject remains.
- Paste into a new Paint window. The subject preserves its anti-aliasing against the original background because the background itself was removed.
This technique, documented by Reddit user joefly50, solves the anti-aliasing halo problem that plagues the free-form cut. It works best when the background is a single, uniform colour.
Why the Conflict Matters
The "cut object" approach (standard method) and the "cut background" approach (Color 2 method) are not interchangeable. The standard method is faster for rough cutouts; the Color 2 method preserves edge quality. Neither is "better" in every case — the choice depends on whether speed or finish matters more for your specific image.
From the community: "I spent an hour trying to fix the white halo around my cutout. Switched to the Color 2 method and it was clean on the first try." — Reddit, r/mspaint
Paint 3D Handles Transparency Natively — But Magic Select Has Limits
Paint 3D, available on Windows 10 and 11, includes a dedicated Magic Select tool that automatically detects the subject. It also has a Transparent canvas toggle that lets you work with a genuinely transparent background — something Classic Paint cannot do.
The Magic Select Workflow
- Open your image in Paint 3D. Click Magic Select in the top toolbar.
- Adjust the selection borders so they enclose the subject. Click Next.
- Use the Add and Remove tabs to refine the selection — click areas the tool missed or included by mistake.
- Click Done. The isolated subject appears on a temporary white background. Move it aside.
- Delete the remaining background area by selecting it and pressing Delete.
- Go to the Canvas tab and toggle Transparent canvas ON. Save as PNG with the Transparency checkbox checked.
The order of the last two steps does not strictly matter — toggling transparent canvas before or after deleting the background produces the same result, as confirmed by All3DP's Paint 3D guide and remove.bg's walkthrough.
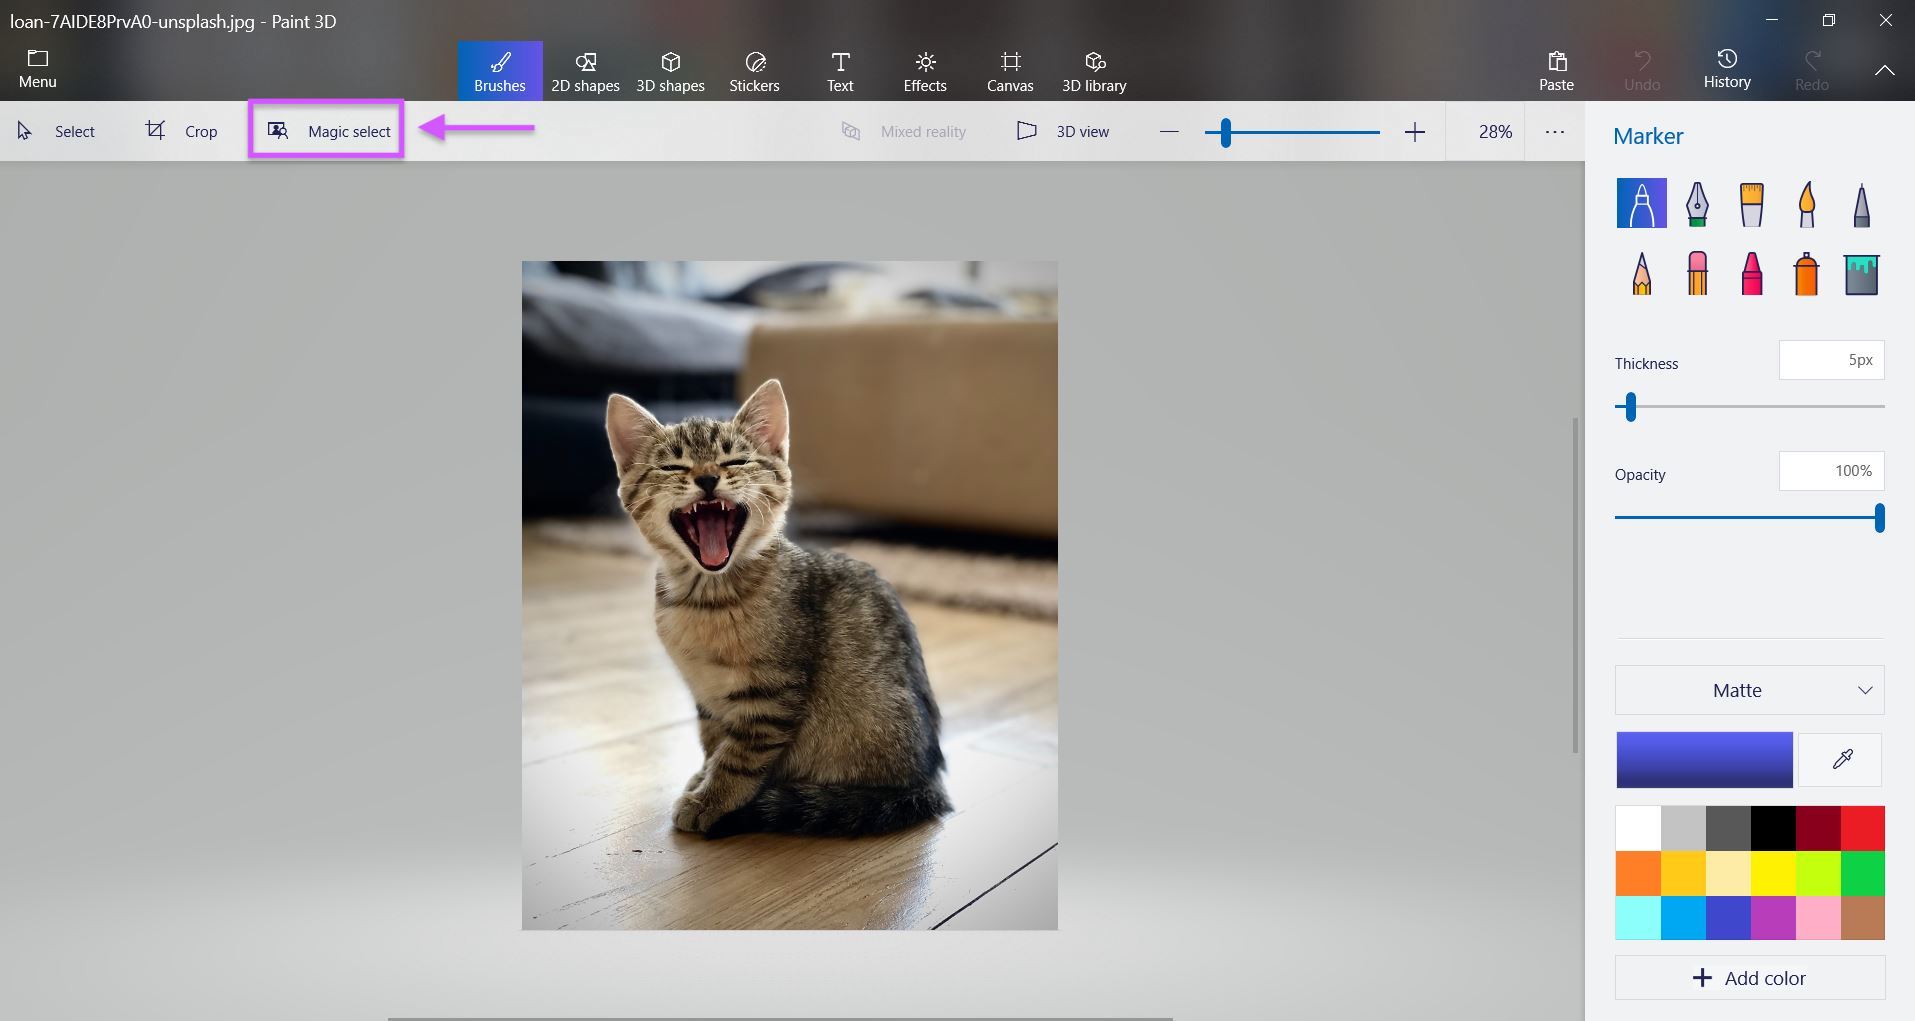
Magic Select in Paint 3D automatically detects the subject. Refine edges using the Add and Remove tools.
Where Magic Select Breaks Down
Magic Select struggles with fine detail. Hair, fur, transparent objects (glasses, water droplets), and low-contrast edges between subject and background all produce imperfect selections. According to Photoroom's analysis, the tool requires patience: toggle between Add and Remove modes to manually correct missed areas. For complex edges, consider using Paint 3D as a first pass only, then touching up the result in a dedicated image editor.
💡 Tip Zoom in (Ctrl+scroll) before using Add/Remove. A single missed pixel at 100% zoom becomes a visible speck at full size.
The Sticker Feature for Reuse
Once you have isolated an object on a transparent background, Paint 3D lets you save it as a sticker. Select the object, click Make sticker, and it appears in the sticker panel for the current session. To reuse it permanently, save the sticker as a separate PNG file (source: remove.bg blog).
Windows 11's New Paint Has Layers — But the Eraser Doesn't Create Transparency Anymore
The updated Paint app in Windows 11 (2023–2024) introduced layers, including a dedicated background layer. This is a significant step forward, but it came with a change that has confused many users: the eraser tool no longer creates transparency the way it used to.
What the New Paint Can (and Can't) Do
As of the layered Paint update, you can now:
- Hide the background layer to reveal transparency underneath.
- Work with multiple layers to composite images.
- Use an AI Remove Background tool (available in some builds, though not yet documented in official sources).
However, there is still no way to paint or fill with "no colour" — you cannot draw directly with transparency. The eraser, which in earlier Paint versions removed pixels to create transparency, stopped doing so for many users around April 2024 (source: multiple Reddit reports).
The Only Reliable Workaround — Hide the Background Layer
The method that consistently works across all recent builds of Windows 11 Paint is surprisingly simple:
- Open your image in the new Paint app.
- In the Layers panel, right-click the background layer (labelled "Background").
- Select Hide from the context menu.
- The background disappears, revealing a checkerboard pattern (transparency). Save as PNG.
This workaround, shared by Reddit user LightningProd12, sidesteps the eraser issue entirely. Sources conflict on whether the eraser still creates transparency in some builds — hiding the layer is the only approach that works regardless of version.
⚠ Eraser change If you relied on the eraser to make parts of an image transparent, that behaviour may no longer work. Do not assume it will — use the Hide background layer method instead.
If You Need 1-Pixel Precision for Eraser or Brush
The eraser tool's smallest preset size is 2 px, which is too coarse for fine detail work. A hidden shortcut — Ctrl+Numpad+ to increase width and Ctrl+Numpad− to decrease it — lets you go beyond the preset limits, including sizes below 2 px. This trick works for the brush, pencil, and eraser alike (source: Reddit user joefly50).
The Most Common Problem: Transparent Selection Stops Working Randomly
Why It Happens
Even when you have set Color 2 to the correct background colour and checked Transparent selection, the tool sometimes does nothing. The selection still cuts or copies, but the pasted object appears with a solid background. This bug has been reported across multiple Windows 10 and 11 versions on Windows 10 Forums, with no official fix from Microsoft.
The Toggle Fix
The most reliable workaround, confirmed by forum users:
- Click Transparent selection to turn it off.
- Click it again to turn it on.
- Repeat 2–3 times if the first toggle does not work.
This forces Paint to re-read the Color 2 setting and apply transparency correctly.
If Toggle Doesn't Work — Alternative Approaches
When the toggle fix fails, switch to one of the alternative methods:
- Use the Color 2 legacy method (described above) instead of free-form selection — it handles transparency assignment differently.
- Move to Paint 3D (if available on your system) and use the Magic Select workflow.
- On Windows 11, use the Hide background layer approach in the new layered Paint.
White Background Keeps Coming Back After Paste — Here's the Fix
Why Pure White Isn't Transparent
When you paste a cut object into a new Paint window, the canvas itself is white. Classic Paint has no concept of a transparent canvas — white is the background. Users expect the pasted area to show as transparent, but it renders as white because there is no transparent canvas underneath (source: Reddit discussion).
Solution — Use a Tool That Supports Transparent Canvas
The fix depends on which Paint version you are using:
| Version | How to get a transparent canvas before pasting |
|---|---|
| Classic Paint | No built-in transparent canvas. You must use Paint 3D or a third-party tool to achieve true transparency. |
| Paint 3D | Toggle Transparent canvas ON before pasting (Canvas tab). |
| Windows 11 Paint | Hide the background layer in the Layers panel before pasting. |
Regardless of the method, always save as PNG. JPG re-introduces a solid white background and discards all transparency data.
!Image editing interface showing a kitten on a transparent background with PNG save option
The "Save as type" dropdown must be set to PNG. The Transparency checkbox at the bottom must be checked.
The Hidden Shortcut That Makes Precision Work Possible
Ctrl + Numpad +/- Changes Tool Size Beyond Preset Limits
A keyboard shortcut discovered and shared by the Paint community gives you finer control over brush, pencil, and eraser sizes than the dropdown menu offers. Press Ctrl+Numpad+ to increase the tool width, and Ctrl+Numpad− to decrease it. The values go both above and below the preset options — for example, you can set the eraser to 1 px, which the dropdown menu does not allow (source: Reddit user joefly50).
📌 Not documented This shortcut does not appear in any official Paint tutorial from Microsoft. It was found through experimentation and shared on community forums.
When You Need Sub-2px Eraser Precision
Removing stray pixels along a cutout edge — or cleaning up anti-aliasing artefacts — often requires a 1 px eraser. The dropdown menu stops at 2 px. The hidden shortcut is the only way to go smaller. Combine it with zoom (Ctrl+scroll) to see exactly which pixels you are removing.
This technique is especially useful after using the free-form cut method in Classic Paint, which tends to leave a thin coloured halo around the object.
Which Method Should You Actually Use?
The right approach depends on your Windows version, the complexity of your image, and how much time you want to spend. Use the guide below to match your situation to the method that will give you the best result with the least frustration.
Windows 7/8/10 — Classic Paint only Use the free-form cut method for simple objects. Switch to the Color 2 legacy method when you need cleaner edges or when the free-form selection fails to produce transparency.
- Accept that anti-aliased edges are a limitation — touch them up with the hidden shortcut (Ctrl+Numpad−) at 1 px.
- Always save as PNG.
- For complex edges, consider using PowerPoint's Set Transparent Color or an AI tool as a first pass.
Windows 10 — Paint 3D available Use Magic Select — it is faster and produces a transparent PNG directly. Refine complex edges with the Add/Remove tools.
- Save frequently used cutouts as stickers for reuse within the same session.
- Fall back to Classic Paint methods if Magic Select cannot handle the image.
- Toggle Transparent canvas ON before or after removing the background — either order works.
Windows 11 — New layered Paint Hide the background layer in the Layers panel — this is the most reliable way to create transparency.
- Do not rely on the eraser for transparency; it may not work in your build.
- Use the AI Remove Background tool if your version includes it.
- For fine touch-ups, use the hidden shortcut (Ctrl+Numpad+/-) to get below the 2 px eraser limit.
Complex edges or batch work Magic Select struggles with hair, fur, and transparent objects. For these cases, use a dedicated tool first:
- PowerPoint — "Set Transparent Color" works well for logos and simple solid-colour backgrounds.
- remove.bg or Photoroom — AI-based one-click removal for complex subjects (source: remove.bg, Photoroom).
- Download the result as PNG, then open in Paint for manual touch-ups using the hidden shortcut.
If you routinely need transparent cutouts from Paint, the most practical long-term setup is Paint 3D for initial extraction (using Magic Select) combined with the hidden shortcut for cleanup — regardless of which Windows version you are on.