- Category:
- Selection & Masking
- Summary:
- Learn how to make a clipping mask in Photoshop: step-by-step guide with correct shortcut (Ctrl+Alt+G) to avoid grouping, plus four easy methods.
To create a clipping mask: place an image or adjustment layer directly above a shape, text, or solid‑colour layer. Select the top layer, then press Ctrl+Alt+G (Win) / Cmd+Opt+G (Mac) — or go to Layer → Create Clipping Mask.
⚠️ Important: Ctrl+G / Cmd+G creates a group (not a clipping mask) in Photoshop CS6 and later. Use Ctrl+Alt+G / Cmd+Opt+G instead.
What a Clipping Mask Actually Does (and Doesn't Do)
A clipping mask is a group of layers where the bottommost layer — called the base layer — defines the visible boundaries for every layer stacked above it. The base layer’s transparency acts as a stencil: only the areas where the base layer has visible content show through.
In the Layers panel, a clipping mask has a clear visual language. The base layer’s name appears underlined, and all layers clipped to it are indented with a small down‑arrow icon beside the thumbnail, as described in Adobe's official documentation.
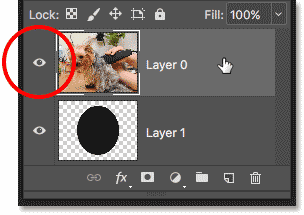
Layers panel indicator: base layer underlined, clipped layer indented with arrow icon.
What a clipping mask is NOT: It is not a layer mask (which uses grayscale painting on a single layer), not a vector mask, and not a clipping path. Each of those controls visibility differently — a clipping mask is strictly about using one layer's transparency to reveal layers above it.
Preparing Your Layers – the One Rule That Never Fails
The single non‑negotiable rule is layer order. The base layer (a shape, text, or solid‑colour layer) must sit below the layer you want to clip. The two layers must be adjacent in the stack — no other layers between them. If you insert a non‑clipped layer between clipped layers, the mask breaks, as LightroomPresets notes.
A common starting point is placing a photograph above a text layer or a simple shape (circle, rectangle, custom vector). The shape becomes the stencil; the photo fills only the shape's visible area. Tutorials by PHLEARN and other creators frequently demonstrate this exact setup.
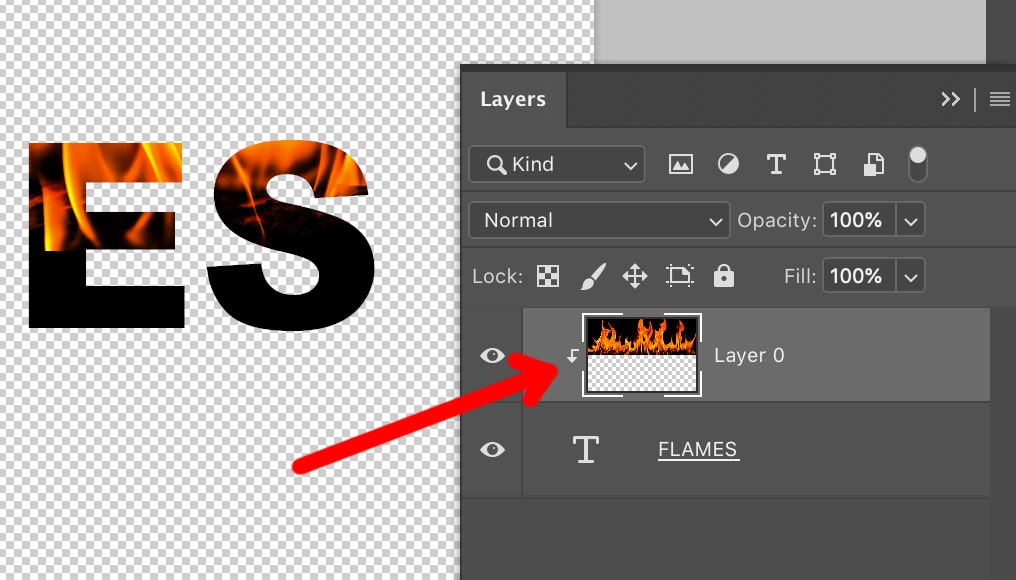
A text layer as the base with an image clipped above it — the classic text‑fill effect.
4 Ways to Create a Clipping Mask – Pick Your Favorite
Photoshop offers four distinct methods. Choose the one that fits your workflow:
- Alt‑click (Win) / Option‑click (Mac) between the two layers in the Layers panel. When the cursor changes to a downward‑pointing arrow, click — the top layer is instantly clipped.
- Right‑click the top layer and choose Create Clipping Mask from the context menu.
- Select the top layer, then go to the menu bar: Layer → Create Clipping Mask.
- Use the keyboard shortcut
Ctrl+Alt+G(Win) /Cmd+Opt+G(Mac). This is the fastest method once you have the reflex.
⚠️ Shortcut Trap
Do not useCtrl+G(Win) /Cmd+G(Mac). In Photoshop CS6 and later, that shortcut creates a layer group, not a clipping mask. This is one of the most common reasons users report that "clipping mask not working," as confirmed in this Adobe Community discussion. The correct shortcut is alwaysCtrl+Alt+G/Cmd+Opt+G.
Bring Your Own Laptop covers all four methods in detail, noting that the right‑click and menu approaches are useful when you are still learning the shortcut.
Clipping More Than Two Layers – a Common Power Move
A clipping mask is not limited to two layers. You can stack three, four, or more layers above the same base, as long as they remain consecutive. Any layer placed between already‑clipped layers is automatically included — no extra step required.
Consider this practical scenario:
- Base layer: a circular shape
- Layer 2: a photo clipped to the circle
- Layer 3: a texture or pattern clipped above the photo
- Layer 4: an adjustment layer (e.g., Hue/Saturation) clipped above the texture
All four layers are constrained to the circle's shape. This is a powerful compositing technique that LightroomPresets highlights as a key advantage of clipping masks over layer masks, which affect only a single layer.
Clipping Masks vs. Layer Masks – Which One Should You Use?
These two masking tools are frequently confused. The table below breaks down the differences so you can pick the right tool for the job.
| Feature | Clipping Mask | Layer Mask |
|---|---|---|
| What it affects | Multiple stacked layers (all layers above the base) | A single layer |
| How visibility is controlled | Base layer's transparency defines boundaries | Grayscale painting (black hides, white reveals) |
| Editing the mask | Edit the base layer's shape or the clipped layers' content | Paint directly on the mask thumbnail |
| Partial / soft transparency | No — transparency is binary (on/off based on base) | Yes — soft edges, gradients, feathering |
| Non‑destructive | Yes — full recovery at any time | Yes — mask can be disabled or deleted |
| Best use case | One shape revealing several layers (photo + texture + adjustment) | Soft transitions, complex edge control on a single layer |
Quick rule of thumb: Use a clipping mask when you want a shape to act as a window for multiple layers. Use a layer mask when you need soft edges, partial transparency, or detailed brushwork on one layer. Adobe's official definition reinforces this distinction.
Why Your Clipping Mask "Isn't Working" – the 5 Most Common Reasons
If the mask doesn't take effect, check these failure modes before troubleshooting anything else.
- You used
Ctrl+G/Cmd+Ginstead ofCtrl+Alt+G/Cmd+Opt+G. This is by far the most frequent issue. Photoshop CS6+ mapsCtrl+Gto Group. Use the correct shortcut or one of the other three methods. - The image layer is below the shape layer. The base layer (shape/text) must be on the bottom. Drag it below the layer you want to clip.
- The base layer is locked, has zero opacity, or uses a blend mode that hides it. A locked base layer can still work, but a base with 0% opacity or a blend mode like Multiply on an empty area will produce no visible result.
- The base layer is a group. Groups cannot serve as the base of a clipping mask. Convert the group to a Smart Object (right‑click → Convert to Smart Object) or merge it into a single layer.
- A non‑clipped layer sits between clipped layers. Only consecutive layers can be grouped. Move the stray layer above or below the mask stack.
Diagnostic check: Look at the Layers panel. If the base layer is not underlined and the clipped layers are not indented with a down‑arrow icon, the mask is not active. Adobe Community threads confirm these as the most common root causes.
The Hidden Gotcha – Clipping an Adjustment Layer
When you clip an adjustment layer (Curves, Hue/Saturation, Levels, etc.) to a base layer, Photoshop applies the adjustment only to the base layer's solid pixels — it ignores the base layer's transparency and any layer mask on the base during the calculation. After the adjustment runs, the base layer's transparency is reapplied.
This means that if your base layer has black or white areas, those areas may appear unchanged because the transparency pass re‑conceals them. Photoshop Gurus contributor John Wheeler explains this behaviour in detail: the adjustment is computed on the solid region, then the original transparency is restored.
💡 Workaround
If you need an adjustment layer to affect the full visible area of a base layer that has transparency or a mask, use a Solid Color fill layer as the base instead. Place the adjustment above it and clip both to the fill layer. Alternatively, paint the adjustment onto a layer mask attached to the adjustment layer itself — this gives you direct control without the clipping‑mask transparency quirk.
How to Remove or Modify a Clipping Mask
Because clipping masks are non‑destructive, you can undo or adjust them at any stage:
- Remove a single layer from the mask: select the clipped layer and press
Ctrl+Alt+G/Cmd+Opt+Gagain (it toggles off), or drag it below the base layer. - Release all clipped layers at once: select the base layer, then go to Layer → Release Clipping Mask. All layers above it become independent again.
- Edit the base layer (e.g., resize a shape or edit text): double‑click its thumbnail. The base stays fully editable, and all clipped layers update automatically.
Both LightroomPresets and Adobe Help confirm that the original layer content is always recoverable — there is no pixel‑destructive step at any point.
Quick Version History – Did Photoshop Change the Shortcut?
Yes. In Photoshop CS5 and earlier, Ctrl+G (Win) / Cmd+G (Mac) created a clipping mask. From CS6 onward, that shortcut was reassigned to create a layer group, and the clipping mask shortcut became Ctrl+Alt+G / Cmd+Opt+G.
This change is documented in Adobe Community discussions, where many users report confusion. If you are using Photoshop Elements, the behaviour may differ — test the shortcut on a sample file to confirm. The feature itself has not changed; only the default keyboard binding was updated.
Next Step – Apply a Filter to a Clipped Layer
Because clipping masks are non‑destructive, you can apply filters to the clipped image without affecting the base layer. For example, add Gaussian Blur to a photo that is clipped inside a circle — the blur is constrained to the circle's shape, and the base layer stays crisp.
To keep everything editable, convert the image layer to a Smart Object (right‑click the layer → Convert to Smart Object) before clipping it. Then apply filters through the Smart Filter mask. This way you can tweak the filter radius or even remove it months later without redoing the mask, as Bring Your Own Laptop demonstrates.
This technique opens up a wide range of compositing possibilities — textured typography, framed photo effects, and layered adjustments — all fully editable and reversible.