- Category:
- Workflow Tips
- Summary:
- For batch cutout workflows where you need to export multiple subjects as transparent PNGs with edge cleanup, consider a dedicated plugin like
▶︶ The Object Selection Tool at a glance
Keyboard shortcut: W (Shift+W cycles through selection tools). Drag a rectangle or lasso around any object—the tool auto-detects its boundaries. Two modes: Rectangle (box drag) and Lasso (freeform draw). Options bar includes New / Add / Subtract / Intersect, Sample All Layers, and Hard Edge. For people, enable Select People to isolate specific attributes (hair, eyes, clothing). Adobe Help covers the full reference; below we go deeper into advanced shortcuts, real-world bugs, and cross-tool comparisons.
Why the Official Docs Say One Thing, but Users Hit Real Bugs
Adobe documentation presents the Object Selection Tool as a reliable, one-drag solution for isolating anything in an image. The official help page describes hover-preview, automatic boundary detection, and the Select People workflow as polished features. In practice, community forums reveal two persistent failures that the docs don’t mention—and that cost users hours of head-scratching.
First, Select Subject (the command that the Object Selection Tool’s auto-detection relies on) can crash on high-resolution Getty images in Photoshop 2023 versions 24.0.1 and 24.1.0, throwing the error “Couldn’t find a subject to select.” Adobe Community reports confirm that rolling back to the 2022 version resolves it. Second, when a subject touches the right or bottom edge of the canvas, the selection consistently misses a pixel strip on those sides—a documented edge-gap bug that affects passport-photo workflows and any full-frame composition.
None of this means the tool is unreliable overall. It means you should know its weak points before you build a critical workflow around it. The sections below cover both the advertised features (Hover preview, Rectangle/Lasso modes, Option bar controls) and the practical workarounds for the bugs that Adobe’s marketing pages don’t show.
⚠︶ Bottom line: The Object Selection Tool is a strong first-pass choice for 80 % of selections. The remaining 20 %—edge gaps, low-contrast subjects, overlapping objects—require either manual refinement or a different tool entirely. This article teaches both the official method and the fixes no one else spells out.
The Object Selection Tool Handles Most Objects Automatically
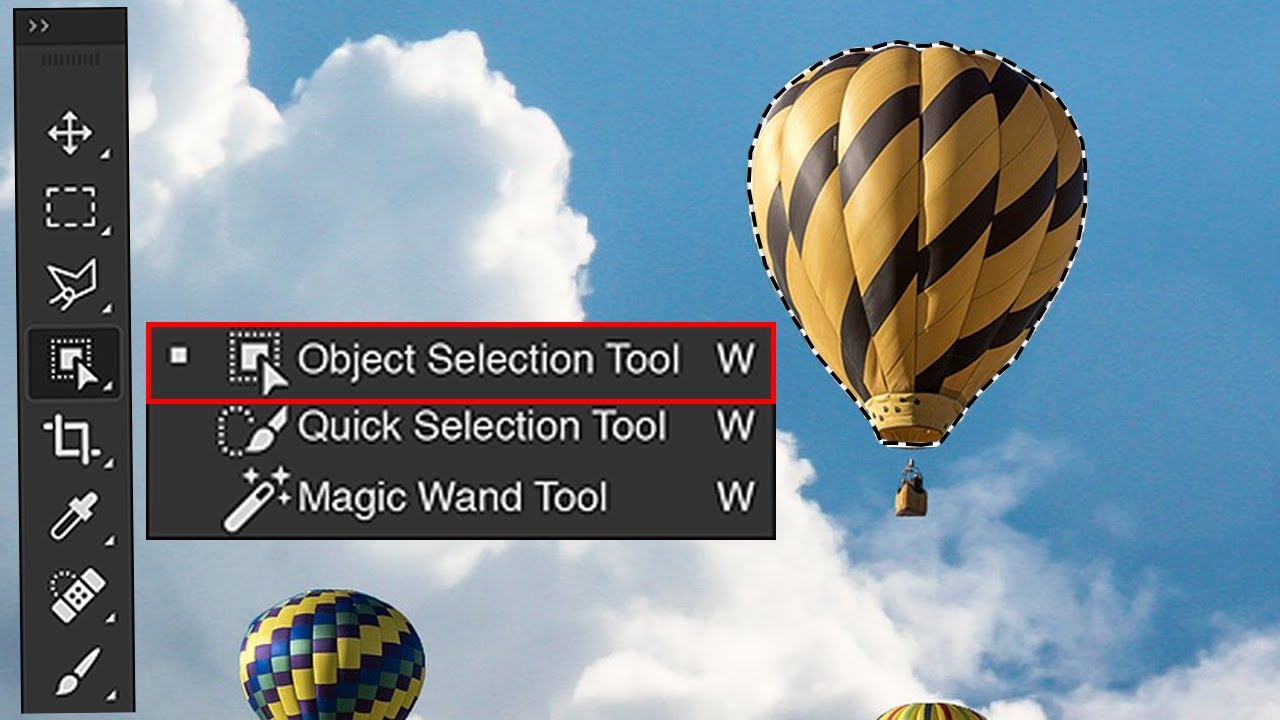
The Object Selection Tool sits grouped with Quick Selection and Magic Wand. Keyboard W activates it; Shift+W cycles through the group.
Activation. Select the tool from the toolbar (it shares the flyout with Quick Selection and Magic Wand) or press W. Press Shift+W to cycle through the group. Adobe Help (desktop) confirms the shortcut and location.
Two drawing modes. The Options bar offers Rectangle (drag a bounding box around the object) and Lasso (draw a freeform boundary). Both trigger the same auto-detection engine. Adobe Help (iPad) documents both modes.
Hover preview. Move the cursor over an object without clicking—the tool highlights the predicted boundary in a coloured overlay. Click once to confirm. This preview saves you from committing to a selection that misses the mark.
Options bar controls. Four selection modes work exactly as they do for other tools: New, Add to (hold Shift), Subtract from (hold Alt/Option), and Intersect with. Check Sample All Layers to include content from every visible layer. Hard Edge applies a sharp boundary with zero feathering—useful for graphic-design cutouts but too harsh for most photo composites. All settings are described in the iPad help article and apply identically on desktop.
Select People. When the tool detects a person, a “Select People” option appears in the Options bar. Click it to see thumbnails of each detected person; you can select the entire figure or specific attributes (hair, eyes, skin, clothes). This is documented on the desktop help page and in Adobe’s Learn section.
Three Advanced Shortcuts Most Tutorials Skip
The standard tutorials cover the basics, but Julieanne Kost’s blog and a few power-user sources reveal several time-saving workflows that rarely appear in beginner guides. Here are the three most valuable ones.
-
Shift+Delete for instant Content-Aware Fill. With the Object Selection Tool active on a single-layer document, press
Shift+Delete. This expands the selection, fills it with Content-Aware Fill, and deselects—all in one action. No need to open the Fill dialog. Julieanne Kost’s blog confirms this shortcut works on any single-layer image. -
Mask All Objects via right-click. After making a selection, right-click (or
Ctrl+click on Mac) inside the Layers panel and choose Mask All Objects. Photoshop creates a layer mask for every detected object in the image—not just the one you selected. Access the same command through Layer > Mask All Objects. This is documented in Kost’s workflow article. -
Record Actions with the correct Select Subject processing option. Before you record a batch action that calls Select Subject, go to Preferences > Image Processing and choose either Device (local) or Cloud processing. Record that preference change as the first step in your Action, then record the Select Subject command. Otherwise, the Action may default to the wrong processing mode and fail on some images. Kost’s blog post covers this nuance.
▶︶ Bonus — sky detection: When the Object Selection Tool identifies a sky, the selection it produces is identical to what Select > Sky would generate. Kost notes that you can use either path interchangeably for sky replacements.

The tool flyout in the Photoshop toolbar. The Object Selection Tool sits between Quick Selection and the legacy Magic Wand.
How the Object Selection Tool Compares to Other Selection Tools
Users frequently ask “Object Selection Tool vs. Quick Selection – which should I use?” The answer depends on speed, precision, and the kind of object you’re selecting. The table below maps the five most common selection methods across those dimensions. Annenberg DL’s overview and Kost’s comparison inform the ratings.
| Tool | Speed | Precision | Best Use Case |
|---|---|---|---|
| Object Selection Tool | Fast (auto-detect) | Moderate – good for distinct objects with clear edges | Complex shapes, multiple objects, isolated subjects |
| Quick Selection Tool | Fast (brush-based) | Moderate – excellent for broad areas; requires brush refinement | Large uniform objects, soft edges, rough cutouts |
| Magic Wand | Instant (click) | Low – relies on colour/tone tolerance | Solid-colour backgrounds, graphic elements with flat colour |
| Pen Tool | Slow (manual path) | Very high – sub-pixel accuracy | Product shots, sharp geometry, hair/fur with Refine Edge |
| Select > Subject | One click | Good for the main subject; misses secondary objects | Whole-subject selection when the subject is clearly dominant |
Practical workflow: Start with the Object Selection Tool as your first attempt for any selection. If the boundary is clean, you’re done. If auto-detection misses fine detail (hair, glass, overlapping edges), fall back to the Pen Tool for a manual path, or use Select and Mask with Refine Edge. The Magic Wand remains useful only for removing solid-colour backgrounds—for almost everything else, the Object Selection Tool is a faster starting point.
Four Real-World Bugs and How to Fix Them
Adobe’s documentation doesn’t cover what happens when the tool simply stops working or produces wrong results. These four issues appear repeatedly in community forums and have reliable workarounds.
Bug 1: Select Subject fails
“Couldn’t find a subject to select.”
Affects: Photoshop 2023 versions 24.0.1 and 24.1.0, especially on high-quality Getty images.
Fix: Roll back to the 2022 version of Photoshop, or bypass Select Subject and use the Object Selection Tool directly (drag a box around the subject). The Adobe Community thread confirms that the 2022 version handles the same images correctly.
Bug 2: Edge gap at canvas boundary
When the subject touches the right or bottom canvas edge, the selection misses a few pixels.
Affects: All recent versions (community reports from 2023–2024).
Fix: Switch to Lasso mode and manually draw a small addition over the missing strip, or use the Quick Selection Tool’s brush to extend the selection. The forum report shows the exact pixel offset.
Bug 3: Tool greyed out
The Object Selection Tool icon is inactive and cannot be selected.
Causes: Image mode is not RGB, there are no visible pixel layers, the document is too small, or the active layer is locked.
Fix: Check Image > Mode (must be RGB/8-bit or RGB/16-bit), unlock the layer, ensure at least one visible pixel-based layer exists, and increase canvas size if it’s below roughly 50×50 px.
Bug 4: Low-contrast detection failure
The tool does not highlight the intended object, or the selection boundary is wildly wrong.
Common on: Busy backgrounds, subjects with similar colour to the background, or very small objects.
Fix: Switch to Rectangle mode and draw a very tight box around the object—this reduces the area the engine has to analyse. If that still fails, use the Pen Tool or Quick Selection with brush refinement. PiXimperfect’s precision tutorial demonstrates the tight-box technique.
Version Matters – What Works Where (and What Doesn’t)
The Object Selection Tool isn’t available in every Photoshop version, and its capabilities have expanded over time. Here’s a version-by-version breakdown so you know what to expect depending on your build.
-
iPad (2026) — Photoshop for iPad. Object Selection Tool added in the February 2026 update. Full parity with desktop: Rectangle/Lasso modes, Select People, Sample All Layers. Adobe Help (iPad) details the feature set.
-
CC 2018–2020 — Desktop. Tool introduced. Basic Rectangle and Lasso modes. No Select People or attribute-level selection. Hover preview added in later point releases.
-
2023 (24.0.1, 24.1.0) — Desktop. Known bug with Select Subject — fails on high-res images. Rolling back to 2022 restores function. Select People works if present, but the underlying detection engine is unstable in these builds.
-
2024–2025 — Desktop. Stable builds. Select People with attribute selection (hair, eyes, clothes) available. Edge-gap bug still present (see Bug 2 above). Cloud processing for Select Subject added in Preferences.
-
CS6 / earlier — Legacy. Object Selection Tool does not exist. Use Quick Selection + Refine Edge as an alternative workflow. The related search “object selection tool photoshop cs6” returns no results because the tool was introduced in CC 2018.
Mac vs. Windows: All keyboard shortcuts are identical (W, Shift+W, Shift+Delete). The only difference: right-click on Windows opens context menus; on Mac use Ctrl+click (or enable right-click in System Preferences).
When the Tool Struggles – Limitations and What to Use Instead
The Object Selection Tool is a top-tier option for most selections, but it has well-defined boundaries. Knowing where it falls short saves you from wasting time on trial-and-error when a different approach would work faster.
Transparent objects (glass, smoke, water)
The auto-detection engine relies on visible edges and contrast. Transparent or semi-transparent subjects—drinking glasses, smoke trails, water splashes—often produce incomplete or hollow selections. Use the Pen Tool for hard-edged glassware, or channel-based masking (duplicate the Blue channel, adjust Levels) for smoke and liquids.
Overlapping subjects
When two objects touch or overlap, the tool frequently merges them into one selection. Draw a tight Lasso around the single object you want, staying as close to its boundary as possible. If the engine still includes the neighbour, switch to the Quick Selection Tool and brush the overlapping area out (hold Alt/Option to subtract).
Low-contrast / busy backgrounds
A subject that blends into a similarly coloured or highly textured background will confuse the auto-detection. The PiXimperfect tutorial recommends drawing an extremely tight rectangle—barely larger than the subject—to limit the engine’s search area. If that fails, the Pen Tool remains the most reliable fallback.
Hair and fur
The Object Selection Tool can detect a person’s hair as a Select People attribute, but fine, flyaway strands are beyond its resolution. After making your initial selection, open Select and Mask (right-click the selection > Select and Mask) and use the Refine Edge Brush to paint over hair. Output to a new layer with a layer mask for a non-destructive result.
▶︶ Performance note: On very large files (4K+ resolution or documents with hundreds of layers), consider enabling Cloud processing for Select Subject via Preferences > Image Processing > Select Subject processing. Local processing can stall on memory-intensive images; Cloud offloads the computation to Adobe’s servers. Julieanne Kost’s blog covers the setting.
Final word on limitations: The Object Selection Tool is a time-saver for roughly 80 % of all selection tasks. For the remaining 20 %—transparency, overlap, low contrast, fine hair—it pays to have the Pen Tool, Quick Selection, and Select and Mask ready as complementary tools. The edge-gap bug (Bug 2) is a reminder that even on simple selections, a quick manual check is worth the extra ten seconds.
For batch cutout workflows where you need to export multiple subjects as transparent PNGs with edge cleanup, consider a dedicated plugin like Layerbench, which runs Photoshop’s own Select Subject and trims each layer to its visible bounds in a single action—useful when you’re processing dozens of layers and don’t want to mask each one by hand.