- Category:
- Background Removal
- Summary:
- Remove background from image on Mac using Preview, Finder, or free online tools, with Ventura+ one-click methods and Instant Alpha for older systems.
Built-in methods for every macOS version, plus third-party options when you need more.
Quick answer: You can remove an image background on Mac using several methods — the right one depends on your macOS version and the complexity of the subject.
- Ventura+ Preview Remove Background button
- Ventura+ Finder Quick Actions
- Monterey & earlier Preview Instant Alpha
- Any version Online tools & Smart Lasso
Why the Preview Remove Background Button Isn’t Available on Every Mac
Official Apple Support documentation shows a dedicated Remove Background button inside Preview’s Markup toolbar, but it does not specify which macOS versions include it. Apple’s own guide describes the feature without a version footnote, which has led to confusion among users running older operating systems.
In practice, the Remove Background button — and the related Finder Quick Actions option — require macOS Ventura (2022) or later. On Monterey (2021) and earlier, the equivalent built-in tool is Instant Alpha, a manual selection method that works differently. Third-party documentation from Icons8 confirms this version split: Instant Alpha is listed for “macOS Monterey and earlier,” while the one-click button and Quick Actions appear only for Ventura and newer.
How to check your macOS version: Click the Apple menu in the top-left corner of your screen and select About This Mac. The version number appears directly below “macOS.”
If your Mac is running Ventura or later, you have two one-click removal methods built in. If you are on an older system, you can still remove backgrounds using Instant Alpha, the Smart Lasso tool, or free online services — all covered in the sections below.
Using Preview’s Remove Background Button <span class="pill">Ventura+</span>
The fastest built-in method is the Remove Background button in Preview’s Markup toolbar. It works well for subjects with clear separation from the background — solid-colour backdrops, well-lit product shots, and simple shapes.

The Markup toolbar in Preview — the Remove Background button (highlighted) processes the image in one click.
- Open your image in Preview. (Right-click the file and choose Open With > Preview.)
- Click the Markup toolbar icon (the brush tip inside a circle).
- Click the Remove Background button — it looks like a silhouette with a dotted border.
- If a dialog asks whether to convert the image to PNG, choose Duplicate to keep the original file, or Convert to overwrite it with the transparent version.
You can also reach the same command from the menu bar: Tools > Remove Background. This shortcut works identically to the toolbar button and is useful if you prefer keyboard navigation. (Users on Reddit frequently point out this menu alternative as a time-saver.)
Format note: The Remove Background button works with JPEG, PNG, and TIFF files. HEIC images may prompt a conversion step. If the button appears greyed out, try opening the image in Preview and converting it to PNG first via File > Export.
Finder Quick Actions for One-Click Removal <span class="pill">Ventura+</span>
If you prefer to stay in Finder, Quick Actions offer the quickest route — no app window required. This method is especially handy for processing a single image in a few seconds.
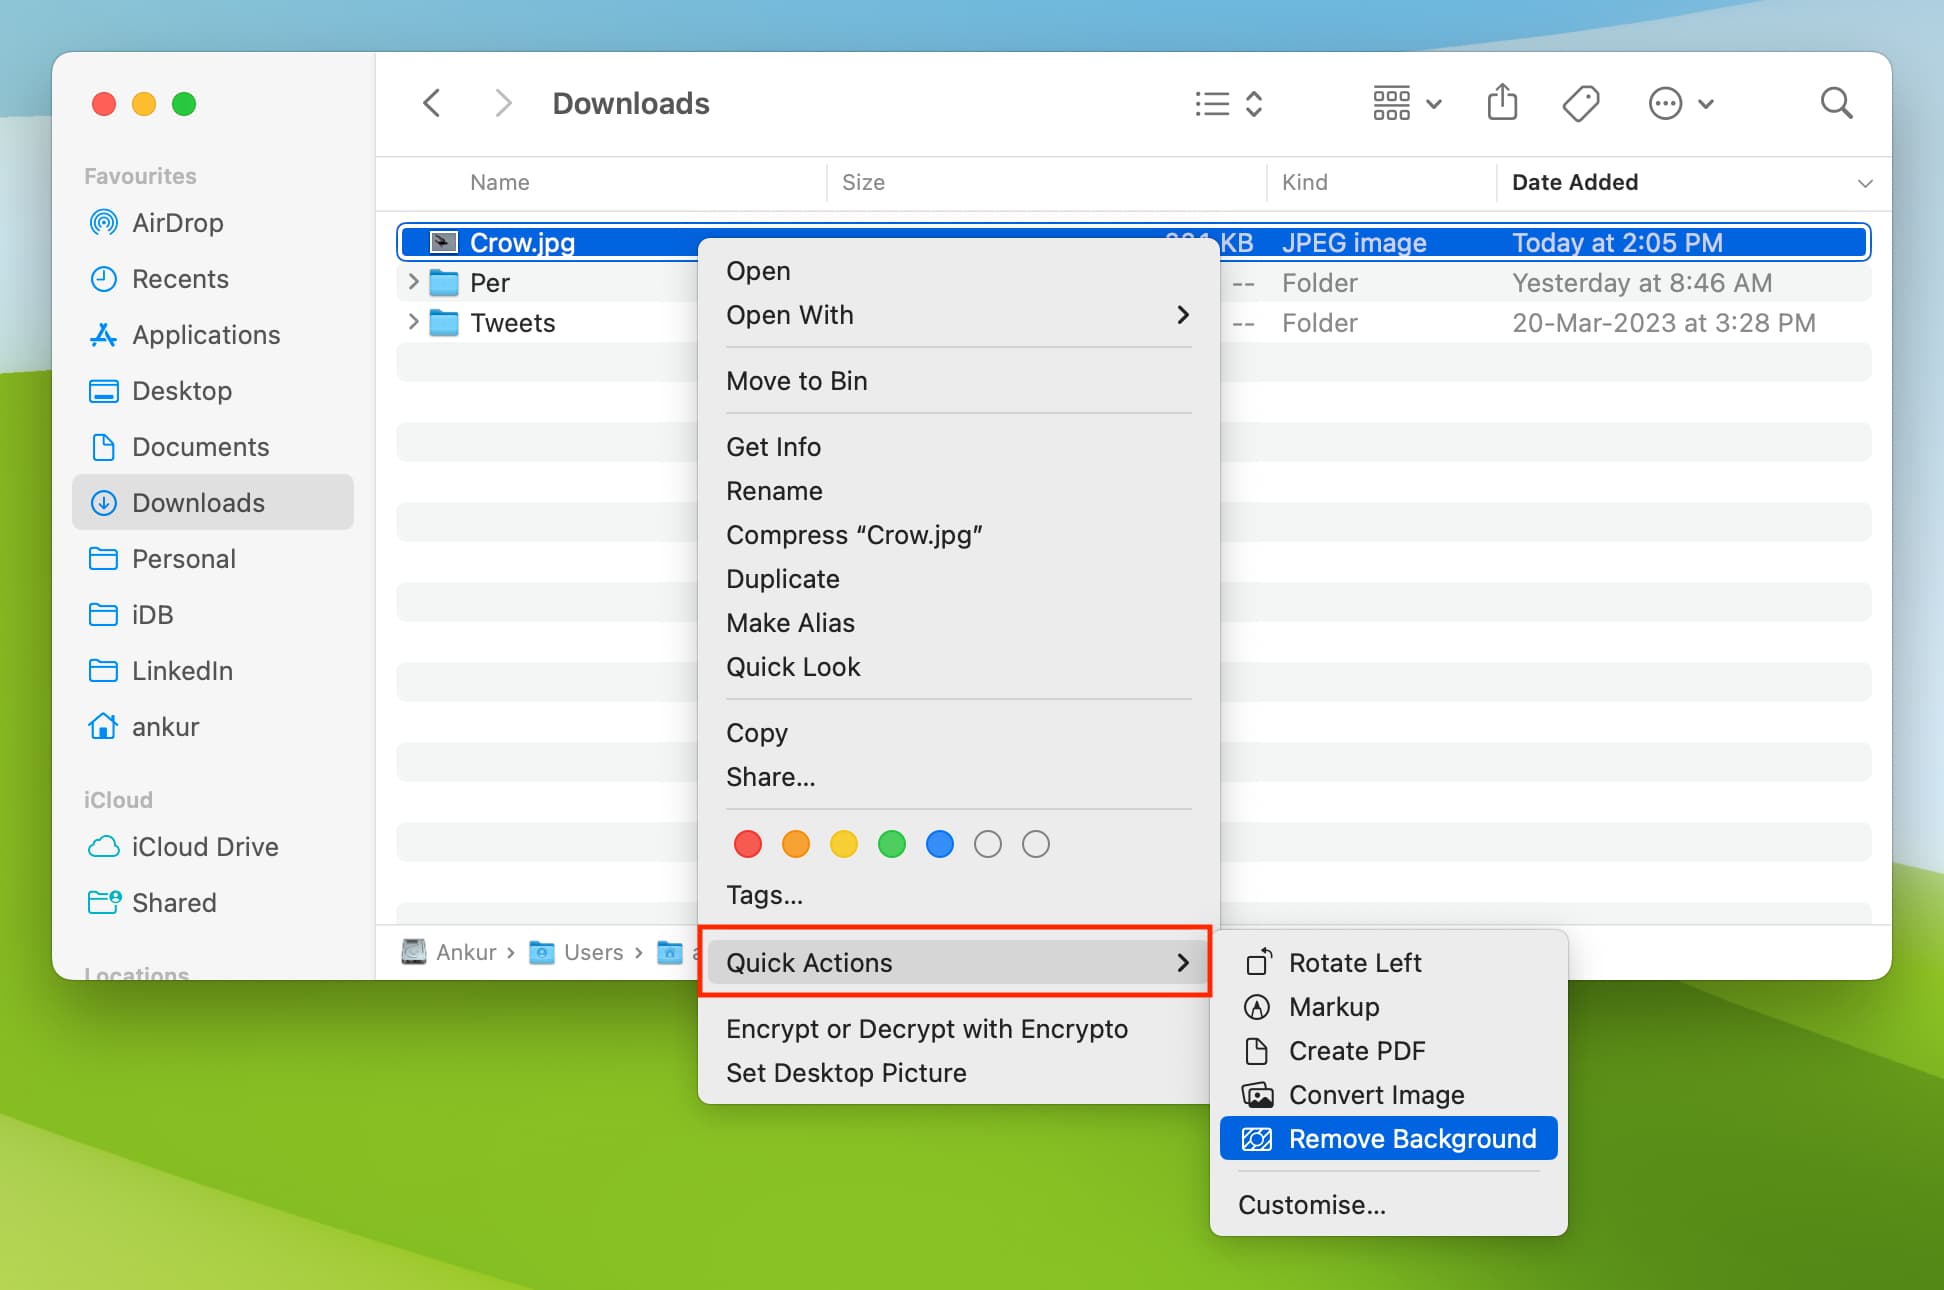
Right-click any image in Finder, then select Quick Actions > Remove Background.
- Right-click (or Control-click) the image file in Finder.
- From the context menu, choose Quick Actions > Remove Background.
- The tool processes the image and saves a new PNG file with a transparent background, placed next to the original with “(Background Removed)” appended to the filename.
Quick Actions rely on the same underlying engine as Preview’s Remove Background button, so the quality and speed are comparable. The main difference is convenience: you never need to open an application. Icons8’s walkthrough notes that this method works on most common image formats and produces a clean cutout for well-defined subjects.
Tip: Quick Actions can also be applied to a single file selected in Finder without right-clicking — open the File menu and choose Quick Actions > Remove Background.
The Instant Alpha Method for Older macOS <span class="pill amber">Monterey & earlier</span>
For Macs running macOS Monterey or earlier, Instant Alpha is the built-in alternative to the one-click Remove Background button. It is a manual tool that works best on backgrounds with uniform colour or smooth gradients.
- Open the image in Preview and click the Markup toolbar icon.
- Select the Instant Alpha tool — it looks like a magic wand.
- Drag across the background area you want to remove. The selected portion highlights in colour.
- Press Delete (or Backspace) on your keyboard. The background disappears, leaving a transparent area.
- Repeat steps 3–4 for any remaining background sections. Zoom in for precision on edges.
Because Instant Alpha works by sampling colour ranges, it performs well on plain backdrops but can struggle with fine details like hair, fur, or transparent objects. Documentation from Icons8 recommends it as a free, lightweight option for older systems, noting that multiple passes may be needed to clean up residual background patches.
Limitation: Instant Alpha removes pixels destructively — you cannot undo after saving. Always duplicate the image (File > Duplicate) before starting so you have a copy of the original.
Using the Photos App — What It Can and Can’t Do
Several online guides list the Photos app as a method for background removal, but the reality is more nuanced. A YouTube tutorial includes Photos among three removal techniques, leading some users to expect a one-click tool inside the app. However, discussions on Reddit clarify that the Photos app does not have a dedicated “Remove Background” button.
What Photos does offer: In Edit mode, the Clean Up brush (sometimes labelled “Erase”) can manually paint over background areas to remove them. This is a retouching tool designed for small blemishes, not full background removal. It works brushstroke by brushstroke and is impractical for clearing an entire backdrop.
The reliable workaround: If your image is stored in Photos, open it in Preview instead. Select the photo in Photos, go to File > Open With > Preview, then use the Remove Background button (Ventura+) or Instant Alpha (older macOS) described in the sections above. This approach gives you the dedicated removal tools that Photos itself lacks.
Bottom line: Skip the Photos app for background removal unless you only need to erase a small object. For full cutouts, use Preview or Quick Actions.
Free Online Tools for Automatic Background Removal
When built-in tools fall short — especially for complex edges, fur, or translucent objects — free online background removers offer a practical alternative. These services use AI to detect and separate the subject with minimal manual effort.
Example: Icons8 Background Remover (documented here) is a straightforward option:
- Visit the Icons8 website and navigate to the Background Remover tool.
- Upload your image — the AI processes it automatically.
- Preview the result and download the transparent PNG.
Pros: No software installation required, works on any macOS version, and AI-powered tools typically handle hair and other fine details better than Preview’s built-in methods. Cons: Images are uploaded to a remote server (privacy consideration), free tiers may add watermarks or limit resolution, and an internet connection is required.
Other free online removers exist — such as the third method shown in the YouTube comparison video — and follow a similar upload-and-download workflow. For users who need a quick result on a complex image and are comfortable with cloud processing, these tools are a strong option.
Advanced Workflow for Complex Edges (Hair, Fur, Transparent Objects)
No single built-in tool handles every edge type perfectly. For subjects with fine detail — loose hair, animal fur, glass edges — a combination strategy produces significantly better results than any one method alone. Experienced users on Reddit share a two-pass approach that balances speed with precision.
The Recommended Combination Strategy
- First pass — Quick Actions: Right-click the image in Finder and choose Quick Actions > Remove Background. This gives you a rough cutout in seconds, removing most of the background.
- Second pass — Instant Alpha cleanup: Open the resulting PNG in Preview. Use the Instant Alpha tool to selectively remove leftover background fragments along the edges. Zoom in (
⌘+) to work on small areas. - Repeat Instant Alpha strokes on stubborn patches. A few careful passes can clean up edges that the initial one-click pass missed.
This workflow is slower than a single click but delivers noticeably cleaner edges, especially around hair and fur. One Reddit user described the process as requiring “very careful, laborious” work on detailed subjects, but the results justify the effort when a polished cutout matters.
Using Smart Lasso for Extraction
Preview’s Smart Lasso tool is designed for extracting a subject (copying it to a new transparent background) rather than removing the background in place. Apple Support documents this method as an alternative workflow.
- Open & Markup — Open the image in Preview and click the Markup toolbar icon.
- Select Smart Lasso — Choose the Smart Lasso tool from the selection menu.
- Trace — Drag around the subject to trace its edge. The tool snaps to contrast boundaries.
- Copy — Press
⌘C(Edit > Copy). - New from Clipboard — Go to File > New from Clipboard — this creates a new document with the subject on a transparent background. Save as PNG.
Video reviews (such as this one) note that Smart Lasso does “a so-so job” for background removal — it works adequately for simple, high-contrast shapes but struggles with intricate edges. Apple Support positions Smart Lasso primarily for extraction (copying a subject out), which aligns with this assessment. It is a useful fallback when the Remove Background button is unavailable and the subject has clear edges.
Professional Tools — Adobe Photoshop and Plugins
For edge cases that defeat all built-in and free online tools — glass objects, translucent materials, wispy hair against complex backgrounds — professional software offers the most control.
Adobe Photoshop provides several AI-powered features for background removal. The Select Subject command (available in Photoshop CC 2018 and later) uses machine learning to detect the primary subject in a single click. After selection, Refine Edge (or Select and Mask) lets you adjust edge softness, shift the boundary, and clean up halos. The process is more powerful than anything built into macOS, but requires a Creative Cloud subscription.
For designers who frequently cut out subjects in Photoshop, the Layerbench plugin automates the subject-cutout and layer-export workflow. It calls Photoshop’s Select Subject to build a mask, then offers one-click operations: trimming the layer to the subject’s bounds, exporting a transparent PNG at original scale, or applying a mask shrink (1–3 px) to reduce background halos. A mask-only mode leaves the PSD fully editable for further refinement. While not a replacement for manual masking on the most difficult edges, it reduces repetitive steps for batch work and standard cutouts.
If you regularly need high-quality cutouts and have access to Photoshop, the combination of Select Subject, Refine Edge, and a dedicated plugin can save hours compared to manual touch-up with Instant Alpha.
Which Method Should You Use? (comparison table)
The table below summarises the key trade-offs across all methods covered in this article, so you can choose based on your macOS version, the image type, and your quality requirements.
| Method | macOS Version | Speed | Edge Quality | Cost | Privacy |
|---|---|---|---|---|---|
| Preview Remove Background button | Ventura+ | Fast (1 click) | Good for simple subjects | Free | Local |
| Finder Quick Actions | Ventura+ | Fastest (1 click) | Good for simple subjects | Free | Local |
| Preview Instant Alpha | Monterey & earlier | Medium (manual) | Good after cleanup | Free | Local |
| Icons8 online tool | Any | Fast (upload) | Very good (AI) | Free tier (watermarks); paid | Cloud (privacy note) |
| Smart Lasso extraction | Any | Slow (manual) | Adequate for simple shapes | Free | Local |
| Combination workflow (Quick Actions + Instant Alpha) | Any | Slowest (multi-step) | Excellent for complex edges | Free | Local |
For quick everyday removal on macOS Ventura or later, use Quick Actions or the Preview button — both are free, local, and take only seconds. For detailed subjects like portraits with hair, the combination workflow (Quick Actions followed by Instant Alpha cleanup) delivers noticeably better edges at the cost of a few extra minutes. If you need one-click quality on complex edges and privacy is not a primary concern, try a free online AI tool. For maximum control — especially with glass, translucency, or fine hair against busy backgrounds — Photoshop with its Select Subject and Refine Edge tools, optionally augmented by a plugin like Layerbench, remains the most capable option.