- Category:
- Workflow Tips
- Summary:
- Learn every method for photoshop rotate layer: free transform, precise angle, and Ctrl+T, plus fixes for common issues like unwanted rotation
Rotate a single layer in three seconds
Select the layer in the Layers panel, press Ctrl+T (Windows) or Cmd+T (macOS) to open Free Transform, then drag any corner handle outside the bounding box. Hold Shift to snap to 15° increments. Press Enter or click the checkmark in the Options bar to commit.
If you accidentally rotated the whole canvas instead, you used Image > Rotate instead of Edit > Transform — use the Edit menu (or Ctrl+T) to rotate only the active layer.
Which Rotation Method Should You Use?
Photoshop gives you several ways to rotate a layer. The right one depends on whether you need speed, precision, or nondestructive editing. Here is a quick guide to each approach.
- Quick, casual rotation — Use the Move Selection tool method — select the layer, enable the Move tool, and drag the corners of the bounding box. Fine for rough adjustments.
- Precision or 90° flips — Use Free Transform (
Ctrl+T) for exact numeric angles, or the preset rotations under Edit > Transform for 180°, 90° clockwise/counter‑clockwise, and horizontal/vertical flips. - Rotate only part of a layer — Make a selection (Lasso, Marquee, etc.), then apply Free Transform. Only the selected area rotates; the rest of the layer stays unchanged.
- Nondestructive editing — Convert the layer to a Smart Object before rotating. You can re‑edit the rotation angle later without losing image quality, and the original pixel data stays intact.
- 3D layers — Select the Mesh in the 3D panel, then use the Move tool's on‑screen x/y/z axes. Rotating the camera instead of the object is a common mistake — see the troubleshooting section for the fix.
- Multiple layers at once — Batch‑select layers with
Ctrl+click(Windows) orCmd+click(macOS) in the Layers panel, then apply Free Transform. All selected layers rotate together while keeping their relative positions.
Sources: Adobe official guide to rotating layers provides the Move tool and Free Transform workflows; Adobe HelpX (Feb 2026) covers preset rotations and flips.
How to Rotate a Layer Using Free Transform
Free Transform is the most flexible rotation method. It gives you visual control via drag handles, numeric precision via the Options bar, and keyboard shortcuts for speed.
- Select the layer you want to rotate in the Layers panel. Click its name to highlight it.
- Open Free Transform by pressing
Ctrl+T(Windows) orCmd+T(macOS). A bounding box with square handles appears around the layer content. - Rotate visually: move your cursor just outside any corner handle until it turns into a curved double‑arrow, then click and drag. Hold
Shiftwhile dragging to constrain rotation to 15° increments. - Rotate by exact angle: type a value (in degrees) into the angle field in the Options bar at the top of the screen — e.g.,
45for 45° clockwise,-45for counter‑clockwise. Decimal values like45.5work too. - Commit the transformation: press
Enter(Return on macOS), or click the checkmark icon in the Options bar. To cancel, pressEscor click the cancel icon (a circle with a line through it).
Tip — If you rotate and change your mind immediately, press
Ctrl+Z(Windows) orCmd+Z(macOS) to undo. You can also step backward through multiple undos withCtrl+Alt+Z/Cmd+Option+Z.
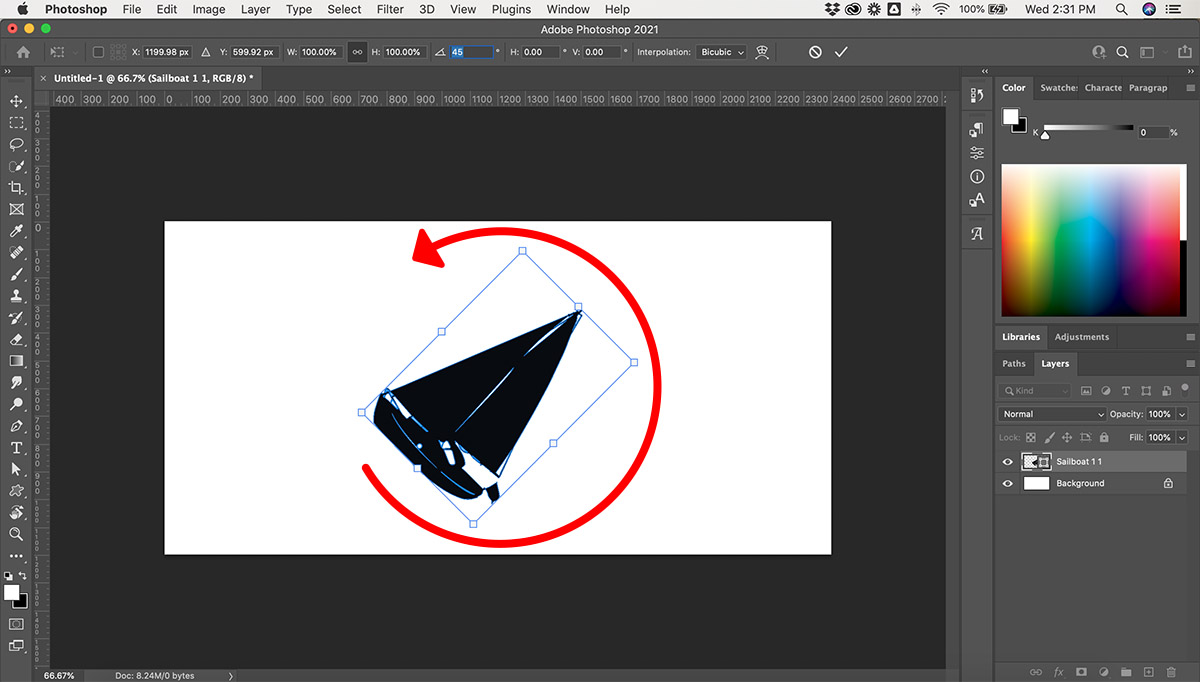
Free Transform bounding box with rotation handles — drag any corner outside the box to rotate the layer. Hold Shift for 15° snaps.
Keyboard shortcuts for Free Transform (Adobe official docs):
| Action | Windows | macOS |
|---|---|---|
| Open Free Transform | Ctrl+T |
Cmd+T |
| Constrain to 15° increments | Shift + drag |
Shift + drag |
| Commit (confirm) | Enter |
Return |
| Cancel | Esc |
Esc |
| Undo last transform | Ctrl+Z |
Cmd+Z |
Rotating a Smart Object Nondestructively
When you rotate a regular (raster) layer repeatedly, each rotation degrades image quality because the pixels are resampled. To avoid this, convert the layer to a Smart Object first: right‑click the layer in the Layers panel and choose Convert to Smart Object (or go to Layer > Smart Objects > Convert to Smart Object). Then apply Free Transform normally. The rotation is stored as a non‑destructive transform that you can tweak or remove later without harming the original pixels. This is especially useful for design mockups and animation frames.
Rotating Multiple Layers at Once
Hold Ctrl (Windows) or Cmd (macOS) and click each layer you want to rotate in the Layers panel. With all target layers selected, press Ctrl+T / Cmd+T. The bounding box encloses all selected content; drag to rotate everything together. The relative positions and spacing between layers are preserved.
Using the Move Tool Instead
If you prefer a tool‑based approach: select the layer, then choose the Move tool (shortcut V). In the Options bar, check Show Transform Controls. A bounding box appears around the layer — drag the corner handles to rotate. This method is slightly less precise than Free Transform (no numeric input on the fly) but works well for quick, rough turns.

With Show Transform Controls enabled, the Move tool displays a bounding box that lets you rotate the selected layer by dragging any corner.
Preset Rotations and Flips
For common angles without dragging, use Edit > Transform and choose one of the presets: Rotate 180°, Rotate 90° CW (clockwise), Rotate 90° CCW (counter‑clockwise), Flip Horizontal, or Flip Vertical. These apply instantly to the selected layer. The Adobe HelpX page (Feb 2026) covers all preset options.
Precise Numeric Rotation for Animations
When you need frame‑by‑frame consistency — for example, rotating a gear or a character's arm by exactly 4.5° each frame — use the numeric angle field in the Free Transform Options bar. You can enter decimal values like 4.5 or -12.25. Photoshop rounds to two decimal places internally, which is sufficient for smooth animation.
Fix Common Rotation Problems
Many rotation issues come from a handful of easily fixable causes. Here are the most frequent ones reported by users.
"Rotate" Option Is Grayed Out — Layer Locked or Background Layer
If the Edit > Transform menu is grayed out, your layer is probably locked. Look for a padlock icon in the Layers panel. Click the padlock to unlock the layer. The Background layer (italic name) is locked by default — double‑click it, give it a name, and it becomes a regular layer that can be rotated. Quora contributors note this as the most common reason for a grayed‑out rotate option.
Rotating the Whole Canvas Instead of a Single Layer
If you used Image > Image Rotation, you rotated every layer at once because that command affects the entire canvas. To rotate only one layer, always use Edit > Transform (or Ctrl+T / Cmd+T). This distinction trips up many beginners, as flagged in an Adobe Community discussion.
The Image > Image Rotation menu rotates the entire canvas (all layers). Use Edit > Transform instead to rotate only the active layer.
After Removing Background, Only a Transparent Square Rotates
If you used the Magic Wand or a similar tool to delete a background and then tried to rotate, you may see only a transparent square rotating. This happens when the selection is still active on the transparent area rather than on the layer content. Fix: press Ctrl+D (Windows) / Cmd+D (macOS) to deselect, then click the layer thumbnail in the Layers panel to target the content, and try rotating again. A Reddit user (Unlucky‑Area4727) ran into exactly this issue after using the Magic Wand.
Rotation Won't Stick — Hidden Commit Checkmark
In some Photoshop versions, especially on M1 Macs, the Options bar checkmark (commit button) can become nearly invisible when the bar is undocked and Enable Narrow Options Bar is unchecked in Preferences. You may think the rotation didn't apply. Fix: dock the Options bar to the top of the workspace, or go to Preferences > Interface and check Enable Narrow Options Bar. A Photoshop Gurus Forum thread by John Wheeler details this exact scenario.
Warning — If you press
Enterto commit but the bounding box disappears and the rotation reverts, the checkmark was likely hidden. Always confirm the commit button is visible in your workspace layout.
3D Camera Rotates Instead of the Layer
When working with 3D layers, it's easy to accidentally rotate the camera view instead of the 3D object. Fix: open the 3D panel and select Mesh (the object itself), not the Camera. Then use the Move tool's on‑screen x/y/z axes to rotate the layer. The pivot point must be set before converting the layer to 3D — centre the object in the layer first. An Adobe Community answer by "Dave" explains this in detail.
"Smart Object Can't Be Rotated" — Myth
Some users believe Smart Objects block rotation. This is not true. Smart Objects rotate exactly like regular layers — select them and use Free Transform or the Move tool. If the option appears grayed, check whether the layer is locked or a Background layer instead. Adobe's official guide confirms that Smart Objects support full transformation controls.
Rotate Only Part of a Layer
You don't have to rotate an entire layer. If you want to rotate just one element — say, a person's head in a group photo — make a selection around that area first.
- Choose a selection tool such as the Lasso (
L), Rectangular Marquee (M), or Elliptical Marquee (M+Shift+Mto cycle). - Draw the selection around the area you want to rotate.
- Press
Ctrl+T/Cmd+T— the bounding box now applies only to the selected pixels within the layer. - Drag a corner handle to rotate, then press
Enterto commit. - Press
Ctrl+D/Cmd+Dto deselect.
A common real‑world example: rotating a face without rotating the whole image. Reddit user Beethonoven asked how to rotate a person's head independently of the background. The solution is exactly this selection‑based method — use the Lasso tool to outline the head, then apply Free Transform. See the Reddit thread for selection‑based rotation for more examples.
!Landscape photo with transformation bounding box showing rotation of a selected area in Photoshop
When a selection is active, Free Transform rotates only the selected pixels — useful for adjusting a single face or object within a layer.
Advanced Tips for Power Users
Change the Pivot Point (Rotation Center)
By default, rotation happens around the centre of the layer. To rotate around a different point — such as a corner, an edge, or a specific detail — look for the pivot point (a small circle with crosshairs) inside the Free Transform bounding box. Drag it to any location on the canvas. When you rotate, the layer spins around that new centre. This is documented in Adobe's layer rotation guide and is essential for tasks like rotating a clock hand around its base or aligning a graphic to a specific anchor.
Rotate 3D Layers Correctly
For 3D layers, select Mesh in the 3D panel before rotating. Use the Move tool's coloured axes (red for x, green for y, blue for z) to rotate in three dimensions. If you need the pivot point in a specific spot, set it before converting the layer to 3D — once converted, the pivot is fixed. The Adobe Community answer by "Dave" walks through this workflow.
Rotate with Precision for Animations
As noted in the Free Transform section, the numeric angle field accepts decimal degrees. For frame‑by‑frame animation, enter values like 5.25 or -12.75 to achieve smooth incremental rotation. Combine this with the pivot point adjustment for realistic mechanical motion (e.g., a wheel or pendulum).
How to Rotate Layers in Photoshop Elements
Photoshop Elements — the simplified version of Photoshop — uses a different menu path. Instead of Edit > Transform, go to Image > Rotate. This rotates the entire layer (it does not support partial‑layer rotation or Free Transform). Elements also lacks the Move‑tool bounding box method. The Adobe HelpX page for Photoshop Elements confirms that rotation works at the layer level only, and the options are limited to preset angles: 90° CW, 90° CCW, 180°, and straighten tools.
Note — If you are using the full version of Photoshop CC (2026 or earlier), always use Edit > Transform or
Ctrl+T. The Image menu rotates the whole canvas, not a single layer. Elements users should use Image > Rotate.
Which Method Fits Your Situation?
Every rotation task has a recommended approach. Use the table below to match your goal with the right method.
- Casual adjustment — Move tool — select the layer, enable Show Transform Controls, drag a corner. Quick and simple.
- Precise angle or animation — Free Transform with numeric input — enter exact degrees in the Options bar. Repeatable and accurate.
- Rotate one element (e.g., a face) — Selection + Free Transform — select the area with the Lasso or Marquee tool, then rotate.
- Nondestructive rotation — Smart Object + Free Transform — convert to Smart Object first, then rotate. Quality stays intact.
- Batch processing many layers — Select multiple layers + Ctrl+T — rotate them all at once while preserving relative positions.
- Working in 3D — Mesh selection in 3D panel — choose Mesh, then use the Move tool's axes for x/y/z rotation.
Real user scenarios at a glance:
- "I rotated the whole canvas by mistake" — use Edit > Transform (not Image > Rotate) to target only the active layer.
- "My layer is locked" — click the padlock icon in the Layers panel, or double‑click the Background layer to convert it.
- "The commit button is invisible" — dock the Options bar or enable Enable Narrow Options Bar in Preferences.
- "Only the transparent square rotates" — deselect (
Ctrl+D/Cmd+D) and click the layer's content thumbnail before rotating.
All methods described here are supported in Photoshop CC 2026 (as confirmed by Adobe's February 2026 HelpX update) and remain consistent with recent versions of the software.