- Category:
- Workflow Tips
- Summary:
- Photoshop offers at least a dozen ways to isolate a background
What to use, based on your image
The fastest method depends on your subject and background. Match your situation below:
- Solid-colour background — Magic Wand or Quick Action
- High-contrast subject — Remove Background Quick Action
- Complex edges (hair, fur) — Quick Selection + Refine Edge
- Geometric / product shot — Pen Tool for sub-pixel precision
- Busy / patterned background — Quick Selection + manual mask
- Fine detail (spokes, glass) — Channels or hybrid workflow
Jump to: full decision guide · fix problems · verify your selection
- Decision guide
- Quick Actions
- Quick Selection Tool
- Magic Wand & Pen
- Hair & fine details
- Fix problems
- Hybrid workflow
- Verify selection
How to Decide Which Background Selection Method Is Right for You
Photoshop offers at least a dozen ways to isolate a background. The right one depends on three factors: your image's composition, the contrast between subject and background, and your Photoshop version. The wrong tool for the job wastes time — the right one can finish in a single click or a few brush strokes.
The table below maps each tool to its ideal scenario, based on guidance from Pro Edu's overview of advanced selection tools and Adobe's own documentation.
| Tool / Method | Speed | Precision | Best for |
|---|---|---|---|
| Quick Action — Remove Background | ★ ★ ★ ★ ★ | ★ ★ ☆ | High-contrast images, one-click removal |
| Quick Action — Select Background | ★ ★ ★ ★ ★ | ★ ★ ☆ | Selecting background pixels for adjustment |
| Quick Selection Tool | ★ ★ ★ ★ | ★ ★ ★ ☆ | Most subjects with moderate edge complexity |
| Magic Wand | ★ ★ ★ ★ | ★ ★ | Solid-colour or uniform backgrounds |
| Pen Tool | ★ ★ | ★ ★ ★ ★ ★ | Hard edges, product shots, geometry |
| Channels palette | ★ ★ ★ | ★ ★ ★ ★ | Hair, fur, smoke, fine detail |
| Select and Mask workspace | ★ ★ ★ | ★ ★ ★ ★ | Refining any selection, especially edges |
The trade-off is straightforward: automated methods (Quick Actions, Magic Wand) are fast but fragile — they work well only when the image matches their assumptions. Manual methods (Pen Tool, Channels) are slower but reliable on any composition. A Reddit user struggling to select only the background of a cake (the frosting kept bleeding into the selection) learned this the hard way: the Magic Wand worked, but only after they manually edited the selection to exclude foreground tones. That kind of hybrid approach — start fast, then refine — is the practical workflow most professionals use.
How to Select a Background Using Photoshop's Quick Actions
Photoshop's Quick Actions (available in the Discover panel) are the fastest route. They use AI to detect the subject or background in one click. Two Quick Actions are relevant to this query: Select background and Remove background. Both are documented in Adobe's official Quick Actions guide.
Using the "Select Background" Quick Action
This action selects the background pixels around your subject, leaving the subject unselected. It is ideal when you want to apply an adjustment — like a colour shift, gradient, or blur — only to the background, without removing it.
Workflow:
-
Open the Discover panel:
Cmd/Ctrl+For Help > Photoshop Help. -
Click Browse, then Quick Actions, then Select background.
-
Click Apply. The background area becomes a marching-ant selection.
-
Optional: switch layers and click Refresh to re-run the action on a different layer. Use Revert to undo.

The "Select background" Quick Action in the Discover panel isolates the background pixels around the parrot, ready for adjustment.
Using the "Remove Background" Quick Action
This action removes the background entirely, leaving it transparent or masked. It is the quicker sibling of "Select background" when your goal is replacement, not adjustment.
Workflow:
- Ensure the layer is active and unlocked — double-click a locked Background layer to convert it to a normal layer.
- Open the Discover panel (
Cmd/Ctrl+F) and choose Remove Background. - Photoshop builds a layer mask (or deletes background pixels, depending on your version and settings).
High-contrast images only
Adobe's own documentation states that the Quick Action works best on "high-contrast images." If your subject and background have similar tones — a white shirt against a pale wall, for example — expect the AI to miss edges and require manual cleanup.
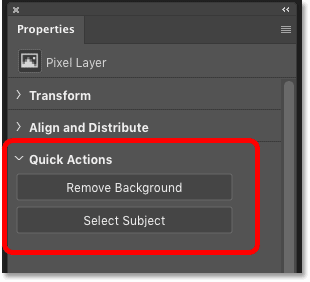
The Properties panel in Photoshop CC displays both "Remove Background" and "Select Subject" as one-click Quick Actions.
When to Refine the Mask Manually
No automated tool is perfect — especially on hair, fur, or translucent objects. Adobe explicitly recommends manual refinement when the Quick Action result is imperfect: "refine the mask manually with the Brush tool," as noted in the Remove Background help page.
How to refine:
- Switch to the Brush tool (
B). - Set foreground to black to hide stray background pixels; set to white to restore areas the mask accidentally removed.
- Zoom to 200% and paint along problem edges. Use a soft brush (hardness 50–70%) for natural transitions.
How to Select a Background with the Quick Selection Tool
The Quick Selection Tool is the workhorse of background selection. It paints a selection by detecting edges and colour similarity, and it responds to brush size and pressure. A detailed walkthrough from Digital Photography School covers the complete workflow.
Step-by-step:
- Select the Quick Selection Tool from the toolbox (shortcut
W). Resize the brush with[(smaller) and](larger). Use a small brush for detailed edges — 10–30 px is typical for hair or product edges. - Drag over the subject (not the background). The tool expands the selection automatically based on edge detection. If it bleeds into the background, hold
Altand drag over the over-selected area to subtract. - Click Refine Edge (or Select and Mask in newer versions). Enable Smart Radius — start with a value of 3–5 px. Use the Edge Detection Brush (the refine-edge brush icon) to paint over hair or fur; this tells Photoshop to treat those pixels as semi-transparent.
- Set the View Mode to Black & White. This reveals the selection mask as a greyscale image — pure white is fully selected, pure black is untouched. Hard, jagged edges appear as sharp transitions; a smooth gradient indicates a clean mask.
Keyboard shortcuts for speed
[/]— resize brush
Alt+ drag — subtract from selection
Ctrl+Alt+R— open Select and Mask
Q— toggle Quick Mask mode
How to Select a Background Manually with the Magic Wand or Pen Tool
When AI tools fail — due to low contrast, similar tones, or a bug — manual tools give you full control. Two stand out for background selection: the Magic Wand for solid colours and the Pen Tool for absolute precision.
Selecting Solid Backgrounds with the Magic Wand
Best for a solid-colour background — white, green screen, a single saturated tone. The Reddit user who couldn't select only the frosting on a cake (the background had similar colours to the subject) eventually solved it with the Magic Wand plus manual editing.
Workflow:
- Select the Magic Wand from the toolbox (shortcut
W, then cycle withShift+W). - Set Tolerance in the options bar — start at 32. A higher value includes more tonal variation; a lower value sticks to the exact colour clicked.
- Click on the background. If the background is non-contiguous (e.g., peeking through gaps in the subject), hold
Shiftand click additional areas, or use Select > Similar. - To isolate the background without selecting the subject: select the subject first (using Magic Wand on the subject, or Select Subject), then press
Ctrl+Shift+Ito invert.
Drawing Precise Paths with the Pen Tool
The Pen Tool produces sub-pixel selections — the cleanest edges you can get. It is the standard tool for product photography, automotive shots, and any image where fringing or edge halos are unacceptable.
Workflow:
-
Select the Pen Tool (
P). In the options bar, choose Path mode. -
Click to place anchor points along the subject's edge. For curves, click-and-drag to create Bézier handles. Tracing the subject and then inverting is usually easier than tracing the background.
-
Close the path. Right-click and choose Make Selection (or
Ctrl+Enter). Set Feather Radius to 0 px for hard edges, up to 0.5 px for a slight softening. -
Press
Ctrl+Shift+Ito invert and select the background.
Precision
For a deeper look at all manual tools — including the Lasso family, Channels, and the full Select and Mask workspace — the Pro Edu advanced selection guide provides a comprehensive breakdown.
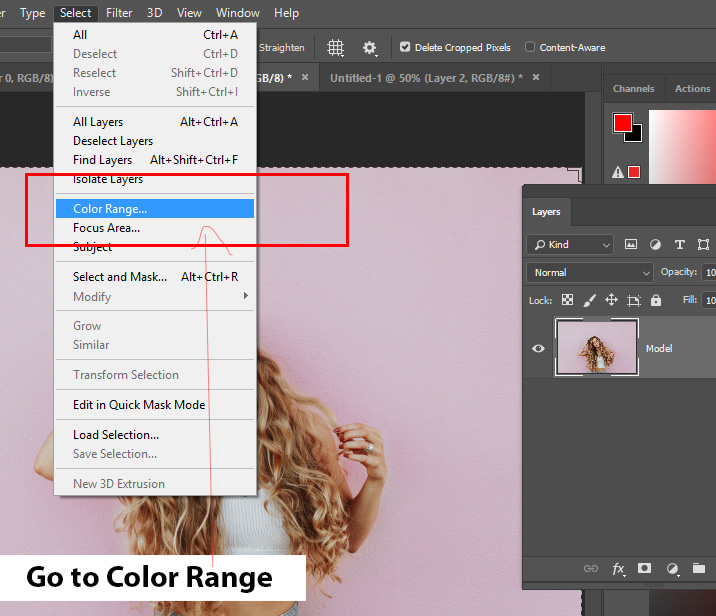
The "Color Range" command under the Select menu offers another manual option for sampling and isolating background tones — especially useful when the Magic Wand's tolerance is too coarse.
How to Select a Background with Hair, Fur, or Fine Details
Hair and fur are the hardest test for any selection tool. Photoshop's AI has improved significantly — tests by PhotoshopCafe on bicycle spokes and colourful patterns showed that the 2025 AI produced "cleaner edges" than earlier versions, though it still "requires a little work" on the trickiest areas. For hair, a hybrid approach consistently delivers the best results.
Recommended workflow:
- Quick Selection Tool for the bulk selection. Drag over the subject, staying away from the hair edge.
- Open Select and Mask (
Ctrl+Alt+R). Enable Smart Radius (3–5 px). Use the Edge Detection Brush (the icon with a brush and dashed circle) to paint over the hair. The brush tells Photoshop to evaluate foreground and background colours and create partial transparency for individual strands. - Set View Mode to Black & White to inspect the mask. If strands are missing, paint them again with a smaller Edge Detection Brush.
- For the most stubborn hair, use the Channels palette method (detailed below).
Channels method for hair
The Channels palette isolates the colour channel with the highest contrast between subject and background — typically Blue or Green. Duplicate the channel, apply Levels (
Ctrl+L) to push the contrast to near 100% black/white, thenCtrl+clickthe channel thumbnail to load it as a selection. This method predates AI and remains one of the most reliable for fine detail.
How to Fix Common Photoshop Background Selection Problems
Even experienced users hit roadblocks. Below are the three most common issues reported in the community, with fixes drawn from real discussions and Adobe's documentation.
"I Can't Select Only the Background"
Reddit — r/photoshop
"I'm trying to select the background of a cake image (the frosting is the foreground). The selection keeps bleeding onto the frosting. How do I select only the background?"
Cause: The Magic Wand or Quick Selection is picking up similar tonal values in both the background and the foreground (frosting).
Fix: Use the Magic Wand to click the background first. If it spills onto the foreground, lower the Tolerance (try 16 instead of 32). For non-contiguous backgrounds (e.g., gaps between frosted details), hold Shift and click each area, or use Select > Similar. Alternatively, select the subject first (using Quick Selection or Select Subject), then invert with Ctrl+Shift+I — this method is often faster than trying to select the background directly.
"Photoshop's Select Subject Isn't Working"
Adobe Community — v24.0.1 / v24.1.0
"Select Subject returns: 'Couldn't find a subject to select. There might not be prominent objects.' Works fine in Photoshop 2022."
Cause: A confirmed software regression in Photoshop 2023 (versions 24.0.1 and 24.1.0) that fails on high-quality stock images (e.g., Getty). The bug does not affect Photoshop 2022 or later patched versions.
Fixes:
- Use the Quick Selection Tool as a fallback — it does not depend on the same AI engine.
- Try the Channels palette method for contrast-based selection (see the hair section above).
- If possible, use Photoshop 2022 for images where Select Subject fails.
- Update to the latest Photoshop 2025 or 2026 version; later builds have resolved this issue.
"My Image Doesn't Have Enough Contrast"
Cause: The Quick Action and Select Subject both rely on contrast. Low-contrast images — like a grey subject on a grey background — produce poor results.
Fix: Add a temporary Levels or Curves adjustment layer above your image. Push the sliders to increase contrast dramatically (e.g., move the black-point slider to the right and the white-point slider to the left). Make your selection on this high-contrast version, then delete the adjustment layer. The selection persists on the original low-contrast image.
How to Combine Selection Methods for a Foolproof Workflow
No single tool is perfect. AI still needs touch-ups on hair (as PhotoshopCafe's tests confirm), and version-specific bugs can break automated features entirely. The professional approach is a hybrid pipeline that layers the strengths of each tool.
Recommended hybrid pipeline:
- Quick Action baseline — Run "Remove Background" or "Select Background" to get a starting mask.
- Quick Mask correction — Enter Quick Mask mode (
Q). Use a soft brush to paint rough corrections without dealing with marching ants. Paint in white to add, black to subtract. - Select and Mask refinement — Exit Quick Mask (
Q), then open Select and Mask (Ctrl+Alt+R). Use Smart Radius and the Edge Detection Brush for hair or fine detail. - Channels fallback — For any detail the AI missed, switch to the Channels palette and use the contrast-based method described earlier.
Keyboard shortcuts compendium for the hybrid workflow:
Ctrl+J — duplicate selection to new layer
Ctrl+Shift+I — invert selection
Ctrl+Alt+R — open Select and Mask
Q — toggle Quick Mask mode
[ / ] — resize brush or tool
Alt + drag — subtract from selection
Automating the pipeline
For users who perform background removal frequently — cutting out dozens of images per week — a plugin like Layerbench can wrap this entire workflow into a single action. It runs Photoshop's Select Subject, creates a mask, trims to the subject's bounds, applies edge cleanup with a user-supplied pixel shrink, and exports a transparent PNG — all without manual steps. The mask-only mode also leaves the PSD editable for further refinement.
How to Verify Your Background Selection Is Clean
A selection that looks perfect on your original image may reveal halos, fringing, or jagged edges when placed against a new background. Use these checks before finalising.
-
Switch to Black & White view in Select and Mask. This neutral view strips away colour and shows the mask as a greyscale alpha — pure white = selected, pure black = unselected. Sharp transitions or speckled grey areas indicate problem edges.
-
Check for edge halos — paste the selection onto a solid black layer and a solid white layer (temporary). Light fringing on the black background, or dark fringing on the white background, means the mask needs the Shift Edge slider (negative values contract the mask, reducing halos) or a manual brush fix.
-
Zoom to 200–400% on hair or fur. If individual strands are missing or appear hard (no partial transparency), paint over the area with the Edge Detection Brush in Select and Mask.
-
Drop a colourful background behind the subject. A high-contrast, colourful layer — like a bright gradient — makes even subtle fringing immediately visible. This is the final test recommended by PhotoshopCafe after their AI selection tests.
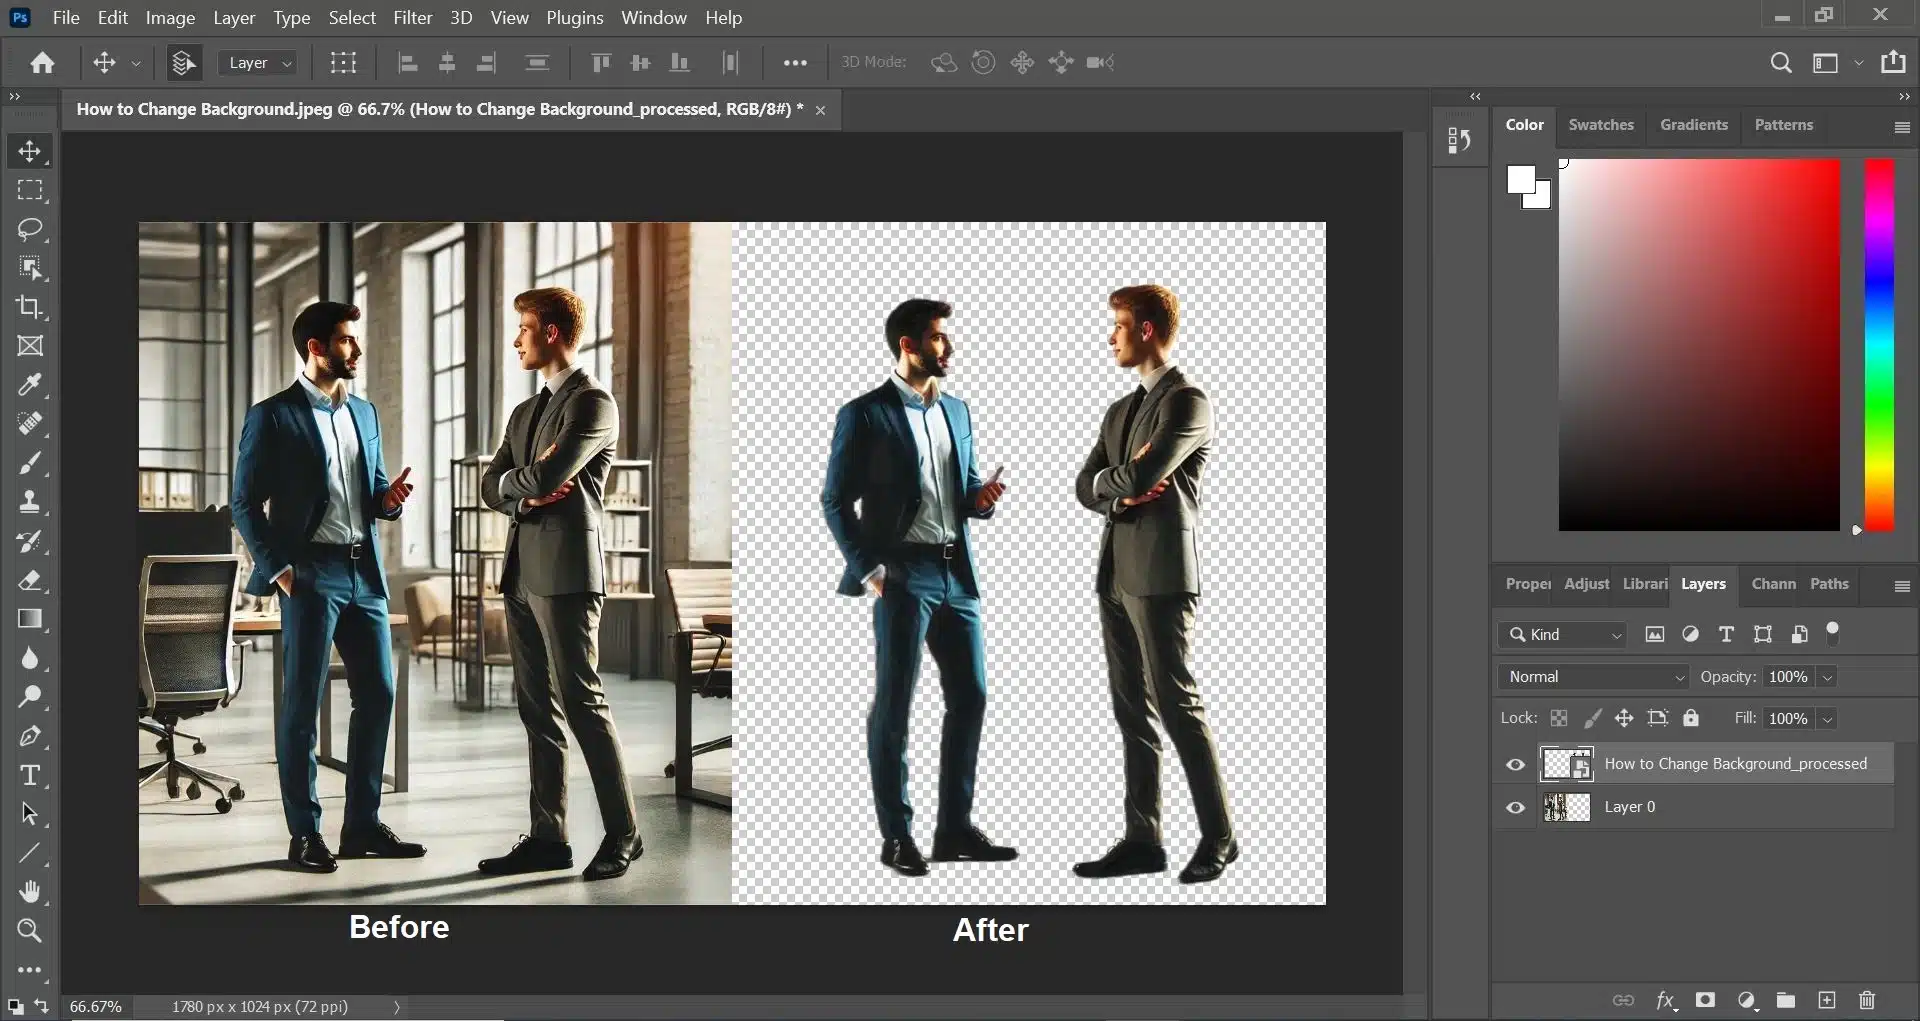
The before/after comparison reveals whether the selection is clean. The "After" image should show a crisp subject edge with no leftover background pixels.
Mask vs. destructive deletion
Always work with a layer mask rather than erasing or deleting pixels. A mask preserves the original image data, so you can refine or revert at any point. To convert a selection to a mask, click the Add Layer Mask icon at the bottom of the Layers panel while the selection is active.