- Category:
- Workflow Tips
- Summary:
- This guide covers Color Range for colour-based and tonal selections, not for channel\-based masking or advanced compositing
Select · Mask · Refine — a complete workflow guide
What is Color Range?
A dedicated selection command (Select > Color Range) that builds a mask based on sampled colours or tonal ranges — far more control than the Magic Wand. Introduced in Photoshop 3, it remains one of the most precise tools for colour-based selections.
-
🎯 Sampled Colors & Skin Tones
-
🔧 Fuzziness 0–200
-
📍 Localized Color Clusters
-
👁️ 4 preview modes
-
💾 Save/Load presets
What Color Range Is — and What It Isn't
Color Range is a command found under Select > Color Range in the menu bar. It was introduced in Photoshop 3 as a more precise alternative to the Magic Wand, and it remains one of the most capable colour-selection tools in the application. Photoshop Essentials provides a thorough historical overview of how it evolved.
It is not a tool in the Tools panel — it coexists alongside the Magic Wand, Quick Selection, and Select Subject. Adobe continues to ship the Magic Wand, but Color Range offers substantially more control through its dialog-driven workflow. Adobe's official documentation (last updated February 2026) confirms all dialog options covered in this article.
Scope note: This guide covers Color Range for colour-based and tonal selections, not for channel-based masking or advanced compositing. If you need to select by luminosity only, the Highlights/Shadows/Midtones options are covered in a later section.
The Core Workflow — Using Color Range Step by Step
Follow these steps to make a precise colour-based selection. Every control mentioned is documented in Adobe's official Color Range reference.
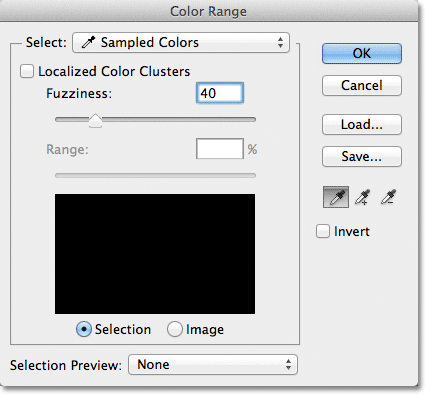
Color Range dialog with Select dropdown, Fuzziness and Range sliders, and Eyedropper tools.
-
Open the dialog Go to Select > Color Range. The dialog shows a preview pane, the Select dropdown (default: Sampled Colors), and the controls you need.
-
Choose your selection mode Keep Sampled Colors for picking a specific colour, or choose a predefined colour family (Reds, Yellows, Greens, Cyans, Blues, Magentas), a tonal range (Highlights, Shadows, Midtones), or Out of Gamut (for CMYK prepress).
-
Sample the colour Click the main eyedropper on the area you want to select. Use the Add to Sample eyedropper (
Shift+click) to include additional colours, and the Subtract from Sample eyedropper (Alt/Option+click) to remove unwanted tones. Three eyedroppers are available. -
Adjust Fuzziness Drag the Fuzziness slider (range 0–200) to widen or narrow the tolerance. Higher values include a broader range of colours around your sampled point. Start around 60–80 and fine-tune.
-
Preview the selection Toggle between Selection (black-and-white mask) and Image view using
Ctrl/Cmd. Choose a Selection Preview mode from the dropdown: Grayscale, Black Matte, White Matte, or Quick Mask — each helps you spot edge issues. -
Invert if needed Check Invert to reverse the selection (e.g., select everything except the sampled colour).
-
Apply the selection Click OK. The marching ants appear on your canvas. You can now add a layer mask, fill, or adjustment layer.
Color Range preview window showing a white flower selection mask against a black background
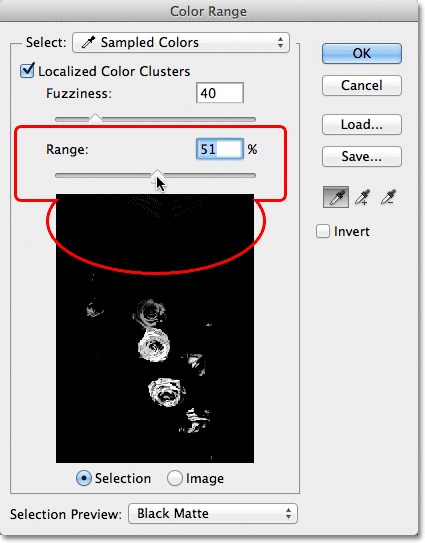
Selection preview in Grayscale mode — white indicates the selected area.
Pro tip Example workflow To select a red flower against green leaves: sample the red petals with the eyedropper, set Fuzziness to ~80, then use the Add eyedropper on any missed red tones. Enable Localized Color Clusters (see below) to keep the selection confined to the flower area. The result is a clean mask ready for a Hue/Saturation adjustment.
Skin Tones Selection — With and Without Detect Faces
Photoshop includes a dedicated Skin Tones option in the Select dropdown. When you choose it, the dialog automatically detects common skin-colour ranges. Adobe's documentation notes that you can also enable the Detect Faces checkbox to improve accuracy on human faces.
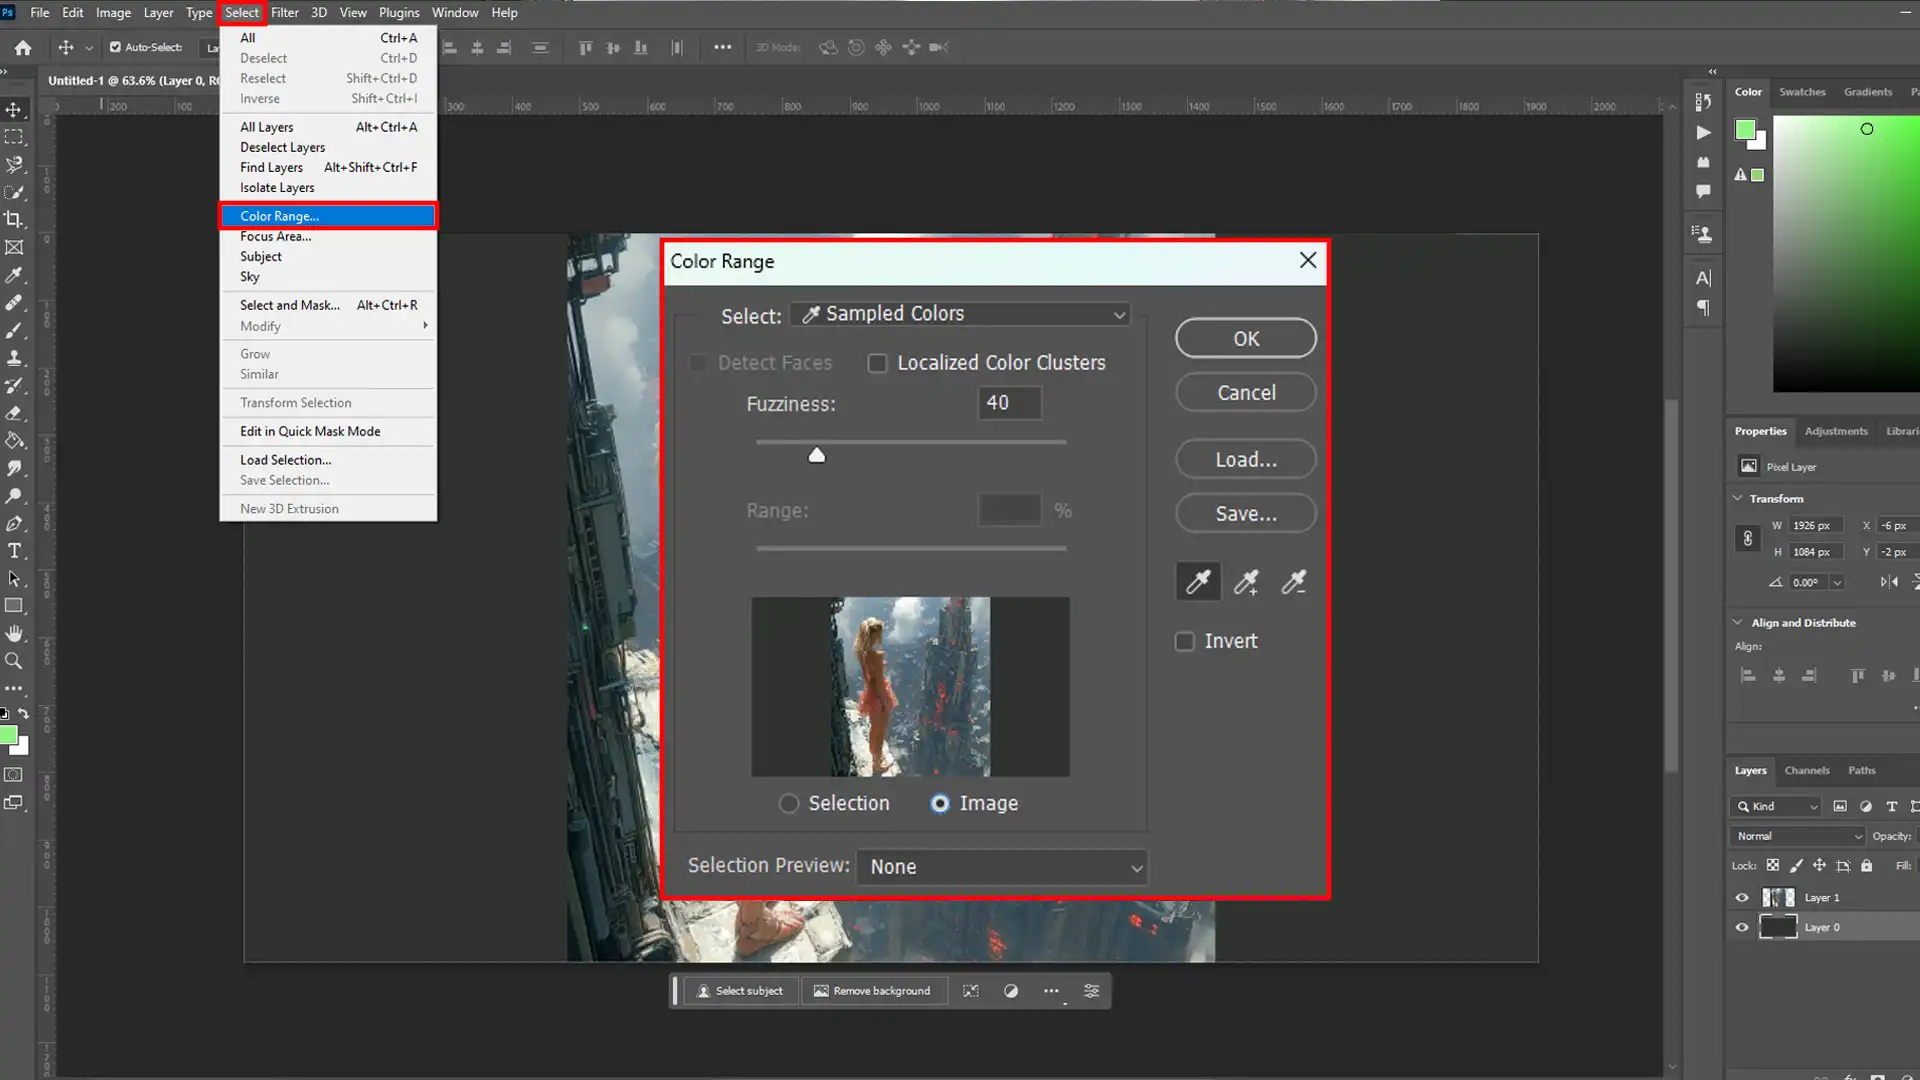
Skin Tones option with Detect Faces enabled.
This mode works best on well-lit, evenly toned skin. In mixed-lighting shots or where background colours are close to skin tones, you may need to use the Subtract eyedropper to clean up. After the selection is made, Select and Mask (Shift+Ctrl+R) is highly recommended for refining hair edges and softening the mask.
Note Saved presets Skin Tones selections — including your Fuzziness and Localized Color Clusters settings — can be saved as a preset using the Save Preset option in the dialog. This is useful when processing a series of portraits shot under the same lighting.
Mastering Localized Color Clusters for Object Isolation
One of the most underused features in Color Range is Localized Color Clusters. When enabled, it restricts the sampled colour to a defined spatial area, preventing Photoshop from selecting the same colour in distant parts of the image.
How it works, per Adobe's specification:
-
Check the Localized Color Clusters box.
-
Adjust the Range slider to control the spatial radius — lower values confine the selection to a tight area around your sample point; higher values expand it.
Example use case: Isolating a blue car in front of a blue sky. Without Localized Color Clusters, both the car and the sky get selected. With it enabled, sample the car's blue, set Range to about 50–70, and the sky stays unselected. Adjust Fuzziness to 60–80 for a clean edge.
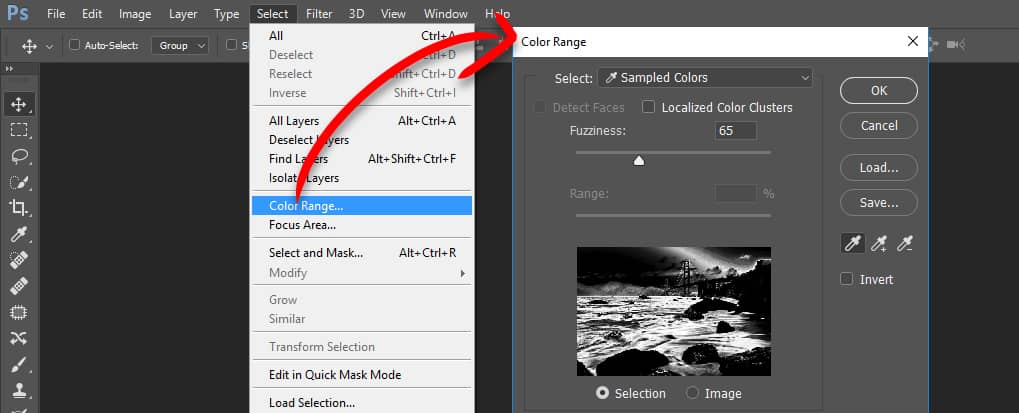
Using Localized Color Clusters to isolate a coloured object from a similar-colour background.
When to Use the Other Select Options — Tonal Ranges and Out of Gamut
The Select dropdown includes several options that don't require sampling a colour with the eyedropper:
-
Highlights, Shadows, Midtones — create luminosity-based selections instantly. Useful for dodging and burning or for targeting tonal adjustments.
-
Out of Gamut — selects all colours that cannot be reproduced in CMYK. This is a prepress tool for print designers who need to identify and shift unprintable colours before output.
-
Predefined colours (Reds, Yellows, Greens, Cyans, Blues, Magentas) — a quick way to select broad colour families without sampling.
These options are documented in Adobe's official reference and are especially useful when you need a fast starting point before refining with the eyedroppers.
Comparison Table — Color Range vs. Other Selection Tools
Choosing the right selection tool depends on your image and the level of precision you need. The table below compares the five most common approaches.
| Tool / Command | Best For | Precision | Ease of Use | When to Avoid |
|---|---|---|---|---|
| Color Range | Colour-based selections, skin tones, tonal masks | High (Fuzziness + Localized Clusters) | Moderate — requires dialog familiarity | Complex edges like hair or fur (use Select Subject instead) |
| Magic Wand | Uniform backgrounds with clear contrast | Low to moderate | Very easy — one click | Images with gradients or soft edges |
| Quick Selection | Organic shapes, moderate detail | Good with brush refinement | Easy — paint over the area | Subjects with colour bleeding into background |
| Select Subject | People, animals, complex silhouettes | Very good (AI-driven) | One click | When you need a specific colour range, not a subject |
| Object Selection | Rectangular or lasso-guided object isolation | Good | Easy — drag a frame around the object | Overlapping objects of similar colour |
Decision shortcut: If you want to select by colour → Color Range. If you need a fast subject extraction → Select Subject. If you have a uniform background → Magic Wand. For everything else, Quick Selection or Object Selection often provides the best balance of speed and control.
Troubleshooting Common Problems with Color Range
Real-world users frequently encounter a few specific pain points. Here are the most common issues and their fixes, drawn from community discussions on Stack Exchange and the Adobe Community forum.
"Color Range selects from all visible layers"
Color Range samples the composite of all visible layers, not just the active layer. This is by design — Adobe's documentation does not offer a native single-layer toggle.
Workarounds:
-
Hide other layers (
Alt+click the eye icon on your target layer) before opening Color Range. -
Ctrl+click (Cmd+click on Mac) the layer thumbnail to load its transparency as a selection, then apply Color Range within that selection. -
Duplicate the target layer and hide the original.
Stack Exchange has more detail on these workarounds.
"Preview shows a selection before I've sampled anything"
This usually happens when an alpha channel or saved selection is already active, or the dialog remembers the last used selection.
Fix: Clear all selections (Select > Deselect) before opening Color Range, or click OK and reopen the dialog. Saving and loading presets can also help avoid accidental persistence. Adobe Community discusses this issue here.
"My selection looks soft or has jagged edges"
Cause: Fuzziness set too low (selection too tight) or too high (bleeding into neighbouring colours).
Fix after applying Color Range: Use Select and Mask (Shift+Ctrl+R). Set Shift Edge to −5% and Feather to 0.5 px for hard edges, or use the Refine Edge Brush for soft transitions. Quick Mask mode (Q) also lets you paint corrections manually.
"Color changes are not accurate when combining with adjustments"
Using Color Range together with a Hue/Saturation layer and a layer style can create three overlapping colour operations, producing mismatched results. This forum thread on Photoshop Gurus documents the problem.
Recommended workflow: Apply the Color Range selection, then create a Hue/Saturation adjustment layer — it automatically uses the selection as a layer mask. This avoids mixing layer styles with adjustment layers. For a clean colour replacement, convert the layer to black & white first (Image > Adjustments > Desaturate), then use a single Color Fill adjustment layer set to Overlay blend mode.
Advanced Use — Custom Luminosity Masks with Color Range
Beyond simple colour selection, Color Range can be used to build custom luminosity masks that give you far more control than the built-in Highlights/Shadows/Midtones options. This YouTube walkthrough demonstrates the technique.
Steps to create a luminosity mask via Color Range:
-
Open the Channels panel.
-
Ctrl+click (Cmd+click) the RGB composite channel to load the overall luminosity as a selection. -
With that selection active, go to Select > Color Range.
-
Choose Sampled Colors or a tonal range, then refine using Fuzziness and Localized Color Clusters to target specific brightness ranges.
-
Save the resulting selection as an alpha channel (Select > Save Selection) for reuse.
This technique is especially useful for landscape and portrait retouching, where you need precise control over highlight and shadow masks without affecting midtones.
Advanced Intermediate You can combine Color Range with Photoshop Actions to record the entire luminosity-mask workflow. Save your Color Range settings as a preset first, then insert the Color Range step into your action with the preset loaded.
Saving and Reusing Color Range Selections as Presets
Once you've dialled in the perfect Color Range settings — say, skin tones for a specific studio lighting setup — you can save them for future use. Adobe's documentation confirms the Save/Load preset functionality.
How to save: In the Color Range dialog, open the dropdown next to the Save button and choose Save Preset. Give it a descriptive name. To reuse, open the dropdown and choose Load Preset.
Batch processing tip: Combine a saved Color Range preset with a Photoshop Action. Record the action once (including loading the preset and applying a layer mask), then run it across an entire folder via File > Automate > Batch.
Where to Go for More — Authoritative Sources on Color Range
The resources below represent the most reliable and up-to-date information about Color Range. Each one serves a different purpose, from official reference to real-world troubleshooting.
-
Adobe Help Center — Official documentation — covers every dialog option, last updated February 2026. Best for reference and exact specifications.
-
Photoshop Essentials — Clear step-by-step tutorial with historical context (Photoshop 3 origins). Ideal for learners who want a guided walkthrough.
-
Stack Exchange (Graphic Design) — Real-world troubleshooting — the single-layer workaround discussion is invaluable for advanced users.
-
YouTube — Custom Luminosity Masks — Visual walkthrough of advanced Color Range techniques, including luminosity masks.
-
Layerbench — A Photoshop plugin for one-click subject cutout and lossless layer export. Useful for streamlining your export workflow after making selections.