- Category:
- Workflow Tips
- Summary:
- Select and Mask only activates when three conditions are met
▸ The short answer
Select and Mask is Photoshop's dedicated workspace for turning rough selections into refined masks. Open it via Select > Select and Mask, the Options bar, orCtrl+Alt+R/Cmd+Option+R. Choose Color Aware for high-contrast backgrounds or Object Aware for hair and complex edges, then adjust the Global Refinements sliders (Radius, Smooth, Feather, Contrast, Shift Edge) to perfect the edge. Output as a layer mask when satisfied.
- Prerequisites
- Open It
- Workspace
- Refine Modes
- Sliders
- Beginner Workflow
- Advanced
- Troubleshooting
- vs. Other Methods
- Shortcuts
- Presets
- Composites
- Which Workflow
What You Need Before You Start: Selection, RGB Mode, and an Unlocked Layer
Select and Mask only activates when three conditions are met. If any one is missing, the menu item stays grayed out or the workspace opens blank.
-
An active selection — even a rough one. Use any selection tool (Quick Selection, Object Selection, Lasso) to mark the area you want to keep. Without a selection, Select and Mask has nothing to refine.
-
RGB colour mode — the image must be in RGB. Grayscale, Indexed Color, or CMYK modes block the feature. Convert via Image → Mode → RGB Color if needed.
-
An unlocked, non‑Background layer — the Background layer is locked by default. Convert it to a regular layer by clicking the lock icon, or duplicate it. A locked layer disables Select and Mask even when a selection exists.
Quick check: If Select → Select and Mask is grayed out, verify these three items first. Nine times out of ten the fix is one of them.
Three Ways to Open Select and Mask
Choose whichever method fits your workflow. All three lead to the same workspace.
❶ Select Menu
Go to Select → Select and Mask. This is the most direct path and works with any active tool.
❷ Options Bar
With any selection tool active (Quick Selection, Magic Wand, Lasso, etc.), click the Select and Mask button on the Options bar at the top of the screen.
❸ Keyboard Shortcut
Press Ctrl+Alt+R (Windows) or Cmd+Option+R (Mac). This shortcut is widely used by practitioners but not officially documented — it works in Photoshop CC 2015.5 and later.
Legacy access: If you need the older Refine Edge dialog (pre‑CC 2015.5), hold Shift while clicking Select and Mask from the Select menu. This is useful when working with very old tutorials or specific legacy behaviours. (Source: Glen Smith — Select and Mask tutorial)
Inside the Select and Mask Workspace: Tools and View Modes
The workspace is a self-contained mini-program with its own toolbar, view controls, and refinement panel. Everything you need lives in one window.

Figure 1: Select and Mask workspace with toolbar (left), view mode dropdown (top), and Global Refinements sliders (right).
The Toolbar
Seven tools are available for refining your selection. You can switch the toolbar between a one‑column and two‑column layout using the double chevron at the top. (Source: Glen Smith)
- Quick Selection Tool — paint to expand or contract the selection.
- Object Selection Tool — drag a rectangle around the subject; Photoshop detects it automatically.
- Brush Tool — manually paint to add (white) or subtract (black) from the selection.
- Lasso / Polygonal Lasso — draw straight or freeform edges for precise manual control.
- Hand & Zoom — navigate and inspect edges at close range.
The Seven View Modes
Each view mode reveals different aspects of your selection. Press F to cycle through them, or choose from the dropdown. (Source: Adobe Help — Refine your selection and mask)

Figure 2: View mode dropdown in the Select and Mask workspace. Selecting the right view helps spot edge problems.
| View Mode | Best For |
|---|---|
| Onion Skin | Seeing the selection as a semi-transparent overlay — useful for checking alignment. |
| Marching Ants | The classic selection border; familiar but can hide fine edge issues. |
| Overlay | Unselected areas shown in a coloured tint (default red). Great for spotting missed regions. Colour is adjustable. |
| On Black | Subject against pure black — reveals light halos and fringe. |
| On White | Subject against pure white — reveals dark halos and transparency leaks. |
| Black and White | Renders the selection as a black‑and‑white mask. White = selected, black = masked. The most honest view for evaluating edge quality. |
| On Layers | Shows the selection against the actual layers below — ideal for composite preview. |
View Options
- Show Edge — displays a blue edge overlay when the Radius slider is active.
- Show Original — toggles between the refined and original selection.
- High Quality Preview — more accurate edge rendering; turn off on slower machines.
- Real‑time Refinement — updates the preview continuously as you brush. When off, results appear after releasing the mouse.
- Transparency / Opacity slider — adjusts overlay transparency from 0% to 100%.
Workspace Shortcuts
F— cycle through view modes.X— temporarily toggle all views off/on.Alt(orOption) — temporarily switch the Brush tool to Subtract mode.
Sources: Adobe Help and Glen Smith
Choose the Right Refine Mode: Color Aware vs. Object Aware
Photoshop offers two refinement algorithms. Picking the right one for your subject is the difference between a clean edge and a frustrating session. (Source: Adobe Help)
Color Aware
This mode analyses colour contrast along the selection edge. It works best when the subject and background have clearly different colours — a person against a solid blue wall, a product on a white sweep, or a dark object on a light gradient. It tends to produce clean results quickly and is the default mode for many users.
Object Aware
Introduced in later CC versions, Object Aware uses AI to detect the subject's actual boundaries. It excels at hair, fur, feathers, and any edge with fine detail against complex backgrounds. When you're masking a model with wind‑blown hair or a pet on a patterned carpet, switch to Object Aware. The AI does a better job of distinguishing ambiguous pixels near the edge.
Rule of thumb: If the background is a solid colour or simple gradient, start with Color Aware. If the background is busy or the subject has fine edge detail, use Object Aware. You can switch between them at any time — the preview updates immediately.
Fine‑Tune Selections with Global Refinements: Radius, Smooth, Feather, Contrast, Shift Edge
The five sliders in the Global Refinements section let you adjust the selection edge after the refine mode has done its work. Each slider affects a different aspect of the edge. (Source: Glen Smith; Adobe Help)
| Slider | What It Does | Typical Starting Value |
|---|---|---|
| Radius | Controls how far from the selection edge Photoshop searches for boundary pixels. Smart Radius (checkbox below the slider) lets it vary locally — essential for hair. | 1–5 px (hair); 0.5–2 px (solid edges) |
| Smooth | Removes jagged, pixelated bumps by rounding the edge contour. Set in pixels. | 0–3 px |
| Feather | Softens the transition between selected and unselected areas. Even 0.5 px makes a visible difference. | 0.5–1.5 px |
| Contrast | Sharpens the edge after feathering. High values create a harder boundary. | 0–25% |
| Shift Edge | Contracts (negative) or expands (positive) the selection boundary. Use –5% to –10% to eliminate background fringe. | –5% (hair); 0% (solid objects) |
Smart Radius is a toggle in the Edge Detection section. When enabled, Photoshop analyses local contrast and adjusts the radius automatically. For hair and fur, always turn Smart Radius on. (Source: Adobe Help)
A Beginner's Step‑by‑Step: From Rough Selection to Clean Mask
Follow these five steps to produce your first clean mask. The entire process takes under two minutes once you're familiar with it.
- Make a rough selection
Use the Quick Selection Tool (paint across the subject) or Object Selection Tool (drag a rectangle around the subject). The selection doesn't need to be perfect — you'll refine it next.
-
Open Select and Mask
PressCtrl+Alt+R/Cmd+Option+R, or go to Select → Select and Mask. The workspace opens with your rough selection loaded. -
Choose a view mode that reveals problem areas
Switch to Overlay (red tint) or On Black / On White to see where the selection misses or bleeds. PressFto cycle quickly. -
Adjust Global Refinements sliders
Start with Smart Radius on, Radius at 2–3 px, Feather at 0.5 px, and Shift Edge at –5%. Tweak each slider while watching the preview. Use the Brush tool to paint over areas where the selection missed hair or included background. -
Output as a Layer Mask
At the bottom of the panel, choose Layer Mask (or New Layer with Layer Mask if you want a separate layer). Click OK. The selection becomes a mask where black conceals and white reveals. (Source: Proedu — The Magic of Masking)
Advanced Workflows for Tricky Subjects: Hair, Glass, and Solid Objects
Different subjects demand different refinement strategies. Here are the specific settings and techniques for the three most challenging categories.
🧵 Hair and Fur
Use Object Aware mode with Smart Radius on. Set Radius to 2–5 px, Shift Edge to –5%, and enable Decontaminate Colors in the Output Settings to reduce colour fringe.
With the Brush tool in Subtract mode (hold Alt), paint out background patches between strands. Zoom in to 200–300% for fine strands.
Object Aware · Smart Radius · Decontaminate Colors
🥃 Glass and Smoke
These translucent subjects work best with Color Aware mode. Use Overlay view with a contrasting colour (change the overlay tint in the View Mode panel) to spot transparency issues.
Refine manually with a soft Brush at 30–50% opacity to gradually build the mask. Avoid high Contrast values — you want soft edges that preserve translucency.
Color Aware · Soft brush · Low Contrast
📦 Solid Objects on Complex Backgrounds
Start with the Object Selection Tool to get a rough boundary, then open Select and Mask. Switch between Color Aware and Object Aware depending on background complexity.
Use Shift Edge at –3% to –8% to tighten around the object and remove any background rim. Feather at 0.3–0.5 px keeps the edge natural without losing definition.
Object Selection Tool · Shift Edge –5% · Feather 0.5 px

Figure 3: Brush settings for manual refinement. Use a soft brush (hardness 0–50%) for gradual mask transitions on hair and glass.
Hair fringing fix: If you see a coloured halo around edges after output, the Decontaminate Colors option under Output Settings replaces the fringe colour with nearby foreground colours. It works especially well on hair against solid backgrounds. (Common knowledge among Photoshop practitioners.)
Troubleshooting Six Common Select and Mask Problems
Even experienced practitioners run into these issues. Here's how to fix each one quickly.
❌ “Select and Mask Is Grayed Out”
Check three things: (1) Is a selection active? (2) Is the image in RGB mode? (3) Is the layer unlocked and not the Background layer? Fix any one that's missing.
❌ “The Workspace Is Blank”
You opened Select and Mask without an active selection. Make a rough selection first with any selection tool, then open the workspace again.
❌ “Refine Edge Is Missing”
Refine Edge was replaced by Select and Mask in CC 2015.5. To access the legacy dialog, hold Shift while clicking Select and Mask from the Select menu. (Source: Glen Smith)
❌ “Performance Is Slow”
Turn off High Quality Preview and Real‑time Refinement in the View Mode panel. The preview will update less frequently but the sliders and brushes will respond faster. (Source: Adobe Help)
❌ “Hair Edges Look Too Sharp or Have Halo”
Increase Radius and enable Smart Radius. Set Shift Edge to –5% to –10% to contract the selection slightly. Enable Decontaminate Colors in Output Settings to remove colour fringe.
❌ “The Feature Isn't Showing at All”
Check your Photoshop version. Select and Mask was introduced in CC 2015.5 (mid‑2016). If you're on CS6 or earlier, you'll use Refine Edge instead. Update to a newer version to access the current workspace.
Select and Mask vs. Other Selection Methods: When to Use Each
Photoshop offers several ways to isolate a subject. Knowing which method to use for a given task saves time and produces better results. (Source: Glen Smith; community knowledge)
| Method | Best Use Case | When to Avoid |
|---|---|---|
| Select and Mask | Most everyday cutouts: people, products, hair, complex edges. Fast, AI‑assisted, non‑destructive. | When you need pixel‑perfect manual control over every edge (use Pen tool instead). |
| Refine Edge (legacy) | Only if you're on an old Photoshop version (CS6–CC 2015) and can't update. | Missing Object Aware mode, real‑time preview, and modern edge detection. Outdated since 2016. | | Quick Mask | Painting selections manually with a brush. Good for rough adjustments or creative masking. | Not suitable for fine edge detail like hair. No AI assistance. | | Channels | When the subject has strong luminance contrast against the background (e.g., black hair on white). Produces very clean masks. | Slower workflow; requires duplicating channels and adjusting levels. Overkill for most subjects. |
Bottom line: Select and Mask is the right default for 90% of masking work. Channels and the Pen tool are worth learning for the remaining 10% where you need absolute precision or where AI struggles.
Keyboard Shortcuts That Speed Up Every Selection and Mask Task
These shortcuts work inside the Select and Mask workspace and in the main Photoshop window. Learning them cuts your refinement time significantly.
Ctrl+Alt+R— Open Select and MaskCmd+Option+R— Open Select and Mask (Mac)F— Cycle view modesX— Toggle all views on/offAlt— Switch Brush to Subtract mode[ / ]— Decrease / increase brush sizeShift+[ / ]— Decrease / increase brush hardnessCtrl+click mask— Convert mask to selectionCtrl+J— Copy selection to new layer
How to Save and Re‑use Your Settings as Presets
Once you've dialled in the perfect combination of refine mode, sliders, and view options, save it as a preset. This is especially useful for recurring subject types — e.g., "product on white" or "studio portrait hair." (Source: Glen Smith)
To save a preset:
- Adjust all sliders, refine mode, and output settings to your liking.
- Click the Presets dropdown at the top of the right panel.
- Choose Save Preset, give it a descriptive name (e.g., "Hair on white bg"), and click OK.
To load a preset: Open the same dropdown and select your saved preset. All settings are restored instantly.
The compact workspace (each panel section collapsible) helps when working on smaller screens while saving or loading presets. (Source: Glen Smith)
Combine Select and Mask with Layer Masks and Adjustment Layers for Flawless Composites
Select and Mask doesn't have to be the end of your workflow. The most polished composites come from combining it with other masking techniques. (Source: Adobe Community — Tips and tricks for selecting and masking)
Using a Curves Adjustment Layer After a Pen Selection
Draw a precise path with the Pen tool, right‑click and choose Make Selection, then create a Curves adjustment layer. The selection becomes the layer's mask automatically. Open Select and Mask from the layer mask thumbnail to refine edges that the Pen tool couldn't handle — typically hair or soft transitions.
Blurring the Mask to Soften Hard Edges
After outputting your mask, apply a small Gaussian Blur (0.5–1.5 px) directly to the layer mask. This softens pixel‑hard edges without losing detail. Use Filter → Blur → Gaussian Blur while the mask is active.
Multiply and Screen Blend Modes on the Mask
This community technique pinpoints where the mask fails:
- Duplicate the masked layer. Set the top copy to Multiply blend mode — areas where the mask is too light show up as dark spots.
- Set the bottom copy to Screen — areas where the mask is too dark show up as light spots.
- Paint corrections on the mask with a soft brush using black (to hide) or white (to reveal).
Dodge and Burn on the Mask
Instead of painting black or white, use the Dodge Tool (lighten) and Burn Tool (darken) directly on the mask. This gives you gradual tonal control — perfect for feathering edges into transparency without harsh brush strokes.
Creating a Group Mask with Alt‑Click
When you want to apply a single mask to multiple layers, group them (Ctrl+G / Cmd+G). Hold Alt while clicking the Add Layer Mask icon on the group — this creates a black (empty) mask. Paint white on the group mask to reveal layers below, or paste a refined selection from Select and Mask into the group mask.
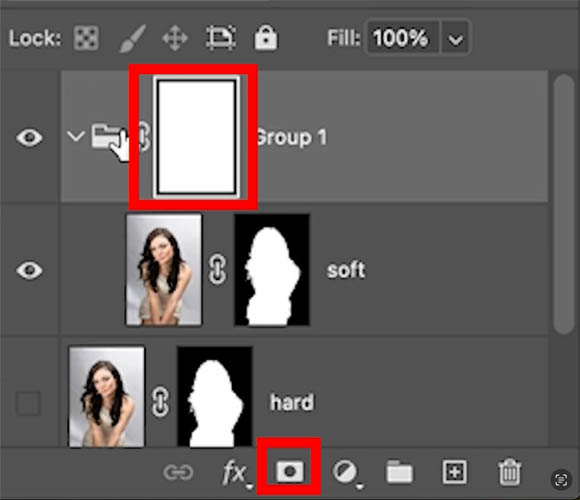
Figure 4: Group with a layer mask. Hold Alt when adding the mask to start with a black mask, then paint white to reveal selected areas.
Which Refine Mode and Workflow Fits Your Subject Best?
Use this quick reference to choose your approach based on what you're masking.
| Subject Type | Recommended Refine Mode | Key Settings | Additional Tips |
|---|---|---|---|
| Hair / Fur / Feathers | Object Aware | Smart Radius ON, Radius 2–5 px, Shift Edge –5%, Decontaminate Colors ON | Use Subtract brush to clean background between strands. Zoom to 200%+. |
| Glass / Smoke / Translucent objects | Color Aware | Feather 0.5–1 px, Contrast 0–15%, manual brush at 30–50% opacity | Use Overlay view with a changed overlay colour to spot transparency. |
| Solid objects on complex backgrounds | Object Selection Tool first, then Object Aware or Color Aware | Shift Edge –3% to –8%, Feather 0.3–0.5 px | Start with the Object Selection Tool for a fast rough selection. | | High‑contrast product shots | Color Aware | Smart Radius OFF, Radius 0.5–1 px, Shift Edge 0% | Minimal slider adjustments — the selection is usually clean already. |
If you regularly process batches of similar subjects — for example, cutting out product photos on white — consider saving your settings as a preset (see section above) and, for one‑click cutout and mask cleanup on repetitive work, you might explore the Layerbench plugin, which automates subject selection, mask creation, and transparent export with adjustable edge shrinkage.
All trademarks and product names referenced belong to their respective owners. Adobe Photoshop is a registered trademark of Adobe Inc.