- Category:
- Selection & Masking
- Summary:
- Master the lasso selection tool across software, from freehand drawing to the three Photoshop variants, and troubleshoot common edge issues.
The lasso selection tool is a freehand selection tool available in most image editors. You click and drag to trace an irregular shape around an object; releasing the mouse closes the selection automatically. Adobe Photoshop offers three variants: the standard Lasso (freehand), Polygonal Lasso (straight segments), and Magnetic Lasso (edge-snapping). The tool is identified by a rope-loop icon in the toolbar. This article covers how it works across software, common failures, and how to verify your selection.
Basic Operation of the Lasso Selection Tool
Freehand Drawing and Automatic Closing
The fundamental way to use the lasso tool is the same across nearly every application. Select the tool from the toolbar — its icon is a looping rope — then click and drag along the edges of the object you want to isolate. When you release the mouse button, the software automatically closes the loop by drawing a straight line from your last point back to the starting point. If your path crosses itself, the tool creates multiple closed contours, letting you select disjointed areas in a single stroke. This basic operation is documented in the Wikipedia entry for the lasso tool.
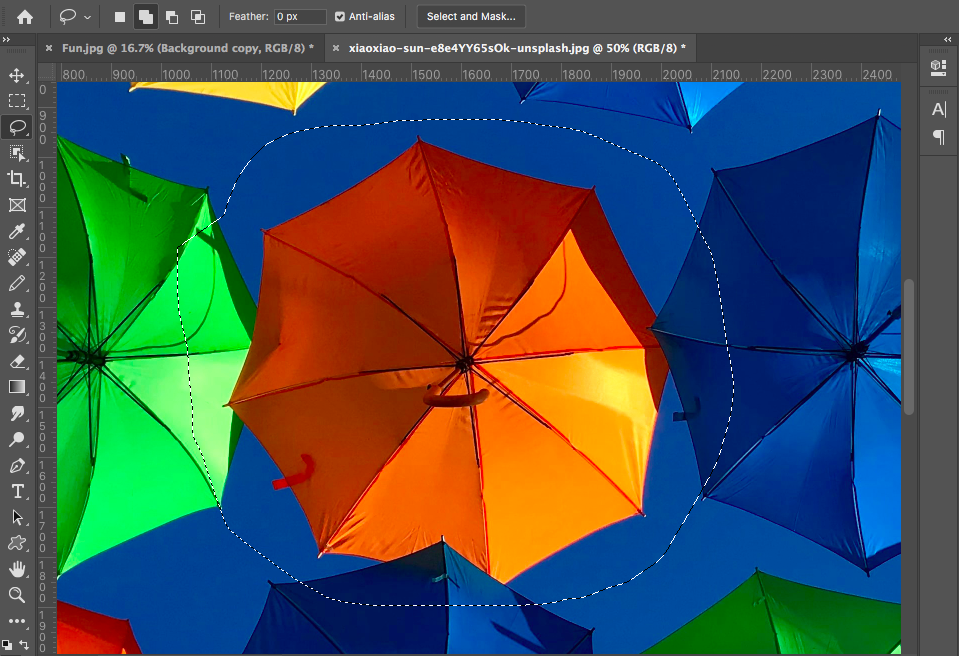
A freehand lasso selection being drawn around an orange umbrella in Adobe Photoshop. The marching ants outline shows the selected area.
The Three Variants in Photoshop
Adobe Photoshop provides three distinct lasso variants, each suited to different kinds of edges. According to Adobe's official documentation, they are:
Lasso (Freehand) — Draw any shape freely. It does not snap to edges automatically — you control the path entirely. Best for rough or highly irregular shapes where edge detection would be unreliable.
Polygonal Lasso — Click to set straight-line anchor points; the selection edge is a polygon. Ideal for architectural subjects, boxes, or any object with straight edges. Hold Shift to constrain segments to 45° angles.
Magnetic Lasso — Uses contrast detection to snap the selection line to object boundaries. You click once to start, then move the cursor near the edge — the tool places anchor points automatically. Works well on high-contrast subjects.
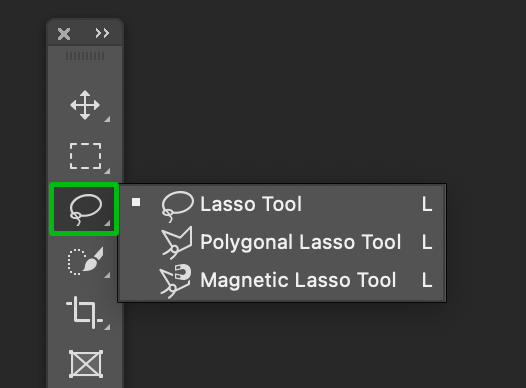
The expanded Lasso tool group in Photoshop's toolbar, showing all three variants.
Feathering and Anti-Aliasing for Soft Edges
Both feathering and anti-aliasing control how crisp or soft the edge of your selection appears. Higher feather values (measured in pixels) create a gradual transition between selected and unselected areas, which helps selections blend naturally when you apply edits or paste onto another background. In Photoshop, you set these values in the options bar before you draw the selection. Graduate School's Photoshop guide notes that a feather of 1–3 px is often enough to soften jagged edges without losing detail; values above 10 px produce a visible blur along the selection boundary.
Tip: Feathering is applied before you draw the selection. If you need to adjust edge softness after the fact, use Select & Mask (Photoshop) or the Refine Edge tool instead — these give you non-destructive control over edge properties.
How the Lasso Creates a Selection Mask
Behind the scenes, the lasso tool acts as a masking tool. When you draw a freehand path, the software creates a temporary binary mask — a black‑and‑white image where white represents the selected area. The final selection is the logical AND of that mask and the active layer, meaning only the pixels that fall within both the mask and the layer remain selected. This masking model is described in the Wikipedia article on the lasso tool and explains why you can combine multiple lasso strokes using Add and Subtract modes: each stroke updates the mask.
Magnetic Lasso Contrast Detection
The Magnetic Lasso variant works by analysing colour and luminance differences between adjacent pixels. It places anchor points along the highest-contrast boundary it detects near your cursor path. Three key parameters control its behaviour, as covered by Graduate School and Clip Studio TIPS:
- Width: How close the cursor must be to an edge for the tool to detect it. A narrower width (10–20 px) works for detailed work; a wider width (40–60 px) helps trace broader edges.
- Contrast: The minimum contrast level required for the tool to register an edge. Set a high percentage (50–100 %) when the subject is well separated from the background; lower it for subtle edges.
- Frequency: How often the tool places anchor points automatically. A higher frequency (50–100) produces a more precise selection but requires more manual corrections.
Lasso Tool Implementations in Raster vs Vector Software
Vector Software – Adobe Illustrator
In vector applications, the lasso tool serves a fundamentally different purpose. Instead of selecting pixels, it selects anchor points, paths, and entire objects. In Adobe Illustrator, you can drag a lasso around specific anchor points of a vector shape to edit only those points, or drag across multiple objects to group-select them. This distinction is often confusing for users switching from Photoshop to Illustrator. Adobe's Illustrator HelpX page makes clear that the lasso in Illustrator is a vector selection tool, not a pixel selection tool — you cannot use it to isolate a portion of a raster image placed inside an Illustrator document.

A freehand lasso selection in action around a hot air balloon — the same basic gesture works in both raster and vector contexts, though the result differs (pixels vs anchor points).
Raster Software – Photoshop and Online Tools
In raster editors such as Photoshop, GIMP, and Krita, the lasso tool selects pixel regions. A notable exception in the Affinity ecosystem: Affinity Designer lacks a vector lasso tool entirely. Users who need to make freehand selections in Designer must switch to the Pixel Persona (the raster workspace), where a lasso tool does exist. This is a long-standing user complaint documented on the Affinity Forum for both versions 1 and 2.
For users who prefer not to install software, online lasso tools offer a practical alternative. The free tool at imageonline.io processes every operation entirely in the browser — no image is uploaded to a server, which matters for privacy. It supports three selection modes (New, Add, Subtract) and delivers a full-resolution cutout when you download the result.
Terminology Differences Between Online and Desktop Tools
The selection-mode labels vary slightly between platforms. The table below maps the terminology used by imageonline.io against Photoshop's options bar:
| imageonline.io | Adobe Photoshop | Keyboard shortcut |
|---|---|---|
| New | New Selection | Default (no modifier) |
| Add | Add to Selection | Hold Shift |
| Subtract | Subtract from Selection | Hold Alt (Win) / Option (Mac) |
| — | Intersect with Selection | Hold Shift+Alt (Win) / Shift+Option (Mac) |
Sources: imageonline.io and Adobe.
Common Lasso Tool Problems and Their Fixes
! Missing Lasso Tool in Affinity Designer — Problem: Users cannot find a vector lasso tool in Affinity Designer — it only exists in the Pixel Persona. This affects both version 1 and version 2. Workaround: Switch to the Pixel Persona (View → Studio → Pixel Persona) to access the raster lasso, or use the Pen Tool for vector-based selections. See this Affinity Forum thread for community discussion.
i Affinity Photo 2.6.0 Lasso Tool Refuses to Work (macOS) — Problem: An intermittent bug in Affinity Photo version 2.6.0 (3125) causes the lasso tool to stop responding on macOS. Suggested steps: Update to the latest patch, restart the application, and disable GPU acceleration (Preferences → Performance → untick "Hardware acceleration"). A bug report on the Affinity Forum tracks this issue.
! Infinite Painter Lasso Tool Not Functioning — Problem: The lasso tool may fail to work correctly in Infinite Painter on mobile devices. Troubleshooting: Clear the app cache, update to the latest version, restart the device, and check that your stylus is properly paired. Reported in an Infinite Painter community group.
? General Beginner Difficulties with the Lasso Tool — Problem: New users sometimes struggle to understand how the lasso tool even works. Quick guide: Select the lasso from the toolbar (look for the rope-loop icon), click and drag around the object you want to select, then release the mouse button to close the selection. A Reddit thread shows this is a common starting point for many learners.
General troubleshooting tip: If your lasso tool behaves erratically — jumping, freezing, or refusing to snap — check that your GPU drivers are up to date and that the software has enough RAM allocated. Large images (especially those above 12 megapixels) can slow down the Magnetic Lasso; try reducing the image resolution temporarily or switching to the standard freehand lasso.
Lasso Selection Verification and Background Removal
Inverting the Selection to Remove the Background
A common mistake when using the lasso tool for background removal is deleting the selected area instead of the area outside it. The correct workflow, explained on Gifgit's lasso tool guide, is:
- Make your lasso selection around the object you want to keep.
- Invert the selection: Select → Inverse (or
Ctrl+Shift+I/Cmd+Shift+I). - Now the area outside your original lasso path is active. Press
DeleteorBackspaceto remove the background. - Deselect (
Ctrl+D/Cmd+D) and inspect the edges for any remaining artifacts.
This inversion step ensures that the object you traced remains intact and only the surrounding background is erased.

The rope-loop icon that identifies the lasso tool across most image-editing applications.
Downloading at Full Resolution
When using the imageonline.io lasso tool, the download preserves the original pixel dimensions of your image — it does not downsample to a preview resolution. This guarantee means you can use the online tool for cutouts that need to retain every pixel of detail, whether for print or for further editing in a desktop application. Always check the download format (PNG is typically offered for transparent backgrounds) before saving.
Verification check: After removing a background, zoom in to 200–400 % and look for stray pixels or jagged edges along the selection boundary. If you see roughness, go back to the original selection and apply a feather of 1–2 px, or use a dedicated Refine Edge tool to smooth the contour.
All trademarks and product names belong to their respective owners. Screenshots and product references are used for educational illustration under fair use.