- Category:
- Workflow Tips
- Summary:
- This guide covers the full workflow — from locating the tool to Instagram carousels and troubleshooting
What it does: The Slice Tool divides an image into separate pieces you can export as individual files or reassemble into a web layout. It sits under the Crop Tool in the toolbar. Select the tool, drag a rectangle to create a user slice, then export via File > Export > Save for Web (Legacy). This guide covers the full workflow — from locating the tool to Instagram carousels and troubleshooting.
- Instagram Carousel
- Find the Tool
- Slice Types
- Create Slices
- Edit & Organise
- Export Slices
- Troubleshooting
- Automate
- Slice Tool vs. Alternatives
Slice an Image for an Instagram Carousel
A common modern use of the Slice Tool is splitting a wide canvas into equal panels for a social media carousel. The Adobe Community forum documents a real example: a 4320 × 1350 px canvas sliced into 4 pieces for Instagram.
-
Set up the canvas. Create a new document at 4320 × 1350 px (4 slides × 1080 px wide, 1350 px tall). Place vertical guides at each 1080 px interval:
View > New Guide > Vertical > 1080 px, then repeat for 2160 px and 3240 px. -
Configure the Slice Tool. Select the Slice Tool (nested under the Crop Tool). In the Options bar, set Style to Fixed Size and enter Width 1080 px, Height 1350 px.
-
Draw the first slice. Click near the top-left corner of the canvas. Photoshop snaps the fixed-size rectangle to the guides. A user slice (solid blue line) appears, and auto slices (dotted gray) fill the rest.
-
Create the remaining slices. Switch to the Slice Select Tool (nested under the Slice Tool). Hold Alt (Windows) / Option (Mac) and drag the first slice to the right, aligning it with the next guide. Repeat for slides 3 and 4.
-
Name each slice. Double‑click a slice to open the Slice Options dialog. Enter a name — e.g.,
slide1,slide2— which becomes the exported filename. -
Export as PNG. Go to File > Export > Save for Web (Legacy). Select each slice and set Format to PNG-24 for crisp text. Click Save, choose a folder, and ensure All Slices is selected.
-
Upload in order. Upload the exported files to Instagram or LinkedIn in sequence — the slice numbering (left to right, top to bottom) matches your carousel order.
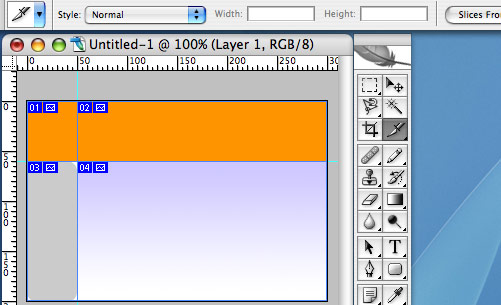
Example of a canvas divided into slices using guides — each section can be exported individually.

The Slice Tool lives under the Crop Tool group in the toolbar.
Tip: For carousels with text or logos, use PNG-24 to preserve sharp edges. For photo-only carousels, JPEG High (Quality 80+) yields smaller files with minimal quality loss.
Find the Slice Tool in Any Photoshop Version
The Slice Tool is nested under the Crop Tool in the toolbar. Right‑click (or long‑press) the Crop Tool icon to reveal the Slice Tool and the Slice Select Tool.
In Photoshop CC 2019 and later, many users report the Slice Tool is missing from the default toolbar. This issue has garnered over 42,000 views on the Adobe Community forum, making it one of the most common Slice Tool problems. To restore it:
- Click the … (ellipsis) button at the bottom of the toolbar.
- Choose Customize Toolbar.
- Find the Slice Tool in the Extra Tools list and drag it into your active toolbar group.
Alternatively, press Shift + C repeatedly to cycle through the Crop Tool group — the Slice Tool appears in the cycle.

The Slice Tool and Slice Select Tool are nested under the Crop Tool in the toolbar.
Note: In Photoshop Elements, the Slice Tool is available in the Expert mode toolbar under the Crop & Straighten group. The Customize Toolbar method applies only to the full Creative Cloud version.
Understand the Four Types of Slices
Photoshop uses four slice types, each with a distinct visual indicator and behaviour. Knowing them helps you decide which to use and how to troubleshoot.
User Slice — Solid blue line. You draw these manually with the Slice Tool. They can be named, resized, moved, and individually optimised. A badge icon indicates Image or No Image content.
Layer-Based Slice — Solid blue line. Created from a layer via Layer > New Layer-Based Slice. The slice area updates automatically when the layer content moves or changes.
Auto Slice — Dotted gray line. Photoshop generates these to fill areas not covered by user or layer slices. They are linked and share optimisation settings. Promote to a user slice to change them individually.
Subslice — Dotted gray line. Generated automatically when slices overlap. They cannot be selected or edited, and they regenerate whenever the slice stacking order changes.
Slice numbering starts from the upper‑left corner and progresses left to right, top to bottom. Numbers update when you add or remove slices. When exported, the slices can be reassembled using an HTML table or CSS layers — though the HTML output is based on older table layouts.
Create Your First Slices
There are three ways to create slices, depending on whether you are working from scratch, using guides, or building around a specific layer.
Manual User Slice
Select the Slice Tool and choose a Style from the Options bar:
-
Normal — drag any rectangle.
-
Fixed Aspect Ratio — enter a width/height ratio (e.g., 1:1 for a square).
-
Fixed Size — enter exact pixel dimensions (useful for carousel panels).
Drag on the canvas. Photoshop automatically creates auto slices to fill the remaining area.
Slices from Guides
Place guides on your canvas (View > New Guide). Then look for the Slices From Guides button in the Options bar. If it is greyed out — a known issue in CS6 and some earlier versions — use this workaround: draw the first user slice manually with Snap enabled (View > Snap), then duplicate it using Alt/Option + drag with the Slice Select Tool.
Layer-Based Slice
Select a layer in the Layers panel, then go to Layer > New Layer-Based Slice. The slice automatically encloses the layer content. If you move or edit the layer, the slice boundaries follow — convenient for elements like buttons or icons that may shift during design iterations.
Important: Layer-based slices can become oversized if the layer animates or moves across a large area. Convert them to user slices (right‑click > Promote to User Slice) before animating to maintain precise control.
Edit and Organise Your Slices
Once your slices exist, the Slice Select Tool (nested under the Slice Tool) lets you modify them.
-
Select and move: Click a slice to select it; drag to reposition. Auto slices adjust automatically.
-
Resize: Drag corner handles. Hold Shift to constrain proportions.
-
Duplicate: Hold Alt (Win) / Option (Mac) and drag with the Slice Select Tool.
-
Name: Double‑click a slice to open the Slice Options dialog. The name becomes the exported filename.
-
Delete: Right‑click a user slice and choose Delete Slice, or press Delete. Use Delete All from the Slice Select Tool options to remove all auto slices at once.
-
Promote: Right‑click a layer‑based or auto slice and choose Promote to User Slice to unlock individual control.
Export Slices as Separate Files
For recent Photoshop versions (CC 2020+), the correct export path is File > Export > Save for Web (Legacy). Older versions used File > Save for Web directly.
In the Save for Web dialog:
- Each slice appears as a separate thumbnail. Click a slice to select it.
- Choose format and quality per slice — JPEG High for photos, PNG-24 for graphics with text, PNG-8 for flat-colour assets.
- Auto slices share optimisation settings by default. To change one, select it and promote it to a user slice first.
- Click Save, choose a folder, and make sure All Slices is selected. Each slice is saved as an individual file named after the slice name you set earlier.
Photoshop can also generate an HTML file that reassembles the slices using a table layout. However, the resulting code relies on deprecated table-based structures. Most modern workflows use the individual files and build a custom CSS or carousel instead.
Tip: For retina (2x) exports, scale the canvas to 200% before slicing, then set the image size to 50% in the Save for Web dialog per slice. This gives you crisp high‑DPI assets without manual upsizing.
Troubleshoot Common Slice Tool Problems
Slice Tool missing from toolbar (CC 2019+)
Fix: Use the Customize Toolbar button (the … icon at the bottom of the toolbar) to drag the Slice Tool back into your toolbar. Alternatively, press Shift + C to cycle through the Crop Tool group.
“Slices From Guides” button not working
Fix: This button is greyed out in CS6 and some earlier versions — no official patch exists. Workaround: place your guides, enable View > Snap, draw the first user slice manually, then duplicate it with Alt/Option + drag using the Slice Select Tool.
Need to slice an image that contains a video layer
Fix: The Slice Tool ignores video content. Export the video as a still frame first, or split the video in a dedicated editor like Premiere Pro before compositing in Photoshop.
Layer‑based slice grows too large during animation
Fix: Right‑click the layer‑based slice and choose Promote to User Slice before animating. This gives you fixed boundaries that do not expand with layer movement.
Automate Slice Exports with Actions
If you frequently slice multi‑panel layouts (product grids, carousel sets, email banners), you can automate the process with a Photoshop Action.
- Record an Action: Open the Actions panel (Window > Actions), create a new Action, and name it something like “Slice & Export Carousel”.
- Set up guides: While recording, place vertical guides at your required intervals (e.g., every 1080 px for a carousel).
- Create slices: Use the Slices From Guides button (or the manual method described earlier).
- Open Save for Web (Legacy): With the Action still recording, open the export dialog and set your preferred format and quality.
- Save and stop: Choose a destination folder and set the save options, then stop recording.
- Batch process: Use File > Automate > Batch to run the Action on an entire folder of images.
For a more streamlined cutout and export workflow — especially when you need to export individual slices with transparent backgrounds quickly — the Layerbench panel offers one‑click subject selection and lossless layer export with edge cleanup. It integrates directly into Photoshop and can be a useful companion when slicing complex compositions.
Slice Tool vs. Modern Alternatives — Which Should You Use?
The Slice Tool has been part of Photoshop for decades. Some designers consider it outdated for full web page layouts because the generated HTML relies on table structures, but it remains highly effective for asset extraction, carousels, and grid slicing. The table below compares it to the most common modern approaches.
| Task | Slice Tool | Crop + Export As | Adobe Generator |
|---|---|---|---|
| Split a single layout into multiple images | Fast with guides; auto‑naming; ideal for carousels and grids | Manual per piece; no auto‑naming; slower for many pieces | No direct support for splitting one image |
| Export individual layer assets (icons, buttons) | Possible, but requires creating slices manually | Export As exports a single layer quickly | Generator exports named layers automatically with @2x support |
| Generate a full web page with HTML table | Produces table‑based code — outdated for modern responsive sites | Not applicable | Not applicable |
| Retina (2x) export | Scale canvas before slicing or use Save for Web image size | Export As can upscale individual layers | Generator supports @2x naming convention natively |
Which approach fits your situation?
- Use the Slice Tool for carousels, product grids, and any multi‑piece export where precise alignment and sequential naming matter.
- Use Export As or Adobe Generator for single‑layer exports — they are faster and non‑destructive.
- Avoid the HTML generation feature unless you are working on a legacy project that specifically requires table‑based assembly.
The Slice Tool remains a practical choice for specific workflows. By pairing it with guides, fixed‑size settings, and batch automation, you can handle everything from social media carousels to multi‑page email layouts efficiently.