- Category:
- Workflow Tips
- Summary:
- Photo editing removes noise and sharpens unfocused areas in digital images, enhancing clarity and detail through advanced denoising and deblurring algorithms.
The short answer: Apply noise reduction before sharpening — never the reverse. For raw files at extreme ISOs (e.g., 12,800), DxO PureRAW combines AI denoising with lens-specific sharpening. Topaz Photo AI handles grain reduction and deblur in one pass, while free RawTherapee offers selective denoising via its Blur/Grain & Denoise module. Before you start, confirm the issue: noise looks like random coloured grains in uniform areas; blur shows as soft edges without that grainy texture — applying the wrong fix makes things worse.
A Two‑Step Workflow: Denoise First, Then Sharpen Selectively
Industry consensus — backed by tests from Fstoppers' noise-reduction challenge — places noise reduction at the start of the editing chain. Sharpening after denoising prevents the algorithm from enhancing the very grain you just removed. Here is the sequence that preserves detail.
Step 1 — Apply Noise Reduction (Global vs. Selective)
- Always denoise before sharpening. The Fstoppers workflow recommends this order: noise reduction first, then shadows/highlights, contrast, clarity, vibrance, saturation. Sharpening earlier amplifies noise.
- Global denoise (Lightroom sliders, Topaz Denoise AI) is fast and works well when the entire frame is noisy. Selective denoise via masks in Darktable or RawTherapee lets you apply stronger reduction to backgrounds and shadows while preserving detail on the subject.
- AI vs. manual: At ISO 3200, manual selective denoising can match AI quality. At very high ISOs (6400+), AI pulls ahead — it is marginally better and significantly faster, as noted in the PhotographyLife comparison.
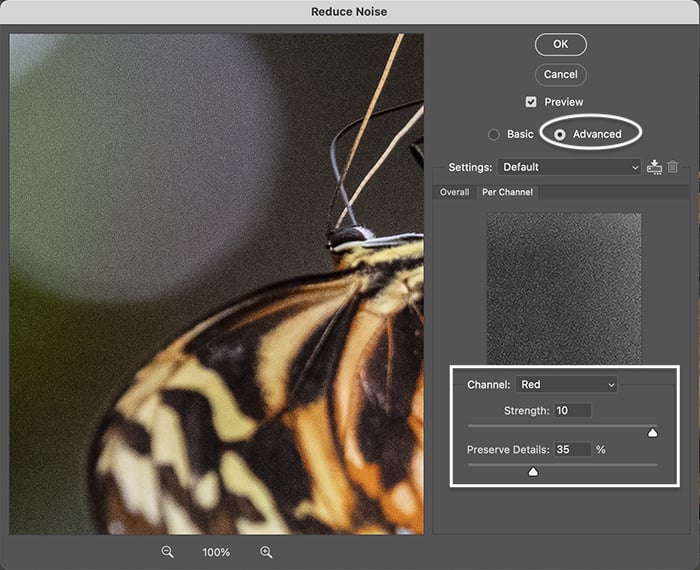
Photoshop’s Reduce Noise filter applies global denoising. For selective control, use layer masks or switch to a raw converter with local adjustments.
Tip: In Darktable, use the masked denoise module to brush over shadow areas and backgrounds only — the subject stays crisp. This selective approach is documented in PhotographyLife’s noise-reduction guide.
Step 2 — Sharpen Only the Edges and Subject
Once noise is under control, apply sharpening selectively — never on uniform areas like sky or out-of-focus backgrounds, which will show artefacts. RawTherapee’s “Blur/Grain & Denoise” module is built for this: it targets noisy skies for smoothing while protecting edges. Picsart’s AI denoise tool reduces grain and blur in a single pass, though with less manual control. Community members on the OM SYSTEM Ambassadors forum report that Topaz software can improve out-of-focus shots noticeably — especially scanned film or slightly missed focus.
Tools That Handle Both Steps in One Pass
Several applications combine denoising and deblurring into a single operation, saving time when you need both corrections:
- Topaz Photo AI — denoise + deblur + face recovery in one workflow. Standalone price $80; also available in the $200 suite.
- DxO PureRAW — converts raw files with AI denoising and lens-specific sharpness. Wildlife photographer Simon d’Entremont uses it for ISO 12,800 images.
- ON1 NoNoise AI — integrated in Photo RAW 2027, aimed at wildlife and high-ISO work (demo on ON1’s channel).
- Picsart AI Denoise — free web tool that reduces grain and blur; suitable for quick casual edits.
- RawTherapee — free, with a dedicated Blur/Grain & Denoise module for selective editing.
Why Your “Noise” Might Actually Be Blur or Chromatic Aberration
Applying denoising to a blurry image — or to chromatic aberration (CA) — will soften detail without fixing the real problem. A correct diagnosis is the most time-saving step you can take.
How to Tell Noise from Defocus Blur
- Noise appears as a random pattern of bright and dark pixels at the pixel level, especially visible in uniform areas such as sky, skin, or out-of-focus backgrounds. It has a grainy texture.
- Blur shows as soft edges with no pixel-level randomness. The image lacks definition on contrast boundaries (e.g., a branch against the sky).
- Zoom to 200% on a uniform region. If you see coloured specks that shift as you pan — that is noise. If the region is just soft and lacks detail — that is blur or missed focus.
Chromatic Aberration from Depth of Field That Looks Like Noise
A comment on the OM SYSTEM Ambassadors community thread points out an easily missed pitfall: “apparent noise may be DoF defocus producing chroma on edges.” This purple/green fringing at high-contrast edges (branches, lettering, fur) mimics the look of colour noise but is actually CA.
Fix before denoising: Use lens-profile corrections or the manual CA removal sliders in Lightroom, DxO PhotoLab, or RawTherapee. Once the fringing is gone, what remains is actual noise — and you can treat it accordingly.
Common mistake: Applying noise reduction to CA-affected edges makes them look muddy. Always check for purple/green fringing at 200% zoom on high-contrast edges before you start denoising.
The Diagnostic Check — Is Your Image Noisy or Soft?
- Zoom to 100% on a high-contrast edge (e.g., a person’s jawline, a bird’s wing against sky).
- If the edge is sharp but the surrounding area is grainy → noise.
- If the edge itself is mushy with no grain → soft focus or motion blur.
- If you see purple or green halos along the edge → chromatic aberration — correct CA first, then reassess.

Use the Detail panel in Adobe Camera Raw or Lightroom to inspect luminance and colour noise separately — a key diagnostic step before choosing a tool.
Real‑World Scenarios — Sports, Wildlife, and Astro Photography
Different shooting conditions demand different workflows. Below are three high-ISO situations drawn from actual user questions, with tool recommendations matched to each.
Low‑Light Sports (ISO 6400+) User problem: Night sports, no flash, ISO 6400 on a Nikon D780 — denoise without destroying the image. Workflow: DxO PureRAW (raw converter + AI denoise + lens sharpness) → export DNG → selective sharpening on faces and jerseys. Avoid global sharpening; use masks. Sports
Wildlife at Extreme ISO (12,800) Simon d’Entremont uses DxO PureRaw 6 for ISO 12,800 frames — his workflow runs PureRAW first, then Lightroom for local clarity and texture adjustments. ON1 NoNoise AI is also marketed specifically for wildlife (see ON1’s demo). Wildlife
OM‑1 II Low‑Light / High‑ISO Community replies on the OM SYSTEM thread recommend DxO PhotoLab 8, Topaz AI, and Lightroom. First check whether the “noise” is actually DoF chromatic aberration — if so, correct CA before any denoising. OM‑1 II
Which Tool Is Best for Your Situation? — A Comparison Table
The right tool depends on your budget, file format, and how much control you need. This table summarises the options covered in the PhotographyLife noise-reduction roundup and the community feedback referenced above.
| Tool | Denoise Quality | Sharpening / Deblur | Price | AI or Manual | Best For |
|---|---|---|---|---|---|
| Lightroom | Criticised by PhotographyLife as not satisfactory vs. dedicated tools; AI Denoise (recent) improves this | Basic sharpening; no dedicated deblur | Subscription | AI Denoise + manual sliders | All‑in‑one cataloguing & editing |
| Darktable | Strong selective denoise via masks | Wavelet sharpening; no dedicated deblur | Free | Manual (with presets) | Open‑source users who want local control |
| DxO PhotoLab / PureRAW | Machine‑learning denoise; rated highly by PhotographyLife | Lens‑specific sharpness included; excellent deblur | Paid (multiple tiers) | AI + lens‑profile data | Raw shooters at extreme ISO (6400–12800) |
| Topaz Denoise AI / Photo AI | One of the strongest dedicated denoise tools | Photo AI includes deblur and face recovery | $80 standalone / $200 suite | AI (with manual tweaks) | One‑click fix for heavy noise + mild blur |
| Picsart AI Denoise | Good for casual use; reduces grain and blur | Basic deblur in same pass | Free (web) | AI | Quick mobile/web edits, casual users |
| ON1 NoNoise AI | Strong AI denoise, marketed for wildlife | Integrated sharpening in Photo RAW 2027 | Paid (part of Photo RAW) | AI | Wildlife and nature shooters already on ON1 |
| RawTherapee | Selective Blur/Grain & Denoise module; good for skies | Wavelet sharpening; deconvolution option | Free | Manual (highly customisable) | Budget‑conscious users who want precision |
Ratings and quality assessments are based on comparisons published by PhotographyLife (2024–2025) and community feedback from the OM SYSTEM Ambassadors group (2025).
Decision guide: If your budget is zero → RawTherapee. If you shoot raw at ISO 6400+ → DxO PureRAW. If you want a single automated pass → Topaz Photo AI. For casual mobile editing → Picsart.
What These Tools Cannot Fix — Limitations and Caveats
No software can recover information that was never captured. Understanding the boundaries of denoising and deblurring tools keeps your expectations realistic and your workflow efficient.
AI Is Not Always Better at Low ISO
According to PhotographyLife’s testing, at ISO 3200 and below, manual selective denoising matches or beats AI quality. The speed advantage of AI is real, but the quality gap only appears at very high ISOs (6400+). If you rarely shoot above ISO 3200, a paid AI tool may not be necessary.
Cannot Fix Severe Motion Blur or Missed Focus
Topaz Photo AI can improve mild defocus — community members report success with slightly soft shots and scanned film. But extreme camera shake, subject motion blur, or a completely missed focus plane cannot be recovered. The Facebook OM SYSTEM thread also notes that DoF chromatic aberration is often mistaken for noise; fix the CA first, then evaluate what remains.
In‑Camera Noise Reduction Remains the Best First Step
Noise is an unavoidable consequence of light’s quantum nature in dim conditions, as explained in PhotographyLife’s background on noise. Proper exposure — expose to the right (ETTR) without clipping — and a fast lens give you a cleaner starting file. Over‑processing cannot fix a poorly exposed image.
Heads-up on software versions: DxO PhotoLab 8 (2025) received noticeably better community feedback than earlier versions. Lightroom’s AI Denoise, added in 2023, may address some of the quality criticisms PhotographyLife raised against earlier Lightroom noise reduction. Check your software version before dismissing a tool — the landscape changes quickly.
Software Version Matters
Tools improve rapidly. DxO PhotoLab 8 users on the OM SYSTEM forum report a meaningful leap over v6 and v7. Lightroom’s AI Denoise (introduced in 2023) may not have been evaluated in older comparisons. Always check the latest reviews and trial the current version before deciding.
All tools and pricing mentioned are as of October 2026. Always check the official website for the most current version and pricing.