- Category:
- Troubleshooting
- Summary:
- Learn to use the Adobe Photoshop Remove Tool with step-by-step guide, on-device and generative AI modes, and troubleshooting for missing tool errors.
At a glance: The Remove tool lives in the toolbar alongside the Spot Healing Brush and Healing Brush. Select it, brush over or draw a loop around an unwanted object, choose an AI mode (Auto, Generative AI On, or Generative AI Off), then press
Enteror click the checkmark to commit. The Contextual Task Bar gives you one-click access to Find distractions, Add to / Subtract from selection, and non‑destructive editing on a new layer. Three processing modes — cloud, on-device (Photoshop 27.7+), and local content-aware — let you balance quality, speed, and privacy.
Use the Remove Tool Step by Step
Select the Remove Tool from the Toolbar
Open Photoshop and locate the toolbar on the left. Click and hold the Spot Healing Brush icon to reveal the flyout menu; the Remove tool (shortcut may vary by version) is grouped there. If you cannot see it, ensure you are running Photoshop 2025 or later — earlier versions lack the tool entirely.

The Remove tool appears in the toolbar grouped with the Spot Healing Brush. Look for the red-box highlight in your own toolbar after updating to a compatible version.
Brush or Loop Around the Object
Two selection methods work for most scenarios:
- Brush over small distractions — adjust the brush size in the Options bar (use
[and]keys) so it covers the object with a little overlap. - Draw a freehand loop around larger objects — the loop auto-closes when the endpoints are close enough. A loop is often more precise for irregularly shaped items such as tourists, vehicles, or furniture.
Choose Your AI Mode in the Options Bar
The Options bar displays a mode dropdown with three choices. Glyndewis.com’s analysis explains that Auto lets Photoshop decide, Generative AI On taps into cloud or on-device models, and Generative AI Off runs a local content-aware engine. The on-device sub‑option appears only in Photoshop 27.7+ on supported hardware.
Use the Contextual Task Bar for Quick Options
When the Remove tool is active, the Contextual Task Bar appears near the bottom of the canvas. It provides:
- Find distractions — automatic detection and categorisation (People, Wires, General).
- Add to / Subtract from selection — refine auto-detected areas.
- Remove after each stroke — toggle on for immediate commit, off to apply multiple strokes before finalising.
- Create new layer — perform the removal on a separate layer for non‑destructive editing.
Remove the Object and Review the Result
Press Enter or Return (or click the checkmark in the Options bar) to commit. If the result looks patchy, press Ctrl+Z (Cmd+Z on Mac) and try a different mode or a tighter selection. A typical Adobe Help workflow shows removing a tourist from a scenic photo in a few seconds — the tool fills the vacated area with contextually appropriate content.
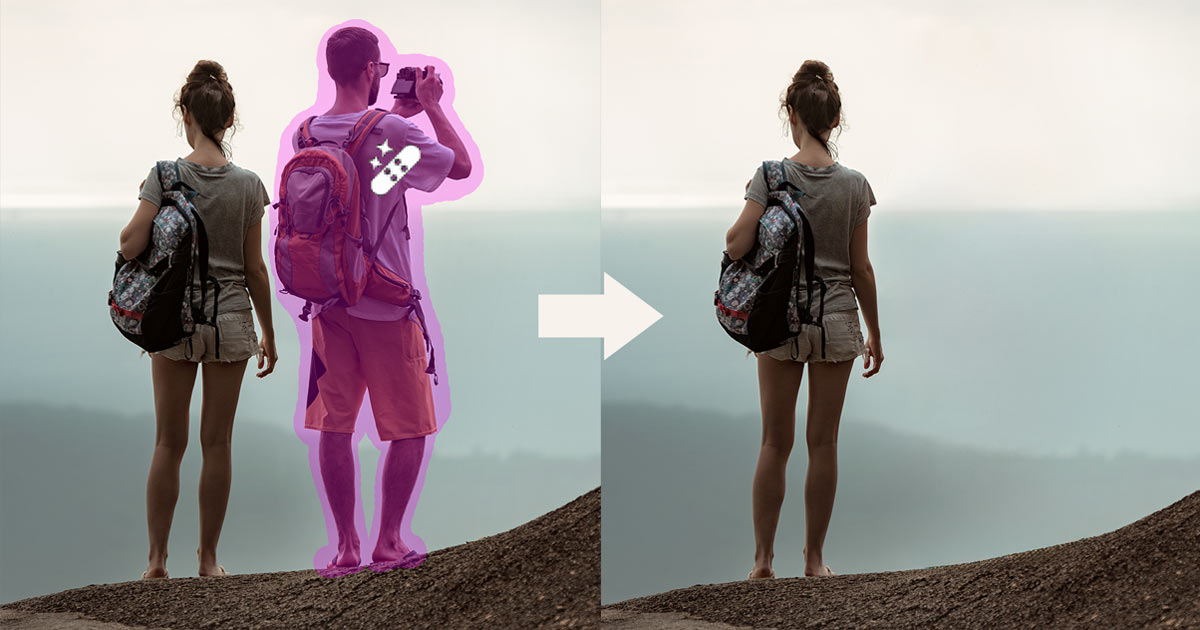
Before (left) and after (right) — the Remove tool erases a person from a landscape scene and fills the area with matching background detail.
Fix the Most Common Remove Tool Errors
Remove Tool Not Showing in the Toolbar
In early Beta versions and Photoshop releases before 2024, the Remove tool was absent from the toolbar. Community reports confirm this affected users on Photoshop 25.x Beta. Update to Photoshop 2026 or later; the tool is standard in 27.7+.
Solution: Go to Help > Updates and install the latest version. If you prefer not to update, use the Spot Healing Brush as a temporary fallback.
Pink Overlay Bug on macOS Monterey
Photoshop 25.0.0 on macOS Monterey exhibits a peculiar bug: circling an object fills the area with pink, and clicking the tick confirms with a solid yellow fill instead of performing the removal. Adobe Community threads document this issue in detail.
Solution: Use the Spot Healing Brush or Content-Aware Fill as a workaround. Upgrading to Photoshop 27.7+ or updating macOS eliminates the pink overlay.
Black, Gray, or Multi-Color Fill After Removal
Some users report that the Remove tool replaces objects with black, gray, or random colour splotches — especially after using AI Expand on the same layer. Forum discussions note that the tool’s behaviour degraded for long-time users after certain updates.
Solution: Reset the tool (right-click its icon > Reset Tool), then reset Photoshop preferences. Avoid using the Remove tool on layers that have been processed with AI Expand without first merging or rasterising. Check your GPU driver and ensure hardware acceleration is enabled in Preferences > Performance > Advanced Settings.
Remove Tool Greyed Out
When the Device sub‑option is greyed out, your system likely falls short of the on-device requirements. As Glyndewis.com details, many mid-range GPUs with 12 GB VRAM still do not unlock the option. On Mac, only Apple Silicon (M1 Pro or later) is supported; Intel Macs are excluded. Minimum RAM is 24 GB, and macOS must be Tahoe (26.4) or newer.
Solution: Switch to Cloud mode or Generative AI Off. Verify GPU acceleration in Photoshop’s performance settings. If you have compatible hardware and the option remains greyed out, update your GPU drivers and Photoshop.
Tool Behaviour Degraded Over Time
Experienced users on the Photoshop Gurus forum report that the Remove tool initially worked flawlessly but later produced black spots and inconsistent fills. This appears to be a configuration-specific bug rather than a universal regression.
Solution: Right-click the tool icon and choose Reset Tool. If the issue persists, reinstall Photoshop or reset preferences entirely. As a preventive measure, work on a duplicate layer and commit manually rather than using auto-commit.
Quick troubleshooting checklist
If the Remove tool behaves unexpectedly: (1) update Photoshop, (2) reset tool defaults, (3) check GPU acceleration, (4) switch AI mode, (5) work on a fresh layer. These five steps resolve the majority of user-reported issues.
Understand the Remove Tool's Three AI Modes
Auto Mode (Default)
Photoshop decides whether to invoke generative AI based on the complexity of the selection. No manual control — best for quick, everyday removals where you trust the tool’s judgement.
Generative AI On — Cloud (Cloud)
Sends the selected area to Adobe servers for processing. Requires an internet connection. Uses Firefly models, which Adobe states are trained on licensed content and commercially safe. Produces high-quality fills for complex backgrounds.
Generative AI On — Device (On-Device)
Available in Photoshop 27.7+ (released May 19, 2026). Processes entirely on your machine — works offline. Requires downloading a ~5 GB model and a powerful GPU (Apple Silicon M1 Pro+ or high-end RTX). Glyndewis.com notes that results are noticeably faster than cloud round-trips.
Generative AI Off (Offline)
Local content-aware processing — no data leaves your computer. Fast and reliable for simple backgrounds, but struggles with complex textures and fine edges. A good fallback when you want privacy or when the internet is unavailable.
Choosing the right mode depends on your priorities: Cloud gives the best quality for difficult scenes, On-Device offers speed and privacy without sacrificing quality, and Off is a reliable lightweight option for straightforward edits.
Discover the New Find Distractions Feature
How Find Distractions Works
Added in the August 2026 update, Find distractions lives in the Contextual Task Bar. Click the button and Photoshop automatically scans the image, detecting and categorising objects as General, People, or Wires and cables — three distinct categories that cover the majority of distractions in travel, real estate, and event photography.
Refining the Auto-Selection
After detection, each category appears as a selectable group. Use the Add to and Subtract from buttons to fine-tune which detected areas should be removed. A PHLEARN tutorial demonstrates how one click can highlight every power line in a frame, then remove them all simultaneously — a task that used to require manual brushing or the Spot Healing Brush applied repeatedly.
When to Use Find Distractions vs. Manual Brushing
Find distractions excels at scenes with multiple small, discrete objects: tourists at a landmark, overhead wires, trash cans on a street. Manual brushing remains the better approach for a single large object (a car, a signpost) or when the subject overlaps with the distraction in complex ways.
Check Which Photoshop Version Has the Remove Tool
The Remove tool’s feature set has expanded significantly across versions. Use this list to identify what your copy supports:
- Photoshop CC 24.x – 25.x —
Cloud GenAIStandard Remove— Original Remove tool with cloud generative AI. No on-device mode, no Find distractions. - Photoshop CC 26.x —
Cloud GenAIFind distractions?— May include Find distractions but not on-device. Verify via Help > System Info. - Photoshop 27.7+ (May 2026) —
On-DeviceCloud GenAIFind distractions— Full feature set. On-device AI requires ~5 GB model download and compatible hardware. - Photoshop Elements 2027 —
Local AI— Includes a Remove tool powered by local AI (not generative). Works on lower-end hardware. Adobe’s Elements guide covers its capabilities. - Adobe Firefly (free online) —
Cloud— Not part of Photoshop. Brush-and-generate workflow at firefly.adobe.com. File size limit >100 MB, min 512×512 px. Commercially safe.

The Remove tool debuted in Photoshop Beta before rolling into stable releases. On-device AI arrived with Photoshop 27.7 in May 2026.
Compare the Remove Tool with Other Removal Methods
| Tool / Method | Best For | Limitations | When to Choose |
|---|---|---|---|
| Remove Tool | Distinct objects on varied backgrounds; one-click removal | Struggles with complex edges (hair, fur) and intricate textures in non-generative mode | Quick result, object is clearly separated from background |
| Spot Healing Brush | Small blemishes, spots, dust, minor distractions | Not suitable for large objects; samples from surrounding area only | Fine detail work, small imperfections |
| Content-Aware Fill | Large uniform backgrounds (sky, wall, road); works on selections | Can produce repeating patterns; less effective on complex, irregular backgrounds | Removing large elements from consistent surfaces |
| Clone Stamp | Precision replacement, repeating patterns, manual control | Requires manual source sampling; slower; demands steady hand | When automatic tools fail — edges, geometric patterns, exact texture matching |
In practice, many professionals combine methods. Mattk.com’s workflow starts with the Remove tool as the primary pass, then switches to the Clone Stamp for residual artefacts — a hybrid approach that leverages speed where it works and precision where it’s needed.
Use Advanced Techniques for Complex Object Removal
Work on a Duplicate Layer
Before any removal, enable Create new layer in the Contextual Task Bar, or duplicate the background layer manually (Ctrl+J / Cmd+J). This preserves the original and lets you mask or discard the result without affecting the source image — a non‑destructive workflow that Adobe recommends.
Use Multiple Strokes with Manual Commit
Disable Remove after each stroke. Brush over different portions of a large object (e.g., a car spanning across a road and a sidewalk) and commit only once. This prevents the tool from making separate, mismatched fills for each segment.
Combine with Content-Aware Fill for Large Areas
After using the Remove tool, inspect the result. If the fill shows uneven seams, make a selection around the affected zone and run Edit > Content-Aware Fill. The two tools complement each other: Remove handles the initial erasure, Content-Aware Fill refines the blending.
Refine Edges with Layer Masks
The Remove tool sometimes struggles with fine detail such as hair strands or transparent objects. Add a layer mask to the removal layer and paint with black or white to hide or reveal parts of the result. This manual touch-up is often necessary for portraits or product shots with complex edges.
Pro tip — Mattk.com’s hybrid workflow
Lightroom crop → Photoshop duplicate layer → Remove tool with manual commit → layer mask → Clone Stamp for residue. This five-step pipeline handles 90 % of object-removal tasks without needing a third-party plugin.
Protect Your Privacy When Using the Remove Tool
What Data Does Cloud Remove Send?
When you use Generative AI On (Cloud), Photoshop sends only the selected area — not the full image — to Adobe’s servers. Adobe Community discussions clarify that the Firefly models used for generative filling are trained on licensed content and do not retain your images after processing.
On-Device Mode for Confidential Work
If you handle sensitive imagery (confidential products, private events, unreleased designs), switch to On-Device mode (Photoshop 27.7+) or Generative AI Off. Both process entirely locally — no data travels over the network. The on-device mode requires the ~5 GB model download and compatible hardware, but the privacy guarantee is absolute.
Privacy at a glance
Cloud Remove sends only your selection to Adobe; Adobe states Firefly is commercially safe and trained on licensed content. For maximum privacy, use On-Device mode or turn generative AI off. No internet connection is needed for local processing.
User Concerns vs. Adobe’s Assurances
Some users remain cautious about cloud processing, preferring to rely solely on data already in the image rather than external models. Adobe’s position is that Firefly is compliant with commercial licensing standards. If you share that concern, the on-device and off modes give you full control over data flow.
When the Remove Tool Falls Short — Limitations and Workarounds
- Struggles with complex textures and fine edges. Standard (non-generative) Remove uses content-aware algorithms that often fail on hair, fur, or intricate patterns. Workaround: combine with manual masking or use the Spot Healing Brush for small parts. Switch to Cloud mode for better generative results on tricky edges.
- On-device mode demands powerful hardware. Many mid-range GPUs with 12 GB VRAM still leave the Device option greyed out. Minimum specs: 24 GB RAM, Apple Silicon M1 Pro or later (on Mac), high-end RTX (on Windows), macOS Tahoe (26.4) or newer. If greyed out, use Cloud mode or turn generative AI off.
- Not available in all Photoshop versions. Users on Photoshop 24.x or earlier lack the tool entirely. Photoshop Elements 2027 includes a basic Remove tool but without generative capabilities. Adobe Firefly offers a free online alternative for those without a compatible Photoshop version.
- What remains unknown. As of September 2026, there is no evidence of video frame support — the Remove tool works on still images only. On-device GPU requirements remain imprecise for specific card models; Adobe may clarify these in future documentation. No public benchmarks directly compare cloud vs. on-device speed on identical hardware.
⚠️ Keep expectations realistic
The Remove tool is a strong addition to Photoshop’s retouching arsenal, but it is not a universal solution. For precise control, repeated patterns, or ultra-fine detail, traditional tools like the Clone Stamp and layer masks remain essential parts of a well-rounded workflow.