- Category:
- Workflow Tips
- Summary:
- Click or drag over an area — the tool analyses tone, colour, and similar textures to find edges automatically
▶ A brush-based selection tool that paints by detecting edges from tone, colour and texture.
Shortcut: W (Windows / Mac) | Introduced: Photoshop CS3 (2007) | Default mode: Add to selection (cursor shows +)
How it works: Click or drag over an area — the tool analyses tone, colour, and similar textures to find edges automatically. Use Alt (Win) / Option (Mac) to subtract, or adjust brush size with [ / ].
Example — selecting a child with a wheelbarrow of pumpkins. The subject includes fabric folds, pumpkin stems, grass, and skin tones — a mix of textures and colours. With the Quick Selection Tool, you paint across the child's body and the wheelbarrow; the tool finds the edges between the subject and the background. Where the tool selects too much (between pumpkin stems), you hold Alt / Option and paint to subtract. The result is a clean selection that would be difficult to achieve with a single click of the Magic Wand. This walkthrough is based on a tutorial by Photoshop Essentials.
Location of the Quick Selection Tool in the Toolbar and Its W Shortcut
The Quick Selection Tool sits near the top of the Photoshop Tools panel, grouped with the Magic Wand Tool. You can identify it by the brush icon with a dotted selection ring. Photoshop Essentials notes that the keyboard shortcut W works on both Windows and Mac.
Once selected, the Options Bar displays three mode icons: New, Add, and Subtract. The tool defaults to “Add to selection” mode, indicated by a small + sign inside the cursor. This default is intentional — the Quick Selection Tool is designed to build up a selection incrementally as you paint.

Quick Selection Tool location in the Photoshop toolbar (shortcut: W). The fly-out groups it with the Magic Wand.
How the Quick Selection Tool Detects Edges by Tone, Color, and Texture
The core mechanism is simple to use but sophisticated under the hood. As you drag, the tool automatically finds image edges by analysing three dimensions of the pixels under the brush: tone (lightness/darkness), colour (hue and saturation), and — notably — similar textures. This texture awareness is what distinguishes it from the Magic Wand, which only compares colour values.
According to Annenberg Digital Learning, the Quick Selection Tool “uses a brush to paint out selected regions. The regions you select are almost Magic-Wand-tooled, because Quick Selection Tool also senses edges.” This combination means the tool can handle subjects with varying colours as long as texture remains consistent — for example, selecting a person wearing a striped shirt against a smooth wall.
Why default Add mode? “The ‘Add to selection’ mode is already chosen for us, since the whole point of the Quick Selection Tool is to continue adding to the selection until you’ve selected everything you need.” — Photoshop Essentials
Painting a Selection with the Quick Selection Tool’s Adjustable Brush
This section walks through every phase of using the tool, from the first click to a refined, ready-to-mask selection. The brush-based workflow is the heart of the Quick Selection Tool.
Starting a New Selection
Step
Select the tool with W and make sure the Options Bar shows the New or Add icon active (Add is the default).
Click or drag over the subject area. You don’t need to be precise — the tool will find the edges as you paint. Start with a brush size slightly smaller than the region you want to isolate.
Brush size and hardness are adjustable in the Options Bar. For most organic subjects, a hardness of 20–40% produces soft, natural edges. For hard-edged objects (a car, a building), increase hardness to 70–90%.
Adding to the Selection
Step Because the tool stays in Add to selection mode by default, you can simply keep painting to expand the selection. Photoshop Essentials emphasises that this is the intended workflow — you build up the selection gradually.
Alternatively, hold Shift while dragging if you have switched to a different mode. To select multiple non-adjacent objects, release the mouse, move to the next area, and drag again.
Subtracting from the Selection
Step
Hold Alt (Windows) or Option (Mac) while dragging over areas you want to remove. The cursor displays a − sign when in Subtract mode. This is the primary way to tighten edges where the tool has selected background material.
Source: Annenberg Digital Learning confirms the Alt/Option shortcut for subtraction.
What Intersection Mode Does (and Doesn’t Do)
Important limitation: The intersection shortcut
Shift+Alt(Win) /Shift+Option(Mac) does not work with the Quick Selection Tool. Jkost.com explicitly lists this exception. A workaround is to create two separate selections and then use the “Intersect with selection” option available in the Object Selection Tool (Adobe HelpX).
Brush Size, Hardness, and Advanced Brush Settings
Adjust brush size on the fly with the [ (smaller) and ] (larger) keys. This lets you switch between broad strokes for large areas and fine strokes for detail work without breaking your workflow.
Tip: Keep hardness between 20–40% for organic subjects (people, animals, plants) to avoid harsh selection edges. For hard-edged objects (buildings, vehicles, products), increase hardness to 70–90% for a sharper boundary.
Advanced settings in the desktop version are accessible via the Brush Settings panel (F5). You can adjust Spacing, Angle, and Roundness there. The web version (covered in the next section) exposes these same controls in the Select panel — Adobe HelpX documents Spacing, Angle, and Roundness as available parameters.
Brush Size and Hardness controls in the Options Bar — adjusted dynamically as you paint.
Refining the Selection Edge
Once the initial selection covers the subject, click Select and Mask in the Options Bar. This opens the workspace for edge refinement:
-
Set Shift Edge to −5% to contract the selection slightly and remove background fringes.
-
Set Feather to 0.5–1 px for a subtle softening.
-
For hair or fur, use the Refine Edge Brush tool (the leftmost brush icon) to paint over flyaway strands.
When satisfied, choose Layer Mask from the Output drop-down — this creates a mask directly from the selection, preserving the original layer intact.
A Practical Workflow — Selecting the Child and Pumpkins
Returning to the Photoshop Essentials example: a child stands beside a wheelbarrow full of pumpkins, with grass and sky in the background. Here is how the Quick Selection Tool handles it:
-
Paint across the child’s body and the wheelbarrow with a medium brush (size ~40–60 px). The tool detects fabric edges, skin tones, and the metal wheelbarrow rim.
-
Subtract between pumpkin stems — hold
Alt/Optionand paint in the gaps where the tool selected background foliage. -
Adjust brush size with
[/]for tight spots around the child’s fingers and the wheelbarrow handles. -
Open Select and Mask — use the Refine Edge Brush on the child’s hair for a natural edge. Set Shift Edge to −5%, Feather to 0.5 px, and output as a Layer Mask.
The result is a clean mask ready for background replacement or adjustment layers — all from one tool and a few minutes of work.
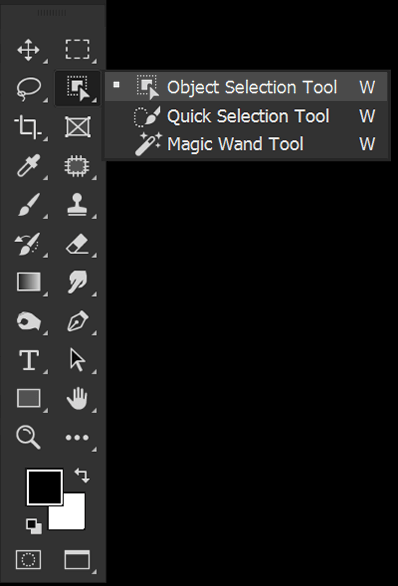
Three selection tools side by side in the toolbar: Object Selection, Quick Selection, and Magic Wand.
The Quick Selection Tool in Photoshop for the Web
Photoshop for the web (the browser-based version) includes the Quick Selection Tool but with a different interface. According to Adobe HelpX:
-
Access it via Select > Quick selection in the top menu — there is no toolbar icon.
-
Brush Size and Hardness controls are in the Select panel on the right, not the Options Bar.
-
After making a selection, the Contextual task bar offers Generative Fill, Remove, Adjust, and other actions.
-
Advanced brush settings (Spacing, Angle, Roundness) are also located in the Select panel.
There are no dedicated Add/Subtract buttons in the web version. Instead, use “Select more” and “Select less” options in the Select panel to refine your selection.
Common Quick Selection Tool Problems and How to Fix Them
“Image Breaks Up in Pieces” or Cropped Selection Appears (Photoshop 2020)
A community user on Adobe Community reported that in Photoshop 2020 (version 21.2.4 on macOS High Sierra), using the Quick Selection Tool caused the image to fragment and a cropped selection to appear instead of the normal marching ants. The thread included screenshots of the broken behaviour.
Troubleshooting steps to try:
-
Reset tool preferences: Right-click the tool icon in the Options Bar and choose “Reset Tool”.
-
Update GPU drivers — the tool relies on GPU acceleration for edge detection.
-
Disable OpenGL: Go to Preferences > Performance and uncheck “Use Graphics Processor”.
-
Reduce image resolution temporarily, or switch to 8‑bit mode (Image > Mode > 8 Bits/Channel).
-
Alternative tools: If the problem persists, use the Object Selection Tool or the Magic Wand as fallbacks.
Quick Selection Tool Missing Entirely (Photoshop 7.0)
The Quick Selection Tool was first introduced in Photoshop CS3 (2007), as noted by Photoshop Essentials. It does not exist in Photoshop 7.0 or earlier versions. A community thread on Adobe Community confirms this: users on PS 7.0 must use the Magic Wand in combination with the Lasso tool, or upgrade to CS6 or later.
Tool Selecting Too Much Background Area
If the selection spills into the background, try these adjustments:
-
Reduce brush size — a smaller brush gives the tool less area to misinterpret.
-
Increase hardness for sharper boundaries.
-
Use Subtract mode (hold
Alt/Option) to remove the over-selected background. -
Switch to the Object Selection Tool for large, well-defined objects — it uses AI-based auto-detection and may produce a cleaner initial selection.
Quick Selection Tool vs Magic Wand vs Object Selection Tool
Each of Photoshop’s selection tools has a distinct strength. The table below compares the three tools that are most often confused. Sources: Annenberg Digital Learning, Adobe HelpX (Object Selection), Photoshop Essentials.
| Feature | Quick Selection Tool | Magic Wand Tool | Object Selection Tool |
|---|---|---|---|
| Selection method | Paint / drag with brush | Single click on a pixel | Draw rectangle/lasso or auto-detect |
| Edge detection | Tone, colour, and texture | Tone and colour only | AI-based auto-detection |
| Modes | New, Add, Subtract | New, Add, Subtract, Intersect | New, Add, Subtract, Intersect |
| Sample All Layers | Not available | Available | Available |
| Hard Edge option | No | No | Yes |
| Best for | Fine detail, textured subjects | Solid-colour areas | Large, well-defined objects |
| Introduced | CS3 (2007) | Earlier versions | Post-CC (later version) |
Selection Brush Tool is a separate tool — it paints a coloured overlay to indicate the selection area, as documented by Adobe HelpX. It is not interchangeable with the Quick Selection Tool.
Where to Find Official Documentation and Authoritative Tutorials
Each source below serves a different need. Use this list to find the depth you want:
-
Adobe HelpX — Desktop version Covers official spec changes and version-specific features. The Object Selection page (updated February 2026) documents Sample All Layers and Hard Edge. The main Quick Selection documentation is part of the broader selection workflow.
-
Adobe HelpX — Web version The only source for Photoshop on the web. The Quick Selection page (updated June 2026) covers the Select panel brush settings and Contextual task bar.
-
Photoshop Essentials (Steve Patterson) The most detailed explanation of how the tool “looks for similar textures” and why default Add mode exists. Uses the child+pumpkins example. Visit the Quick Selection Tool tutorial for the full walkthrough.
-
Annenberg Digital Learning Compares all nine selection tools in one page. The selection tools explainer is a good reference when deciding which tool to use for a given subject.
-
Adobe Community forums Real-user troubleshooting for version-specific bugs that official docs don’t address. Two relevant threads: Quick Selection breaking in 2020 and missing tool in Photoshop 7.0.
For practitioners who want to speed up repetitive cutout work, tools like Layerbench automate the Quick-Selection-to-mask workflow by running subject selection, creating a mask, and exporting a transparent PNG in one action — useful for batch processing once you have mastered the manual approach.