- Category:
- Export & Automation
- Summary:
- Learn how to export GIF in Photoshop using Save for Web for animations or Export As for static GIFs, with RGB mode and timeline frames required.
The short answer
For an animated GIF, use File > Export > Save for Web (Legacy), select GIF, set looping, and save. For a static GIF (single frame), use File > Export > Export As and choose GIF. Modern Photoshop removed GIF from Save As — those two dialogs are your only options.
Prerequisites: your Timeline must contain multiple frames (or a video layer converted to frames) and the document colour mode must be RGB.
Set Up Your Timeline and Choose RGB Color Mode
Before you export, Photoshop needs two things in place:
- Open the Timeline panel (
Window > Timeline). It must contain multiple frames — either frame animation frames or a video layer that has been converted to frames. Without frames the export produces a single static image. - Colour mode must be RGB. Go to
Image > Mode > RGB Color. If the document is CMYK or Grayscale, the GIF option may be hidden or unavailable.
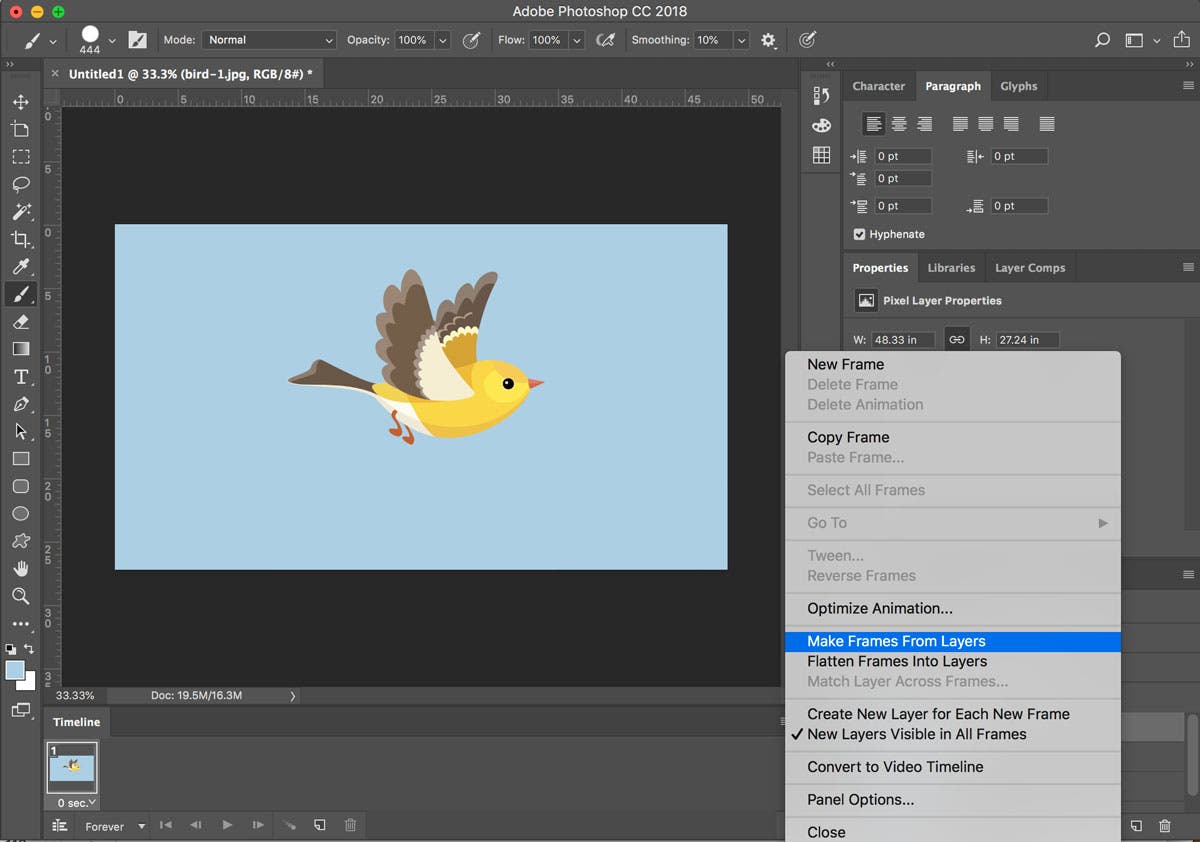
The Timeline panel with frame animation layers ready for export.
macOS note: Memory errors during GIF export are reported more frequently on Mac systems, especially with 8 GB RAM. Consider reducing your frame count early to avoid frustration — more on this in the troubleshooting section.
Use Save for Web (Legacy) to Export an Animated GIF
This is the standard method Adobe recommends for animated GIFs. It gives you full control over colour, dithering, and looping.
Open the Save for Web Dialog
Go to File > Export > Save for Web (Legacy). A dedicated dialog opens with a preview pane and optimisation controls.
Choose GIF Format and Set Looping
In the dialog, select GIF from the format dropdown. Below the preview you’ll find looping options: Once, Forever, or a custom number of repeats. Choose the one that fits your project.
Optimize Color and Dithering
GIF is limited to 256 colours per frame, so you need to manage colour reduction carefully:
- Colors: Reduce to the lowest number that still looks good — 128 or 64 often work well and keep file size smaller.
- Algorithm: Selective preserves hard edges; Perceptual mimics human vision and works better for smooth gradients.
- Dither: Enable dither to reduce colour banding, especially in skies or gradients. The dither slider lets you control how much.
- Lossy GIF: A small lossy value (10–30%) can reduce file size noticeably with minimal visible artifacts.
Preview and Save
Use the 2‑Up tab to compare the original with your optimised version side by side. When you’re satisfied, click Save.
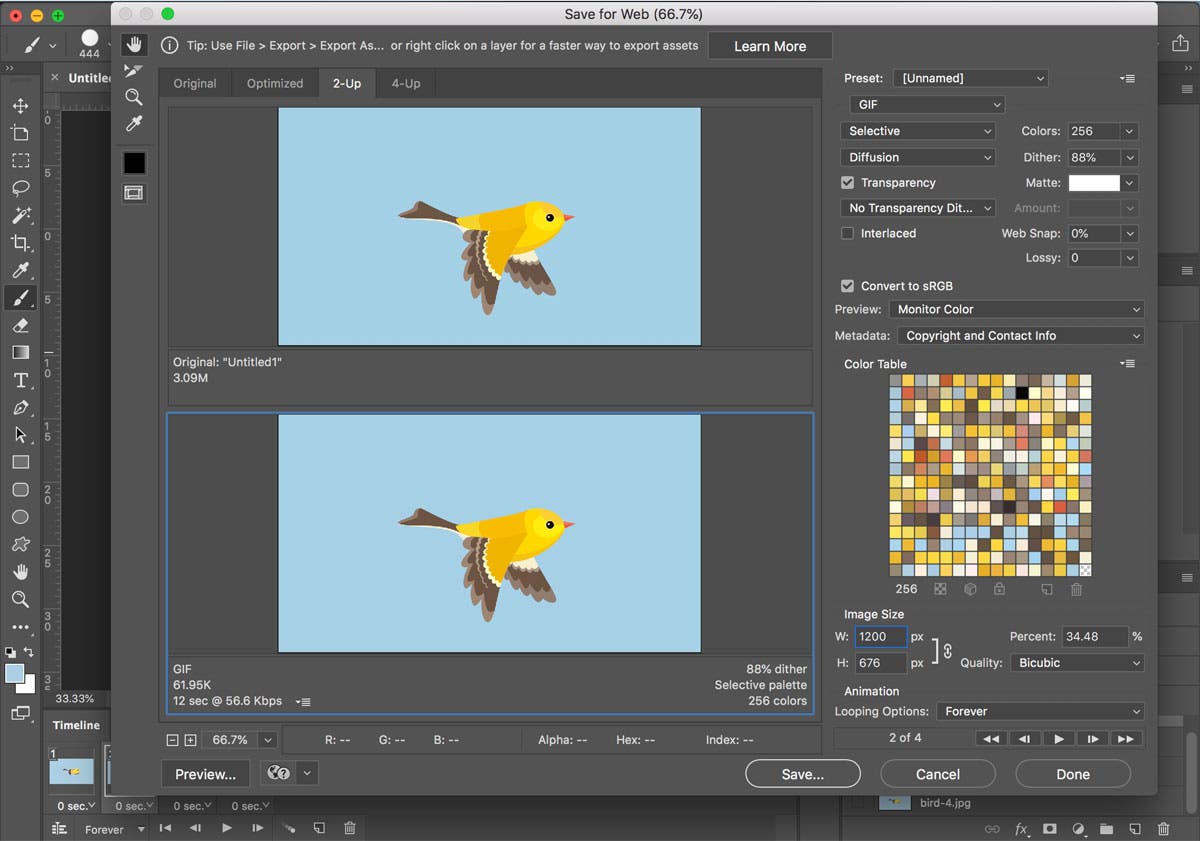
Save for Web (Legacy) dialog with GIF selected, showing colour and dither controls.
Remember: This is the only reliable method for exporting animated GIFs. The next method — Export As — exports only the current frame.
Use Export As for Static GIFs (Not for Animation)
When to Use Export As
Export As is a quick, modern dialog suitable for single-frame GIFs — logos, icons, banners, and any static graphic. It does not export animation.
How to Use It
Go to File > Export > Export As. From the Format dropdown choose GIF. You can set transparency and matte options. Click Export and choose a location.
Critical warning: If your document contains multiple timeline frames, Export As exports only the current frame — you will get a static image, not an animation. Always use Save for Web (Legacy) for animated GIFs.
Modern Photoshop versions have removed the GIF option from File > Save As. If you’re used to the old Save As workflow, switch to Export As (static) or Save for Web (animated).
Fix Common GIF Export Problems in Photoshop
Real-world users hit a handful of recurring issues. Here’s what causes them and how to resolve each one.
Static frame export
Why: Your Timeline lacks multiple frames, or you used Export As instead of Save for Web.
Fix: Verify the Timeline panel shows multiple frames. Then use File > Export > Save for Web (Legacy).
Community thread →
Missing GIF in Save As Why: Modern Photoshop removed GIF from the Save As dialog. Fix: Use Export As (static) or Save for Web (animated). Also ensure your colour mode is RGB. Adobe Community discussion →
Not enough memory Why: Common with 200+ frames, especially on macOS with 8 GB RAM — even with ample scratch disk space. Fix: Reduce frame count (export every 2nd frame), lower resolution, or export as MP4 via Render Video then convert to GIF. Bug reports →
Colour loss / washout Why: GIF’s 256-colour limit forces Photoshop to discard colour data. Fix: In Save for Web, switch algorithm to Selective for crisp edges, enable dither, and use the 2‑Up preview to compare. Accept that 256 colours is a hard ceiling. Advanced optimisation tips →
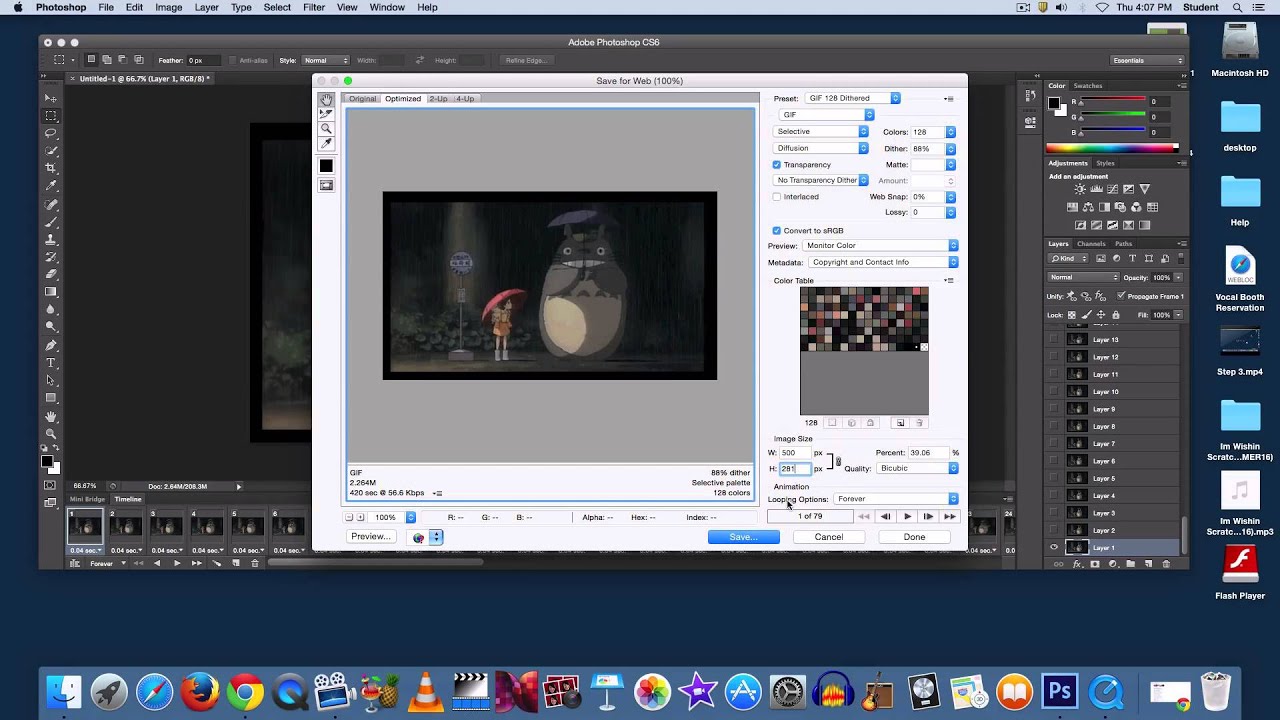
This frame from ‘My Neighbor Totoro’ appears as a single image when the timeline has no animation frames. Always check your Timeline panel before exporting.
Comparison of Export Methods
| Method | Best for | Animation support | Key controls |
|---|---|---|---|
| Save for Web (Legacy) | Animated GIFs | ✅ Full animation | Colour table, dither, lossy, looping |
| Export As | Static GIFs (logos, icons) | ❌ Exports only current frame | Transparency, matte |
| Render Video → convert to GIF | High-quality / memory-heavy projects | ✅ Full animation (via MP4) | H.264 quality, frame rate, resolution |
Export Your Animation as an MP4 Video Instead
When you hit the memory ceiling of Save for Web, or when you need full colour fidelity and a smaller file, exporting as video is a smart workaround.
- Go to
File > Export > Render Video. - Choose H.264 as the format. Set quality to High and match your frame rate and dimensions.
- Click Render to produce an MP4 file.
- If you must deliver a GIF, use a free converter such as EZGIF.com or FFmpeg to turn the MP4 back into a GIF. The result will often look better than a direct Photoshop GIF export and bypasses the memory bug entirely.
Why this works: Video codecs (H.264) handle motion and colour far more efficiently than GIF’s 256-colour palette. You get smoother gradients and a fraction of the file size.
Official Adobe Documentation and Community Support
Adobe provides several official channels that cover GIF export, each with a different focus:
Adobe Learn Step-by-step tutorial with screenshots for creating and exporting animated GIFs. Best for first-time users. Visit Adobe Learn →
Adobe Creative Cloud Overview of the GIF format, its limitations, and the standard export workflow. Good for understanding the “why” behind the settings. Read the overview →
Adobe Community User-run forum where real export bugs (memory errors, missing options) are reported and workarounds shared. Check here for version-specific issues. Browse the forum →
These resources are kept current by Adobe and are the most reliable place to check for changes in newer Photoshop versions.
If you also work with static exports, our guide on how to save a PNG in Photoshop covers the Export As workflow in more detail.