- Category:
- Workflow Tips
- Summary:
- How to undo in Photoshop: learn essential shortcuts, use the History panel for multiple undos, customize undo steps, and fix the Ctrl+Z toggle issue.
Quick answer: Press
Ctrl+Z(Win) /Cmd+Z(Mac) to undo your most recent action. UseShift+Ctrl+Z/Shift+Cmd+Zto redo. For multiple undos, pressAlt+Ctrl+Z(Win) /Option+Cmd+Z(Mac) repeatedly. This article covers every undo method, how to customize the number of undo steps, and how to fix common problems like “Ctrl+Z only works once.”
Which Undo Method Should You Use?
Photoshop offers several ways to reverse actions, each suited to a different situation. Use the table below to pick the right approach for your workflow.
| Method | Shortcut / Access | Steps Undone | Best For | Caveat |
|---|---|---|---|---|
| Basic Undo | Ctrl+Z / Cmd+Z |
1 step | Quick single-step reversal | In legacy mode, toggles instead of stepping back |
| Step Backward | Alt+Ctrl+Z / Option+Cmd+Z |
Multiple (one at a time) | Going back several steps without opening a panel | Must be pressed repeatedly |
| History Panel | Window > History |
As many as you have states | Visual navigation; jumping to any earlier state | States beyond your limit are lost |
| Revert | File > Revert or F12 |
All changes since last save | Discarding everything after a save | Cannot be undone itself |
| Smart Objects | Right-click layer > Convert to Smart Object | Any single filter/adjustment | Non-destructive editing; change or remove filters later | Requires setup before applying adjustments |
Values in this table are drawn from Adobe’s official documentation, the TourBox blog, and PhotoUp’s tutorial. If Ctrl+Z seems to toggle only one step, the next section explains why.
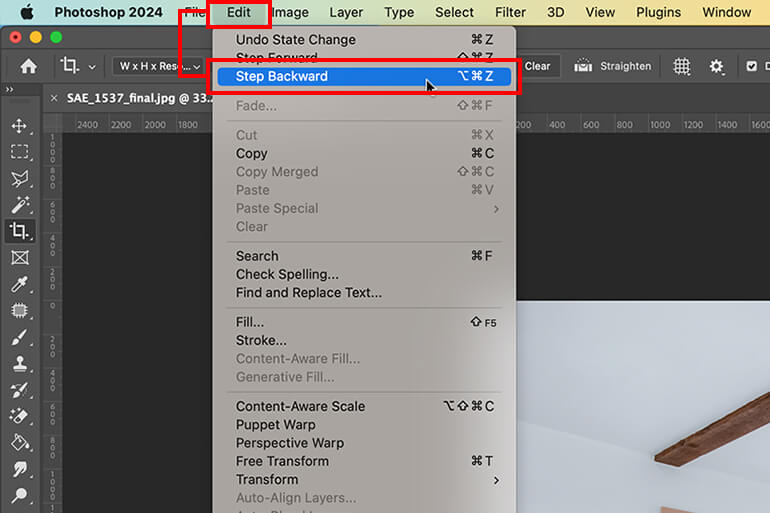
The Edit menu lists Undo, Step Backward, and Step Forward — the main entry points for keyboard shortcuts.
Basic Keyboard Shortcuts – Ctrl+Z, Step Backward, and Redo
Mastering a few key combinations makes undoing in Photoshop much faster than clicking through menus. Here are the essential shortcuts for Windows and macOS:
- Ctrl+Z (Win) / Cmd+Z (Mac) — Undo the last action.
- Shift+Ctrl+Z (Win) / Shift+Cmd+Z (Mac) — Redo (step forward).
- Alt+Ctrl+Z (Win) / Option+Cmd+Z (Mac) — Step Backward (multiple undos, one press per step).
The difference between Ctrl+Z and Alt+Ctrl+Z is important: Ctrl+Z performs a single undo of the most recent action, while Alt+Ctrl+Z (Step Backward) lets you walk back through multiple actions one at a time. You can press it repeatedly until you reach the desired state — no panels required.
Note on naming: Some sources label
Ctrl+Alt+Zas “Toggle Last State” (see the TourBox guide), while others use it for multi-step undo. Adobe’s own interface calls it Step Backward, and that is the behaviour you get by default. For clarity, this article uses Step Backward forAlt+Ctrl+Z/Option+Cmd+Z.
The “Ctrl+Z Trap” – Legacy vs Modern Undo Behavior
A common frustration, especially for beginners: pressing Ctrl+Z seems to undo and then redo the same action, rather than stepping back through multiple changes. This happens because of a difference between Photoshop’s legacy and modern undo modes.
In older versions of Photoshop (and when Legacy Undo is enabled), Ctrl+Z acts as a toggle: it undoes the last action, and pressing it again redoes that same action. It never moves further back. This behaviour confuses users who expect multi-step undo from a single shortcut, as noted in discussions on Reddit.
You have two ways to handle this:
- Enable Legacy Undo if you prefer the toggle behaviour: go to
Edit > Keyboard Shortcuts and Menusand check Use Legacy Undo Shortcuts. A restart is required. (See Adobe Help for the official steps.) - Use
Alt+Ctrl+Z(Step Backward) for multiple undos — this works regardless of the legacy setting and is the recommended approach for most users.
⚠️ Tip: Unless you specifically need the old toggle behaviour, leave Legacy Undo off. The modern default lets
Ctrl+Zundo the last action andAlt+Ctrl+Zhandle multi-step reversal — a cleaner separation.
Using the History Panel for Visual Undo and Customization
The History Panel is Photoshop’s most powerful undo tool. Instead of stepping backward one action at a time, you can see every change you’ve made and jump directly to any previous state. This section covers how to use it, how to increase the number of available steps, and why unlimited undo isn’t possible.
How to Access and Navigate the History Panel
Open the panel via Window > History. You’ll see a list of every action you’ve performed, from the moment you opened the file to the most recent edit. Each entry is called a state.
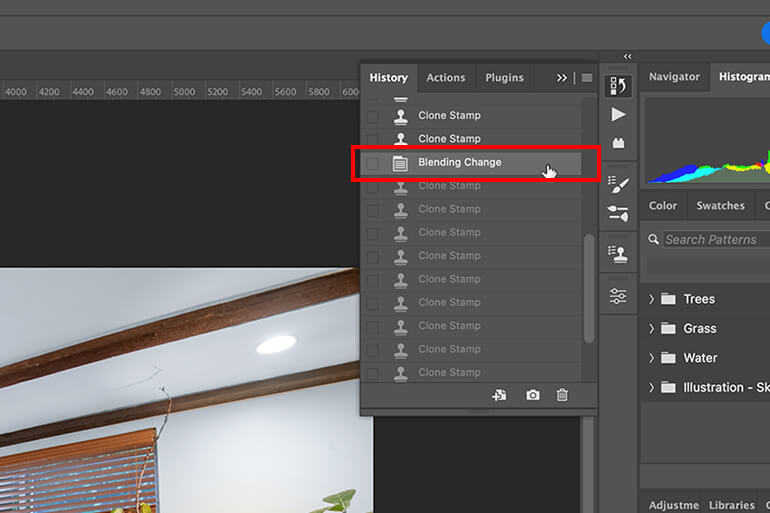
The History Panel lists each action; click any state to jump back to it instantly.
To revert to an earlier state, simply click its name. Photoshop restores the document to exactly how it looked at that moment. You can also click forward to a later state if you haven’t performed any new actions since stepping back. Both the TourBox guide and PhotoUp’s tutorial cover this workflow in detail.
Customizing the Number of Undo Steps (Up to 1000)
By default, Photoshop stores 20 history states. If you need more, you can raise this limit — up to a maximum of 1000.
To change the setting:
- Go to
Edit > Preferences > Performance(Win) orPhotoshop > Preferences > Performance(Mac). - Find the History States field (a slider with a numeric input).
- Set a value between 1 and 1000. A setting of 50–100 works well for most users; keep 20 on systems with limited RAM.
- Click OK. The change applies immediately — no restart needed.
This information comes from Adobe’s documentation and is confirmed by the TourBox article, which also notes the 20‑state default and the 1000‑state cap.
Why Photoshop Can’t Offer Unlimited Undo
A common question is: “Why can’t Photoshop just remember everything like Lightroom does?” The answer comes down to how the two editors handle changes.
Photoshop uses destructive editing for most operations — when you paint, erase, or apply a filter, the pixel data is changed directly. Each history state must store a full copy of the affected pixels, which uses significant memory. Lightroom, by contrast, stores parametric edits (a set of instructions like “increase contrast by +20”), which take up much less space and can be retained indefinitely. As the TourBox blog explains, this fundamental difference is why Photoshop caps history states at 1000 while Lightroom can keep a full edit history for every photo.
Performance Tips and Recommended Settings
Balancing history capacity with performance is key, especially when working with large files.
- Heavy files: Keep history states low (20–30) to avoid excessive RAM usage.
- Use Snapshots: Click the camera icon at the bottom of the History Panel to save a snapshot of the current state. Snapshots persist even as later states fall off the list — they act as bookmarks that don’t count toward your history limit.
- Combine with Smart Objects: For complex adjustments, convert layers to Smart Objects first (see the next section). This keeps destructive changes off the history list and preserves your original pixels.
Non‑Destructive Undo with Smart Objects
Smart Objects let you apply filters, transforms, and adjustments without permanently changing the original pixels. This means you can “undo” a filter even after performing other actions — something the regular undo system cannot do once the history limit is reached.
Here’s how to use Smart Objects for non‑destructive editing:
- Convert a layer: Right‑click the layer in the Layers panel and choose Convert to Smart Object. A small icon appears on the layer thumbnail to confirm.
- Apply a filter or adjustment: Use any filter from the
Filtermenu. It appears as a Smart Filter below the layer. - Edit or remove the filter later: Double‑click the Smart Filter name to change its settings, or drag it to the trash to remove it entirely. The underlying image stays untouched.
This technique is recommended by PhotoUp’s guide as a way to keep your edits reversible long after the standard history has rolled off. For even more control, you can also apply adjustments as Smart Filters through the Layer > New Adjustment Layer menu — those remain editable independently.
Revert – Undo Everything Since Your Last Save
Sometimes you need to discard everything you’ve done since the last save. The Revert command does exactly that: it returns the document to the state it was in the moment you last saved.
- Menu:
File > Revert - Shortcut: Press F12
⚠️ Important: Revert is irreversible. It does not create a new history state, so you cannot undo the revert itself. Use it only when you are certain you want to abandon all changes made since your last save. Both Adobe Help and the TourBox article emphasize this point.
Solving Common Undo Problems
Real Photoshop users run into the same undo frustrations again and again. Here are three of the most frequent issues and how to solve them.
“Why Does Ctrl+Z Only Work Once?”
This is the Ctrl+Z trap covered earlier. In short: if Ctrl+Z seems to toggle between two states, you are either in Legacy mode or you’re expecting multi-step behaviour from a single shortcut. The quick fix is to use Alt+Ctrl+Z (Step Backward) for multiple undos. If you prefer the toggle behaviour, you can enable Legacy Undo via Edit > Keyboard Shortcuts and Menus — but for most workflows, the modern default is simpler. For more context, see the Reddit discussion where users describe this exact confusion.
“How Do I Erase vs Undo?”
The Eraser tool permanently modifies pixels — it’s like using a real eraser on paper. Undo reverses the most recent action, including an erase, but only if the erase was the last thing you did. If you erased, then painted or used another tool, you cannot undo the erase without also undoing the subsequent actions.
A better approach: instead of using the Eraser tool, add a layer mask. Paint with black on the mask to hide parts of the layer and white to reveal them again. Masks are non‑destructive and give you unlimited “unerase” without relying on the undo system. As Reddit beginners often discover, this one change saves hours of frustration.
“I Want More Than 20 Undo Steps – But I Saw a Blog Saying I Can Do 50”
Some tutorials — including PhotoUp’s article — claim you can “undo the last 50 steps” by default. This is likely an error. Adobe’s default is 20 history states, as confirmed by the TourBox blog and general Adobe documentation. You can raise the limit to any value between 1 and 1000 in Preferences > Performance (see the History Panel section above). If you need 50, set it to 50 — but be aware that more states consume more RAM.
If you are also exploring other Photoshop workflow improvements, our guide on unmerging layers covers related undo scenarios after merging.
Where to Get Trusted Answers on Photoshop Undo
The resources below offer reliable, up‑to‑date information on Photoshop’s undo system. Each has a specific strength, so pick the one that matches what you need.
Adobe Help (Undo and Redo)
Official, canonical reference for all shortcuts, the Legacy toggle, and the Revert command. Always the first place to check for version‑specific details.
Visit Adobe Help →
Adobe Learn (Undo, Redo, Revert)
A structured learning path with screenshots and video clips. Good for visual walkthroughs, though some content may require an Adobe login.
Visit Adobe Learn →
TourBox Tech Blog
Excellent deep dive into history state limits (default 20, max 1000), performance trade‑offs, and the destructive vs non‑destructive distinction. Strong third‑party authority.
Visit TourBox →
PhotoUp Real Estate Blog
Covers Smart Objects and basic steps clearly. Useful for practical workflow examples, though be cautious of the “50 undo steps” claim — check against your own Preferences.
Visit PhotoUp →
Reddit (r/photoshop)
Real user problems and edge cases that official docs don’t always address. Answers vary in quality, so cross‑check anything critical against Adobe Help.
Visit Reddit →
layerbench.design
Practical Photoshop tutorials covering shortcuts, exports, and layer management. A solid companion for building efficient workflows.
Visit layerbench →
All trademarks and product names belong to their respective owners. This article is not affiliated with or endorsed by Adobe Inc. Product references are for informational purposes only.