- Category:
- Game Art Workflow
- Summary:
- For Photoshop sprite export, use manual assembly for few frames, built-in scripts for layer sequences, or automated tools for advanced packing with metadata.
Three reliable paths from Photoshop frames to usable sprite assets:
- Manual assembly — canvas resize + Move Tool (best for 2–8 frames, no metadata needed).
- Built-in script — File > Scripts > Export Layers to Files outputs a PNG sequence (layers must not be inside groups).
- Automated scripts & tools — the free GitHub spritesheet generator or TexturePacker for advanced packing with metadata.
No single built-in Photoshop command creates a ready-to-use sprite sheet — but the workflows below cover every common scenario.
Photoshop Has No Native Sprite Sheet Export – Here's What Works Instead
Adobe Animate includes a dedicated sprite sheet exporter that packs animation frames into a single atlas with configurable padding, layout, and metadata. Photoshop, by contrast, lacks this feature entirely — a gap that has frustrated game developers and motion designers for years.
Because the Timeline panel and frame animation tools live inside Photoshop, many users assume a direct export path exists. It does not. What the community has built instead is a set of manual workarounds, built-in scripts, third-party packing tools, and open-source automation that together cover every reasonable use case. This guide walks through each approach, sorted by complexity, so you can pick the one that matches your project size, animation format, and need for metadata.
Manual Methods Work for Simple Projects
When you have only a handful of frames and no requirement for automated slicing, manual techniques get the job done without installing anything. Two common scenarios: assembling a sprite sheet from separate layers, and splitting an existing sprite sheet back into individual images.
Assembling a Sprite Sheet from Layers
If your animation frames live as individual layers in a single Photoshop document, you can arrange them side by side into a single image. This method, documented on Graphic Design Stack Exchange, works well for simple sequences:
- Increase canvas width. Image > Canvas Size — set the width to accommodate all frames side by side (e.g., 1600 px for eight 200 px frames). Keep the anchor on the left.
- Select the Move Tool (V). Make sure Auto-Select is off and Show Transform Controls is unchecked.
- Shift-drag each layer sideways. Hold
Shiftto lock the Y-axis so every frame stays aligned vertically. Position each layer at its grid position. - Merge visible layers. Layer > Merge Visible (or
Shift+Ctrl+E/Shift+Cmd+E). - Save. File > Export > Save for Web (Legacy) or Export As — PNG with transparency.
When to use this approach A few frames, no need for padding or metadata, and the animation fits in a single row. For larger projects the tedium and alignment risk make a script-based method more reliable.
Slicing an Existing Sprite Sheet into Individual Frames
Sometimes you already have a sprite sheet (a single image with all frames in a grid) and need individual PNGs. A straightforward manual technique, shared on Reddit's r/photoshop, uses the selection box tool (the Slice tool is another option for grid-based cuts):
- Make a selection equal to the dimensions of the largest sprite in the sheet.
- Drag the selection across each sprite position — copy (
Ctrl+C/Cmd+C) and paste into a new document (Ctrl+N/Cmd+N, thenCtrl+V/Cmd+V). - Export each as a transparent PNG.
For a video walkthrough of this process, see Max Rohowsky's tutorial on splitting sprite sheets. The same technique works whether you are preparing assets for Unity, Pygame, or Godot.

Organising layers inside groups is common in UI design — but groups cause trouble with the Export Layers to Files script (see below).
Export Layers to Files Produces a PNG Sequence – With a Critical Caveat
Photoshop includes a built-in script that exports every layer as a separate image file: File > Scripts > Export Layers to Files… It is one of the fastest ways to generate a PNG sequence from a layered document.
- Go to File > Scripts > Export Layers to Files…
- Choose a destination folder. Under File Name Prefix, enter a base name (e.g., "run_frame").
- Select PNG as the format. Enable Trim Layers to remove excess transparent space around each sprite.
- Click Run. Each layer is saved as a separate PNG, trimmed to its visible content.
⚠ Critical: layers must not be inside groups As reported on the Unity Forum, the Export Layers to Files script fails or produces corrupted output when layers are nested inside group folders. Before running the script, drag all layers out of groups, or flatten the structure with Layer > Ungroup Layers (repeated as needed).
This method works best when you already have each animation frame on its own layer (e.g., from frame-by-frame animation or a flattened timeline). The output is a PNG sequence ready for import into a sprite packer like TexturePacker or for direct use in engines that accept individual frame files.
Free Photoshop Scripts Automate Sprite Sheet Generation
Several community-developed scripts run directly inside Photoshop, creating a packed sprite sheet from your animation frames without manual placement. They vary in features, cost, and compatibility, so choosing the right one depends on your Photoshop version and the complexity of your project.
GitHub Spritesheet Generator (bogdanrybak)
The spritesheet-generator script by bogdanrybak is a free, open-source tool that produces a sprite sheet directly from Photoshop animation frames. It targets game development workflows and includes metadata output.
Installation: Download the .jsx file and place it in Photoshop's Presets/Scripts folder. Restart Photoshop — the script appears under File > Scripts > Spritesheet Generator.
Key features:
- Frame range — export only a subset of frames from the Timeline.
- Columns and rows — auto-calculated or manually set.
- Padding — configurable spacing between sprites.
- Metadata output — saves a
_spritesheets.txtfile alongside the PNG.
John Wordsworth's Script (Paid Option)
John Wordsworth's Photoshop Sprite Sheet Generator Script is a professional alternative that offers more advanced control over layout, padding, and output formatting. Pricing and exact feature set are listed on the author's site. It is suited for production pipelines where consistency and repeatability matter.
Both scripts address the same core problem — turning animation frames into a packed sprite sheet — but the free GitHub option is more widely used in the game-dev community and includes the metadata format that many engines can parse directly.
Choosing Between Direct Script and Flattened Layers
A common workflow decision is whether to run a script directly on animation frames (the GitHub script reads frames from the Timeline) or to flatten frames into layers first and then use Export Layers to Files. The Stack Exchange discussion suggests flattening when you need fine control over trimming, while the GitHub script is better when you need padding and metadata. If your priority is a single command that outputs a ready-to-import sheet plus a data file, the direct script route saves several steps.
| Approach | Input source | Output | Metadata | Best for |
|---|---|---|---|---|
| GitHub script | Timeline frames | Single PNG + .txt |
Dimensions, padding, frame count | Automated game-engine import |
| Export Layers to Files | Individual layers | PNG sequence | None (filenames only) | Manual packing or TexturePacker |
| Manual canvas resize | Individual layers | Single PNG | None | Small projects, quick tests |
Third-Party Tools Like TexturePacker Offer Advanced Packing
When your sprite atlas needs automatic packing, rotation, or metadata in formats like JSON or XML, dedicated tools outperform anything that runs inside Photoshop. The most commonly recommended option across the Unity Forum and related communities is TexturePacker.
Typical workflow:
- Export a PNG sequence from Photoshop (via Export Layers to Files or the GitHub script).
- Import the PNG sequence into TexturePacker.
- Configure trimming, padding, extrusion, and output format (JSON, XML, Unity Sprite Sheet, etc.).
- Export a single packed sprite sheet with matching metadata.
TexturePacker's algorithms minimise wasted space and handle sprite rotation automatically. It is especially useful for projects with many frames of varying sizes — character animations, UI asset sets, or particle textures. Alternatives mentioned by the community include GraphicsGale, though that tool is better suited for pixel-art workflows rather than layered PSD exports.
- 🔹 TexturePacker: Automated packing, rotation, JSON/XML metadata. Free for individual use; paid for commercial projects.
- 🔹 GitHub script (free): Grid-based packing inside Photoshop. Outputs a
_spritesheets.txtfile with frame dimensions. - 🔹 Manual method: No additional tools needed. Best for small sets where layout control matters more than speed.
Prefer to stay in Photoshop? Layerbench splits and exports frames
If you'd rather not leave Photoshop or hand-slice cells, Layerbench — a separate Photoshop panel plugin (not a script) — is purpose-built for this: point it at a sprite sheet, set Rows × Columns, and it splits the canvas into equal frame layers, can auto-build a frame-animation timeline, and exports the frames as a numbered PNG sequence (or scaled Default/iOS/Android sets, or an animated GIF).
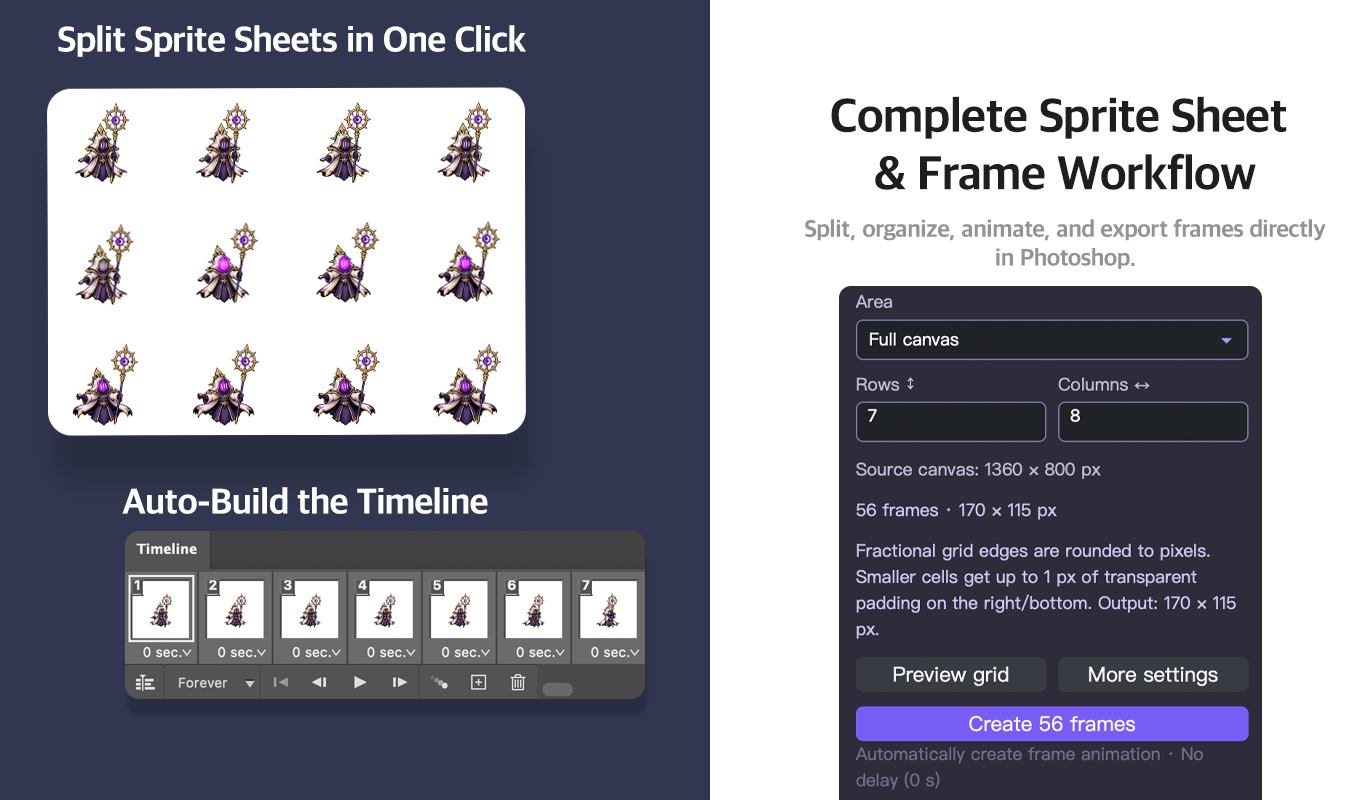
Layerbench — a Photoshop plugin: split a sprite sheet into frames by grid, auto-build the timeline, then export a numbered PNG sequence. Try it at Layerbench.
It won't replace TexturePacker's bin-packing, but for the common split-and-export-frames step it keeps everything inside Photoshop. See also how to export a GIF in Photoshop for the timeline-based animation route.
Common Pitfalls and How to Fix Them
Sprite export from Photoshop is prone to a handful of recurring issues, many of which are documented across the Unity Forum and Stack Exchange threads. Here are the most frequent problems and their solutions.
⚠ Pitfall 1: Export Layers to Files fails or produces no output Cause: Layers are nested inside groups. The script cannot process grouped layers and either skips them or crashes. Fix: Drag all layers out of their groups, or use Layer > Ungroup Layers repeatedly until no groups remain. Run the script again.
⚠ Pitfall 2: Manual placement misaligns frames Cause: Dragging layers by hand introduces tiny vertical offsets, which cause visible jumps during animation playback. Fix: Use a grid-based script instead, or enable Photoshop's grid (View > Show > Grid) and snap layers to grid lines. Alternatively, set guides at exact pixel intervals.
⚠ Pitfall 3: Scripts don't appear in the File > Scripts menu Cause: The script file (
.jsx) was placed in the wrong folder or Photoshop was not restarted after installation. Fix: Verify the file is in Presets/Scripts inside your Photoshop installation directory (not in a user Documents folder). Restart Photoshop completely. If the script still does not appear, check whether it was written for an older version of Photoshop — some CS6 scripts are incompatible with modern CC builds.
⚠ Pitfall 4: Trimming cuts off parts of sprites Cause: The Trim Layers option in Export Layers to Files removes transparent pixels based on the outermost opaque pixel. If a sprite has inconsistent transparent margins around each frame, trimming produces frames of different sizes. Fix: Ensure each layer has a uniform amount of transparent padding — or skip trimming and handle the padding in your game engine or sprite packer.
Using Metadata from Scripts for Automated Game Engine Import
The GitHub spritesheet generator script outputs a _spritesheets.txt file that contains the exact pixel dimensions of every sprite in the sheet. This metadata can drive automated slicing in Unity, Godot, or a custom pipeline — eliminating the need to manually set grid values in the engine's sprite editor.
Metadata format (two modes):
Mode 1 — Without separate padding data
spritename,cell width+pad left+pad right,cell height+pad top+pad bottom,number of frames
basic_attack.png,68,68,4
Mode 2 — With separate padding data
spritename,cell width,cell height,padding left,padding top,padding right,padding bottom,number of frames
basic_attack.png,64,64,2,2,2,2,4
The first mode packs padding into the cell dimensions, which is simpler to read but requires the game engine to subtract padding at import time. The second mode gives explicit per-side padding values, making it straightforward to configure a slice grid in Unity's Sprite Editor or Godot's SpriteFrames importer.
Example Unity integration: Write a small Editor script that reads _spritesheets.txt, slices the imported sprite sheet at the specified cell widths and heights, and sets the pivot point. This turns a batch import into a one-click operation, which is especially valuable when you have dozens of animation sheets to process.
For advanced users, the same metadata can feed into a build pipeline: export each animation from Photoshop with the GitHub script, let a post-process script parse the .txt file, and generate the engine-specific atlas configuration automatically. This approach eliminates manual data entry and reduces the risk of slice misalignment across a large project.
Pro tip: batch export multiple animations Combine the GitHub script with a Photoshop Action that loops through all open PSD files. Each animation exports its own sprite sheet and metadata file with consistent naming — ideal for projects with many character animations, UI states, or effect sequences.