
- Category:
- Workflow Tips
- Summary:
- How to change background color in Photoshop with Solid Color Fill and Hue/Saturation Colorize — two nondestructive methods that avoid Match Color artifacts.
Step-by-step workflows for clean, nondestructive edits — from simple fills to advanced colour-range targeting.
The most reliable method for general use: Use Solid Color Fill with an inverted layer mask. Select your subject, invert the selection, add a Solid Color fill layer, and pick your colour. For the fastest result on light or neutral backgrounds, try the Hue/Saturation Colorize shortcut. Both are nondestructive and produce clean edges when refined. Detailed steps for each method are below.
Why the Match Color Tool Is Not the Best Choice for Changing Backgrounds
If you have used Photoshop for a while you may have come across the Match Color command (Image > Adjustments > Match Color). Its intended purpose is to shift the overall colour cast of one image to match another — useful for colour-grading a set of photos so they look consistent. But many users try to use it to change a background colour directly, and the results are often disappointing.
Community experts on the Photoshop Gurus forum point out that Match Color tends to amplify compression artifacts, especially when working with low-saturation targets. The tool was developed early in Photoshop's history and was not designed for localised colour replacement. Adobe's own documentation does not recommend it for changing a background colour — they steer users toward the Solid Color Fill layer method instead.
If you need to match a specific brand colour or hex value, skip Match Color entirely. Use a Solid Color fill layer with the exact hex code or RGB numbers, assuming sRGB colour space for consistency. This approach gives predictable, artifact-free results every time.
⚠️ Common pitfall
Match Color can introduce visible banding and halos in areas of smooth gradation. For background colour changes, the methods in this article are far more reliable and easier to control.
The Solid Color Fill Layer Method (Recommended for Most Users)
This is the workflow Adobe recommends and the one professional retouchers use most often. It is entirely nondestructive — the original image pixels never change — and it works on any background type: solid, gradient, textured, or photographic.
Below are the sub-steps broken into five stages.
Selecting the Subject — Which Tool to Use
The quality of your final background change depends almost entirely on the selection that separates subject from background. Photoshop offers several selection tools; pick the one that best fits your image:
- Object Selection Tool (W) — best for well-defined subjects with clear edges. Works especially well on people, products, and animals. Enable Cloud processing in Preferences > Image Processing for a noticeably better AI-driven selection, as noted by the Photoshop Training Channel.
- Quick Selection Tool (W) — good for subjects with high contrast against the background. Paint over the subject and let the tool detect edges by tone and texture. For a deeper look at its settings and refinement, see our guide on the Quick Selection Tool.
- Magic Wand Tool (W) — useful when the background is a single flat colour. Set a low tolerance (8–16) to avoid bleeding into the subject. Our Magic Wand guide covers tolerance, contiguous vs. non-contiguous, and fixes for common issues.
- Lasso or Polygonal Lasso (L) — for manual selections when automated tools fail (e.g. very low contrast or complex geometric shapes).
Whichever tool you use, zoom in to at least 100 % and check the selection edge before moving to the next step. A clean selection now saves minutes of mask cleanup later.
Inverting the Selection and Adding a Solid Color Fill Layer
- Select your subject using one of the tools above.
- Go to Select > Inverse (Shift+Ctrl+I on Windows / Shift+Cmd+I on Mac). Now the background is selected instead of the subject.
- Click the adjustment-layer icon (half-filled circle) at the bottom of the Layers panel and choose Solid Color.
- In the Color Picker that appears, choose your new background colour. The fill automatically appears only on the background area because the mask is already inverted.
That is the core method. The layer mask attached to the Solid Color fill layer holds the selection data — white areas reveal the fill, black areas hide it. Because the mask is inverted from your original selection, the fill appears on the background and leaves the subject untouched.
Adding a Solid Color fill layer after inverting the selection. The mask restricts the fill to the background area only.
Refining the Layer Mask (Edge Cleanup)
No automatic selection is perfect. After the fill layer is in place, you will almost certainly need to clean up the mask edge — especially around hair, fur, or translucent objects.
- Select the layer mask thumbnail on the Solid Color fill layer.
- Paint with a white brush to reveal the fill where it is missing (e.g. background patches the selection missed).
- Paint with a black brush to hide the fill where it bleeds onto the subject.
- Use a soft brush with low opacity (20–40 %) for hair edges and translucent areas like glass or smoke. A few gentle strokes often do more than a single hard pass.
For blending the subject into the new background colour, you can use the Smudge tool or Mixer Brush on a separate layer clipped to the subject, as noted in Adobe's official documentation. This helps when the original background had a coloured cast that spilled onto the subject edges.
Keyboard Shortcuts for Faster Workflow
These shortcuts save significant time when working with solid-colour fills:
Alt+Backspace(Windows) /Option+Delete(Mac) — fills the selection or layer with the foreground colour.Ctrl+Backspace(Windows) /Command+Delete(Mac) — fills with the background colour.
These come from Adobe's own shortcut reference and work in any version of Photoshop that uses standard keyboard defaults.
Testing for Halos Before Finalising
Here is a test that experienced retouchers use routinely. Create a temporary Solid Color fill layer set to a very dark colour — dark blue or black — and place it directly behind the subject. If there are white or light fringes around the subject's edges, they will become immediately visible against the dark fill.
💡 Pro insight
Bright colours hide mask imperfections. Dark colours reveal them. Always test your mask against a dark solid before you consider the job done. This advice comes from the Photoshop Training Channel and is one of the most practical tips in this article.
If you see halos, go back to the mask and paint over the fringe with a black brush at low opacity, or use Layer > Matting > Defringe with a radius of 1–2 pixels. Once clean, delete the test layer and proceed.
The Hue/Saturation Colorize Shortcut (Fastest for Light Backgrounds)
When the existing background is light or neutral — white, pale grey, pale blue — and the subject contains none of those colours, the Hue/Saturation adjustment layer with Colorize is the fastest method available.
- Use Select > Subject to select your subject.
- Click the adjustment-layer icon and choose Hue/Saturation.
- In the Properties panel, check the Colorize box.
- Adjust the Hue slider to pick the colour, then tweak Saturation and Lightness to fine-tune.
- The layer mask will already be white; invert it (
Ctrl+I/Cmd+I) so the colour change applies to the background, not the subject.
This method is entirely nondestructive — the original background information remains intact inside the adjustment layer. If you change your mind later, you can double-click the layer thumbnail and adjust the sliders again.
⚠️ Limitation
This method does not work well if the background colour also appears on the subject. For example, a subject wearing a blue shirt against a blue wall — the shirt will shift colour along with the wall. For that scenario, use the Color Range method described later in this article.
As with the Solid Color Fill method, test against a dark colour to check for halos before finalising. The same dark-colour test applies here.
The Multiply Blend Mode Approach (Preserve Shadows and Texture)
Product photographers and e-commerce image editors often need to keep shadows and reflections that were cast onto the original background. A simple fill would lose those details. The Multiply blend mode method solves this.
- Add a Solid Color fill layer above your image layer.
- Set the layer's blend mode to Multiply in the Layers panel.
- The new colour blends with the existing background, so shadows and textures remain visible through the colour.
- Add a Levels adjustment layer clipped to the fill layer to control the brightness and contrast of the new colour.
This technique works best when the original background is bright or white. On a darker background, Multiply will produce a colour that is too dense and may lose detail. It is a relatively niche method, but when it fits — product shots on white, for example — it produces results that are difficult to achieve with other approaches.
This method is documented by the Photoshop Training Channel as one of three clean workflows for background colour replacement.
How to Change Background Color on a Single-Layer Image
A common frustration: you open a PNG or JPEG that has only one layer — the subject and background are merged into a single pixel layer. The selection tools cannot separate them cleanly because there is no distinct edge between subject and background in the layer data.
A community-sourced workaround from Adobe Community uses two adjustment layers to shift the background colour without needing a selection:
- Add a Selective Color adjustment layer.
- In the Properties panel, pick the Colours dropdown and choose the colour you want to change — typically Whites or Neutrals for a light background.
- Reduce the Black slider in that channel and adjust the other colour sliders (Cyan, Magenta, Yellow) to tint the background toward your target colour.
- Add a Levels adjustment layer to clip the whites and midtones, confining the colour shift more tightly to the background area.
This method is quick and nondestructive. It will not give perfect separation around fine details (hair edges may still carry the original background tint), but it often gets you 95 % of the way in under a minute. For the final 5 %, paint with a black brush on the Selective Color mask to restore any subject areas that shifted unintentionally.
💡 When to use this
This workaround is ideal for flat PNG graphics, screenshots, and images where the subject has no strong colour overlap with the background. If you need a precise cutout, combine this method with a separate selection workflow using Select and Mask.
How to Fix Halos, White Fringing, and Messy Edges
Halos — those thin white or light-coloured fringes around the subject — are the most common sign of an incomplete selection. They happen when the original selection did not quite capture the edge pixels, leaving a sliver of the old background visible around the subject.
Causes: Insufficient edge refinement in the selection phase, especially with hair, fur, or low-contrast edges.
Fixes, in order of effectiveness:
- Paint the mask: Select the layer mask and paint over the fringe with a black brush at low opacity (20–30 %). This trims the halo without creating a hard edge.
- Layer > Matting > Defringe: Set a radius of 1–2 pixels. Photoshop replaces the fringe pixels with colours from the surrounding area. See our dedicated Defringe guide for detailed steps and troubleshooting.
- Select and Mask workspace: Re-open Select and Mask from the selection tools. Use the Edge Detection sliders and Decontaminate Colors option to recover hair details. Output to a new layer with a layer mask.
- For translucent subjects: Use a low-opacity white brush on the mask to gradually reveal the new background through glass, smoke, or semi-transparent fabrics.
The single most important precaution: test against a dark colour before you finalise. As noted in the halo-testing section above, a bright fill colour will hide fringing that a dark colour will immediately reveal. The Photoshop Training Channel emphasises this as a non-negotiable step in any professional workflow.
If you used the Multiply blend mode method, halos are often less visible because the blend naturally hides fringing — but it is still worth testing on a dark background to be sure.
The Workspace Background Color Confusion (Not the Image)
This is a surprisingly common issue. A user opens Photoshop, somehow the area around their image turns bright blue, and they search for "how to change background color in Photoshop" because they think they changed the image background. In reality, they changed the workspace interface background — the neutral grey area that surrounds the canvas.
According to an Adobe Community thread, the fix is trivial:
- Right-click anywhere on the grey (or coloured) backdrop area outside the canvas boundaries.
- A context menu appears with colour swatches. Choose Default to return to the standard medium grey, or pick any other colour you prefer.
The default setting in Photoshop is "Custom" which appears as a bright blue in some configurations. Selecting "Default" restores the standard interface grey. This change affects only the Photoshop workspace — it does not alter the image itself, its layers, or any exported file.
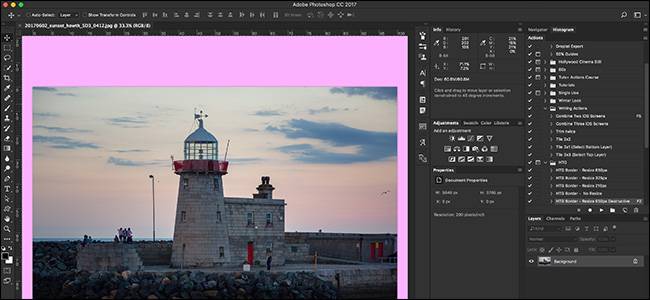
Right-click the grey backdrop (outside the image) to change the workspace colour. This does not affect the image content.
The Color Range Method (When the Background Colour Appears on the Subject)
This is the most advanced workflow in the article, and it handles a problem that none of the other methods can solve cleanly: when the background colour also appears on the subject itself. For example, a person wearing blue jeans standing in front of a blue wall. A simple Hue/Saturation shift would turn both the wall and the jeans to a new colour.
The Color Range approach lets you isolate the background colour and change only that, then paint back the subject areas that were affected. The Photoshop Training Channel details this method as the cleanest solution for colour-overlap scenarios.
- Add a Hue/Saturation adjustment layer as a full layer (not clipped to anything below).
- In the Properties panel, open the colours dropdown and select the channel that matches your background — e.g. Blues for a blue wall.
- Drag the Saturation slider all the way to the left (−100). This desaturates only the blue channel, effectively removing the blue from the entire image — including the jeans.
- Use the colour-range sliders at the bottom of the Properties panel to narrow which hues are affected. The two outer sliders control the range of hues, and the two inner sliders control the feathering falloff. Adjust them until only the wall colour is targeted.
- Now, paint with a black brush on the layer mask over the subject areas (the jeans) to restore their original colour. The Hue/Saturation adjustment will no longer affect those areas.
- Finally, adjust the Hue slider to choose the new background colour while leaving the restored subject areas untouched.
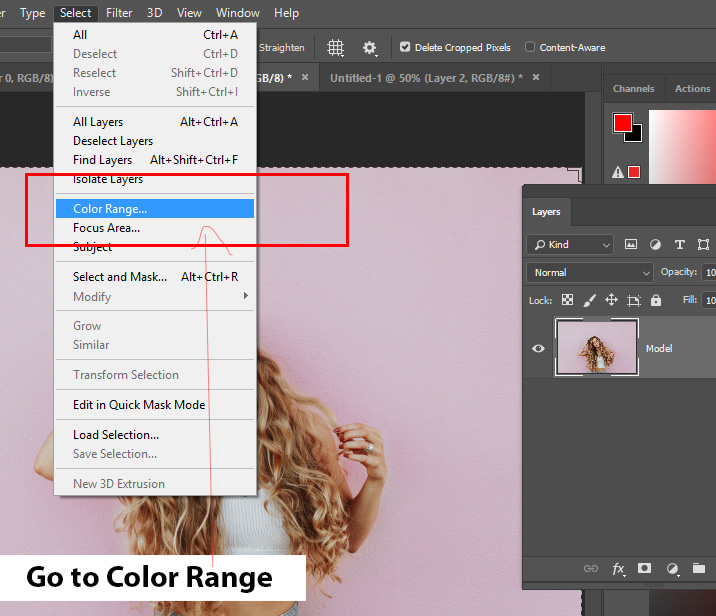
The Color Range tool in the Select menu allows you to target specific hues — essential when the background colour overlaps with the subject.
This method requires careful slider adjustments and manual mask painting, but it solves a problem that has no clean one-click alternative. Because the Hue/Saturation adjustment layer is fully editable, you can return to tweak the colour range and mask at any point without losing quality.
💡 Workflow tip
Start with a broad colour range and narrow it step by step. If you remove too much colour from the subject, simply paint it back on the mask with a black brush. The mask is your safety net — use it generously.